This tutorial describes how to use the Monitor Sync feature to play dynamic content.
Monitor Sync is a feature that allows the player to periodically synchronize local copies of files with their remote sources over HTTP or FTP. Typically, this feature is used to fetch small data files containing time-sensitive information such as weather or stock quote information.
For this tutorial, we will use the Monitor Sync feature to set up an ad copy that will get the current temperature and UV index.
Note: This tutorial relies on Monitor Sync for data, which enhances resilience to network outages. However, in the event of an extended network outage, the data may become outdated.
To complete this tutorial, you will need to follow these steps:
This tutorial uses different files that are listed below. These files must be uploaded into Broadsign Control as a single zipped file. You can download that zipped file.
This is the main file to be referenced when uploading the HTML Package into Broadsign Control.
<!DOCTYPE html>
<html lang="en">

<head>
  <meta charset="UTF-8" />
  <meta name="viewport" content="width=device-width, initial-scale=1.0" />
  <meta http-equiv="X-UA-Compatible" content="ie=edge" />
  <link rel="stylesheet" href="style.css" />
  <link href="https://fonts.googleapis.com/css?family=Poppins" rel="stylesheet" />
  <link rel="stylesheet" href="https://cdn.jsdelivr.net/npm/animate.css@3.5.2/animate.min.css" />
  <script src="./js/jquery-3.4.1.min.js"></script>
  <title>Welcome</title>
</head>

<body id="body">

  <img id="imagelogo" src="https://broadsign.com/static/20th_logo.601565da.svg"
    alt="Company Logo" />

  <div id="container" class="container">
    <div class="today">
      <div id="title" class="title row">Today</div>
      <div class="row">
        <div class="temp">Temperature:</div>
        <div id="tempCurrent" class="tempValue">10</div>
      </div>
      <div class="row">
        <div class="temp">UV Index: </div>
        <div id="uvCurrent" class="tempValue">0</div>
      </div>
      <div class="row">
        <img id="weatherIcon" src="" alt="Weather Icon"
          class="icon" />
      </div>
    </div>

  </div>

  <div class="attribution">Powered by Tomorrow.io</div>

  <script src="./broadsignObject.js"></script>
  <script src="./broadsignPlay.js"></script>
  <script src="./feed.js"></script>

  <script>
    getBroadsignVariables() // from broadsignObject.js
    getFeed() // from feed.js
  </script>


  <!-- Due to pre-caching, we will use BroadSignPlay to begin animation, it will be called automatically in the broadsign player -->

</body>

</html>All layout options for the HTML file are located in the CSS file. The CSS file includes a section at the end dedicated to minor adjustments specifically for portrait layout display.
html {
  height: 100%;
}

body {
  height: 100%;
  background-image: url("img/WelcomeTo.jpg");
  background-size: cover;
  background-position: center;
  font-family: "Poppins";
  overflow: hidden;
}

.container {
  display: flex;
  width: 100vw;
  height: 60vh;
  margin: 0;
  justify-content: center;
  align-items: center;
}

.today {
  margin: 20px;
  padding: 10px;
  color: white;
  text-shadow: 2px 2px 4px #000000;
  justify-content: center;
  align-items: center;
}

.title {
  font-size: 7vmin;
  color: white;
  text-shadow: 2px 2px 4px #000000;
}

.row {
  display: flex;
  flex-direction: row;
  font-size: 5vmin;
  justify-content: space-around;
  align-items: center;
  margin: 0;
}

.temp {
  padding: 10px;
  text-align: left;
}

.tempValue {
  padding: 10px;
  text-align: right;
}

.icon {
  padding: 10px;
  margin: 5px;
  width: 12vmax;
}

.attribution {
  width: 100vw;
  position: absolute;
  bottom: 2vh;
  text-align: center;
  font-size: 1.5vmin;
  color: rgb(7, 98, 235);
}

#imagelogo {
  width: 20vw;
  max-height: 10vh;
  margin-left: 40vw;
  margin-top: 5vh;
}


@media screen and (orientation: portrait) {
  body {
    font-size: 16vmin
  }

  .title {
    font-size: 10vmin;
  }

  .row {
    font-size: 8vmin;
  }

  .icon {
    width: 20vmax;
  }
}This javascript file will execute after the index.html file is loaded by the player. It will search for the default variable display_unit_address and log it to the console. Additionally, it will check for the optional logoURL variable.
The logoURL must use the format “https://www.example.com/image.png”. The image can be in PNG, JPG or SVG format. For more information, see Step 2 – Add a Variable for the Logo (Optional).
let weatherLocation = "montreal" // "latitude,longitude zip/postal code or city name for weather in feed.js
let apiKey = "yourapikey" // here or as a variable in Broadsign Control UI, sign up https://app.tomorrow.io/signup to get an API key

getBroadsignVariables = () => {
    if (window.BroadSignObject) {
      // default variables listed here https://docs.broadsign.com/broadsign-control/latest/content-variables.html
      let address = decodeURIComponent(
        window.BroadSignObject.display_unit_address
      );

      // you can also add your own custom variables in the Control UI that can be accessed here
      let logoURL = decodeURIComponent(
        window.BroadSignObject?.logoURL // will change the logo used in the content
      );

      let location = decodeURIComponent(
        window.BroadSignObject.weatherLocation // will change the location used in the weather feed call
      );

      let weatherApiKey = decodeURIComponent(
        window.BroadSignObject.weatherApiKey // will change the API key used in the weather feed call
      );

      // if there is a custom weatherLocation variable, override the default of montreal
      if (location) {
        weatherLocation = location;
        console.log("weatherLocation: ", weatherLocation);
      }

      if (weatherApiKey) {
        apiKey = weatherApiKey;
      }

      // apply the variables to the HTML
      document.getElementById("imagelogo").src = logoURL;
      console.log("display_unit_address: ", address);
    }

};This javascript file includes the BroadSignPlay() function, which the player calls when scheduling this content to its loop. The function executes after pre-buffering, as the content is displayed on screen. Any videos, animations, or sounds should be configured to start only after this function is called.
In the example file, multiple CSS classes are added to elements in the index.html file to ensure that animations begin only when the content displays.
BroadSignPlay = () => {
    // if this content is run within a Broadsign player, it will be pre-buffered and this function will be called when the content is displayed on screen
    console.log("Called Broadsign Play function")

    // we will add css classes to the elements when BroadsignPlay is called so the animation only begins when displayed
    document.getElementById("weatherIcon").classList.add("animated", "rubberBand", "icon");
    document.getElementById("container").classList.add("animated", "fadeIn", "container");
}This javascript file loads the temperature.json file, which is copied to the player via Monitor Sync (see Step 3 – Set up Monitor Sync). It extracts the temperature, UV index and weather code from the JSON file. Subsequently, it applies changes to the index.html file to display this information.
Additionally, image icons for the weather feed are stored in the weatherIcons folder. These icons, provided by tomorrow.io, are used with attribution.
Note: Broadsign is not asssociated with tomorrow.io and merely uses it as an example API.
// this file will access the example json feed and return the data
const feedURL = "https://api.tomorrow.io/v4/timelines"
// weatherLocation and apiKey should be set in broadsignObject.js or in the Broadsign Control UI as variables.
// weatherLocation can be latitude,longitude zip/postal code or city name
const weatherCodes = {
"0": "Unknown",
"1000": "Clear, Sunny",
"1100": "Mostly Clear",
"1101": "Partly Cloudy",
"1102": "Mostly Cloudy",
"1001": "Cloudy",
"2000": "Fog",
"2100": "Light Fog",
"4000": "Drizzle",
"4001": "Rain",
"4200": "Light Rain",
"4201": "Heavy Rain",
"5000": "Snow",
"5001": "Flurries",
"5100": "Light Snow",
"5101": "Heavy Snow",
"6000": "Freezing Drizzle",
"6001": "Freezing Rain",
"6200": "Light Freezing Rain",
"6201": "Heavy Freezing Rain",
"7000": "Ice Pellets",
"7101": "Heavy Ice Pellets",
"7102": "Light Ice Pellets",
"8000": "Thunderstorm"
}
const getFeed = async () => {
console.log("weatherLocation: ", weatherLocation)
let url = `${feedURL}?apikey=${apiKey}&location=${weatherLocation}×teps=current&fields=temperature,weatherCode,uvIndex`
// let jsonfeed = await fetch(url)
// .then((response) => {
// if (response.status !== 200) {
// throw new Error("HTTP error " + response.status);
// }
// return response.json()
// }).then(res => {
// return res
// })
// .catch(err => {
// console.log(err)
// // return incorrect information to display something for demo purposes,
// return {
// "data": {
// "timelines": [
// {
// "timestep": "current",
// "endTime": "2024-02-29T15:28:00Z",
// "startTime": "2024-02-29T15:28:00Z",
// "intervals": [
// {
// "startTime": "2024-02-29T15:28:00Z",
// "values": {
// "temperature": 15,
// "uvIndex": 0,
// "weatherCode": 1000
// }
// }
// ]
// }
// ]
// }
// }
// });
let jsonfeed = await $.getJSON("../../sync/temperature.json");
console.log("feed", jsonfeed)
// assign the data to the HTML
let temperature = jsonfeed.data.timelines[0].intervals[0].values.temperature
let weatherCode = jsonfeed.data.timelines[0].intervals[0].values.weatherCode
let uvIndex = jsonfeed.data.timelines[0].intervals[0].values.uvIndex
document.getElementById("tempCurrent").innerHTML = parseInt(temperature) + "°C"
document.getElementById("weatherIcon").src = "./weatherIcons/" + weatherCode + ".png"
document.getElementById("uvCurrent").innerHTML = uvIndex
console.log("weatherCode: ", weatherCodes[weatherCode])
}
An HTML Package ad copy allows you to schedule a self-contained HTML file that displays HTML5 content.
Broadsign stores the package's extracted files on the local system. As a result, you do not have to worry about network issues, or latency, during content playback.
For more information on HTML Package ad copies, see HTML Package Ad Copy.
To add an HTML package ad copy:
- Go to the Schedules ribbon and select the arrow on the Ad Copy icon. Then, from the drop-down menu, select HTML Package.
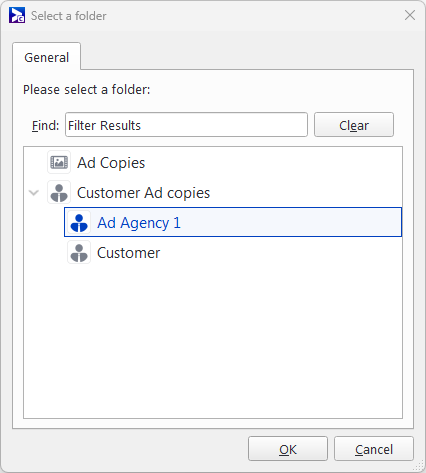
- Select a folder where to add the ad copy.
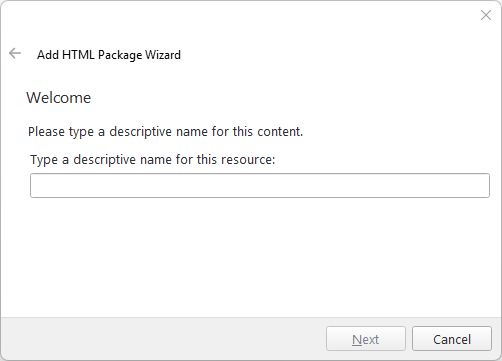
- Give a Name to the HTML Package ad copy.
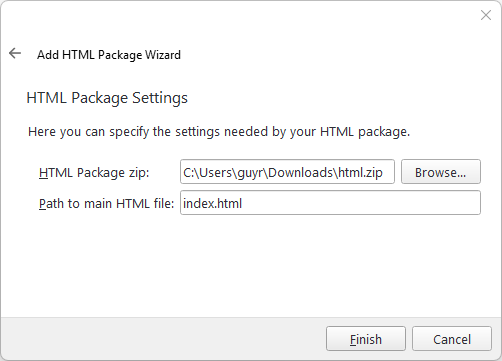
- Browse to locate and select the .zip file of your HTML Package. In the Path to main HTML file field, enter "index.html".
- Click Finish.
The Add HTML Package Wizard opens.
You will now be able to set up that HTML Package ad copy.
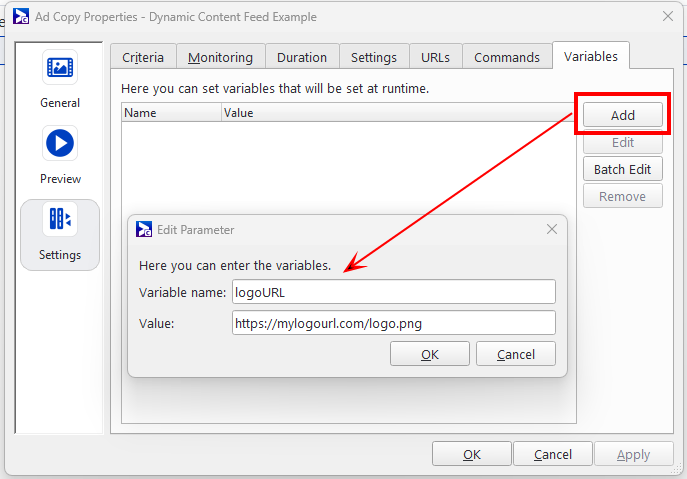
You can optionally add a variable to the HTML Package ad copy that will be used when playing in the Player. Variables are case sensitive.
For more information on Ad Copy variables, see Content Variables.
To add a variable:
- Locate the HTML Package ad copy that you have uploaded.
- Double-click the ad copy.
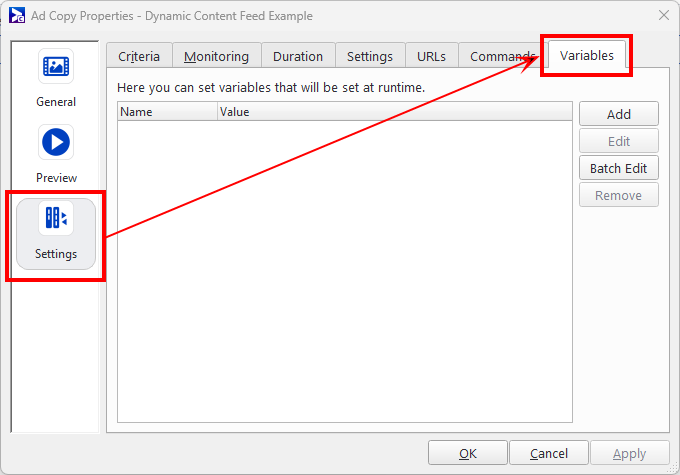
- Click the Settings section on the left, then the Variables tab.
- Click the Add button.
- Enter the following information:
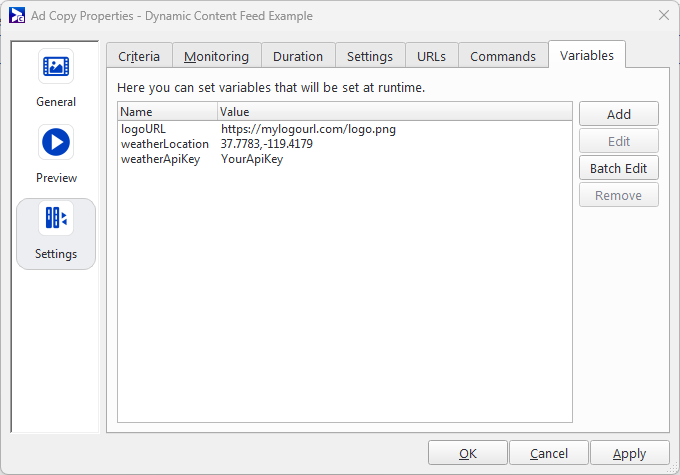
- Add a variable with the weather location:
- Variable name: weatherLocation
- Value: 37.7783,-119.4179
- Add a variable with the API Key:
- Variable name: weatherApiKey
- Value: YourApiKey
- Click OK.
The Ad Copy Properties window opens.
The API key is required if it is not hardcoded into the broadsignObject.js file before uploading the HTML Package Ad copy.
This tutorial offers two ways to set up Monitor Sync to get weather information – with or without using the API.
For more information, see The Monitor Sync Section.
Once the set up is done, you will be able to schedule the HTML Package ad copy in a campaign.
For this tutorial, we will set monitor sync to get either temperature1.json or temperature2.json from a static bucket (these are not live feeds), and save it locally to the player as temperature.json.
- https://broadsign-quickstart.s3.amazonaws.com/temperature1.json
- https://broadsign-quickstart.s3.amazonaws.com/temperature2.json
To set up static Monitor Sync:
- Locate the HTML Package ad copy that you have uploaded.
- Double-click the ad copy.
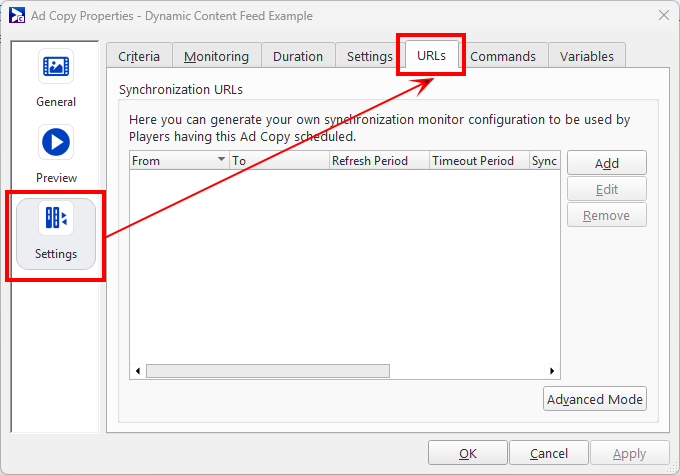
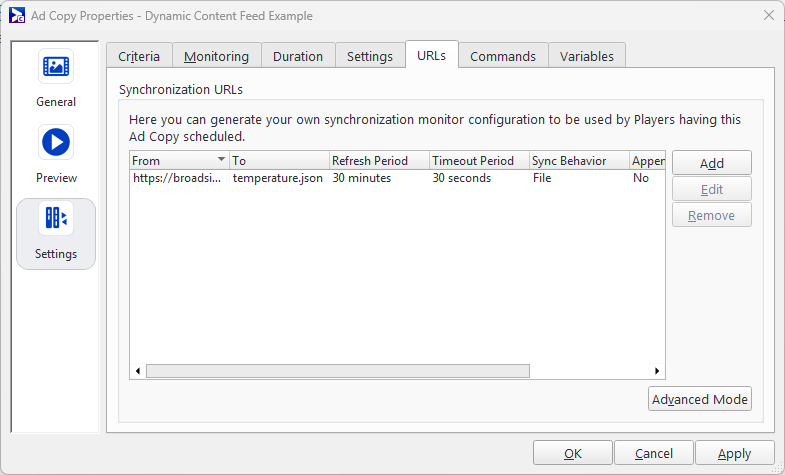
- Click the Settings section on the left, then the URLs tab.
- Click the Add button.
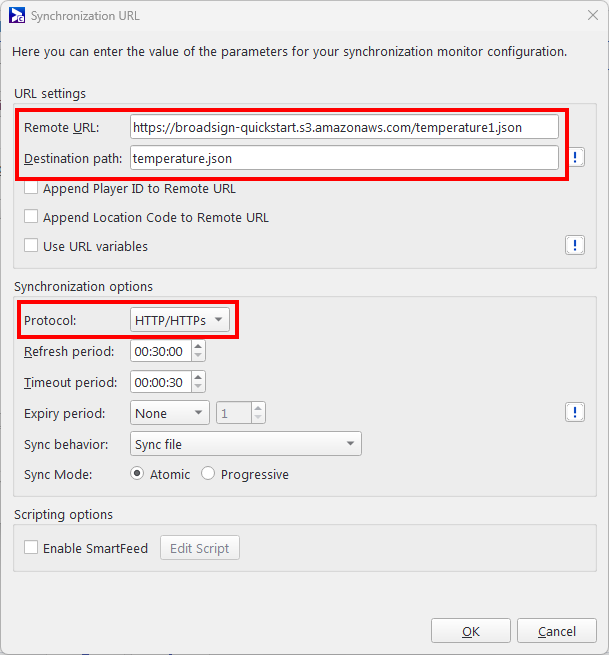
- Enter the following information:
- Remote URL: https://broadsign-quickstart.s3.amazonaws.com/temperature1.json
- Destination Path: temperature.json
- Protocol: HTTP/HTTPS
- Leave the rest as is
- Click OK.
The Ad Copy Properties window opens.
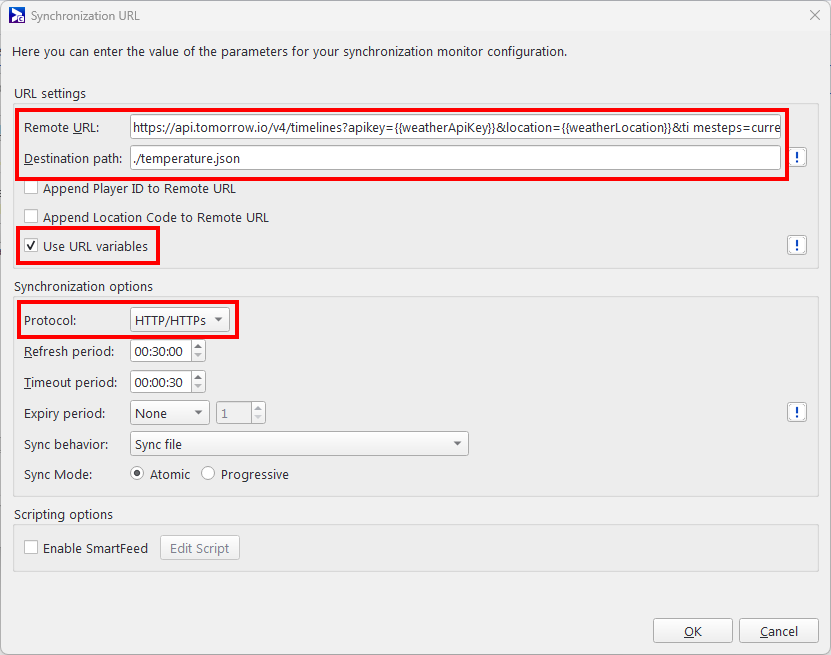
The Synchronization URL window opens.
This will cause the file to be downloaded to the player sync folder.
This approach calls the tomorrow.io API using Ad Copy variables to pass in the necessary details.
Note: Broadsign is not asssociated with tomorrow.io and merely uses it as an example API.
For the remote URL setting, we will pass in variables for the API key and location.
https://api.tomorrow.io/v4/timelines?apikey={{weatherApiKey}}&location={{weatherLocation}}×teps=current&fields=temperature,weatherCode,uvIndexIf you have the geo-coordinates set on the display unit, you can also use these instead of specifying a location.
https://api.tomorrow.io/v4/timelines?location={{display_unit_lat_long}}&apikey={{weatherApiKey}}×teps=current&fields=temperature,weatherCode,uvIndexTo set up static Monitor Sync from the API:
- Locate the HTML Package ad copy that you have uploaded.
- Double-click the ad copy.
- Click the Settings section on the left, then the URLs tab.
- Click the Add button.
- Enter the following information:
- Remote URL: https://api.tomorrow.io/v4/timelines?apikey={{weatherApiKey}}&location={{weatherLocation}}×teps=current&fields=temperature,weatherCode,uvIndex
- Destination Path: ./temperature.json
- Use URL variables: check
- Protocol: HTTP/HTTPS
- Leave the rest as is
- Click OK.
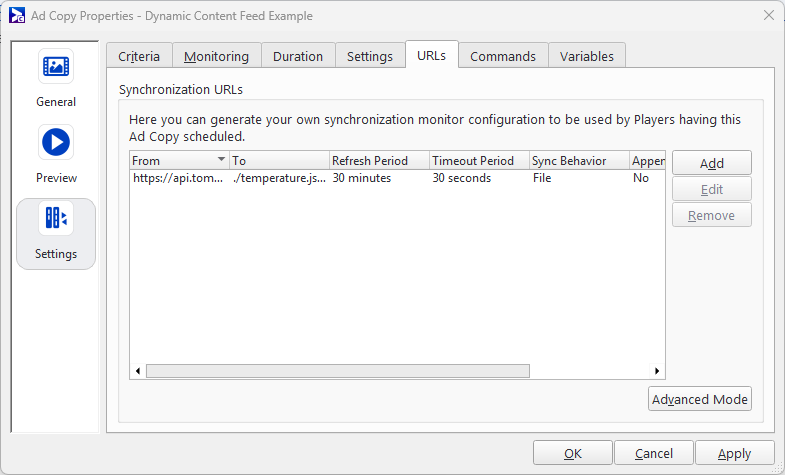
The Ad Copy Properties window opens.
The Synchronization URL window opens.

