This section describes the inventory targeting that can be used with deals.
When creating or editing deals, you can apply several other targeting categories to them. This targeting is used to associate screens with a deal. There are six different targeting options to choose from:
- Geography Targeting: Targeting based on geographical location. See Set up Geography Targeting.
- DMA Targeting: Targeting using the Designated Market Area tags. DMA is available only to U.S. publisher screens.
- Location Targeting: Targeting using specific locations.
- Tag Targeting: Targeting based on specific tags such as Mall, Landscape, and Rural. See Set up Tag Targeting.
- Size Targeting: Targeting based on screen resolutions, such as 1320x320. See Set up Size Targeting.
- Venue Targeting: Targeting based on venue types, such as airports and train stations. See Set up Venue Type Targeting.
- Screen Targeting: Targeting based on selected or deselected individual screens to be included into a deal. See Set up Screen Targeting.
The numbers in parenthesis beside some of the targeting options represent ISO-3166-1 or ISO-3166-2 country and city code standards. They will be updated to harmonize on alphanumeric standards.
Note: If you set up multiple targetings, they act as an AND. The deal must meet all the targeting criteria to be run.
Geography targeting is used to target screens based on their geographical location. To determine if the tags set up in the Geography targeting correspond to screens, they are compared to the screen latitude and longitude coordinates. For example, if you have the following Geography targeting in a deal, "Canada:Quebec:Montreal", then all screens which latitude and longitude coordinates are located in Montreal will be added to the deal.
For more information on screen location, see Screen Editing Mode - Location.
To set up Geography targeting:
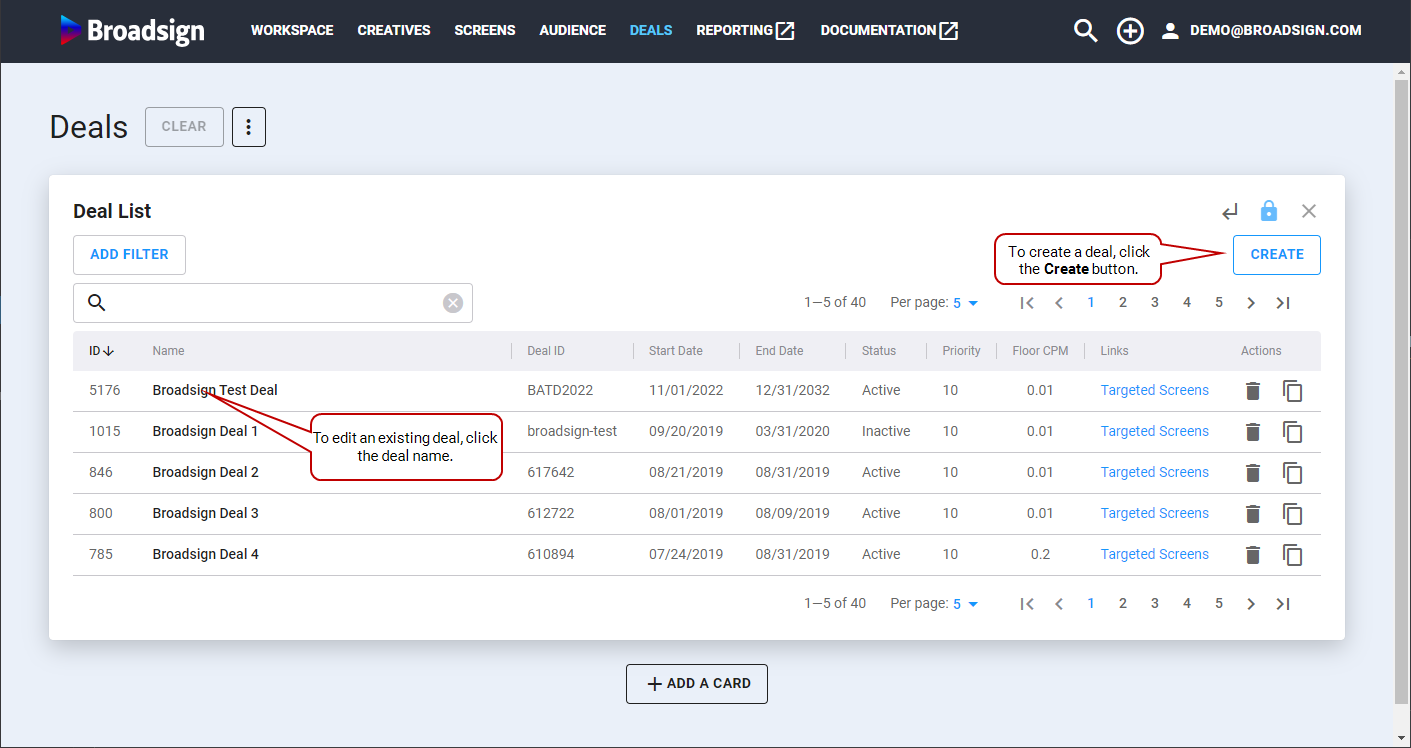
- Access the Deals section.
- You can set up Geography targeting as follows:
- Create a new deal. In this case, click Create on the top right of the Deal List.
The Creating New Deal card is displayed.
For more details on how to create deals, see Create a Deal.
- Click an existing deal in the Deal List section.
The Editing Deal card for this deal is displayed.
- Click Inventory Targetings.
- Click Geography Targeting.
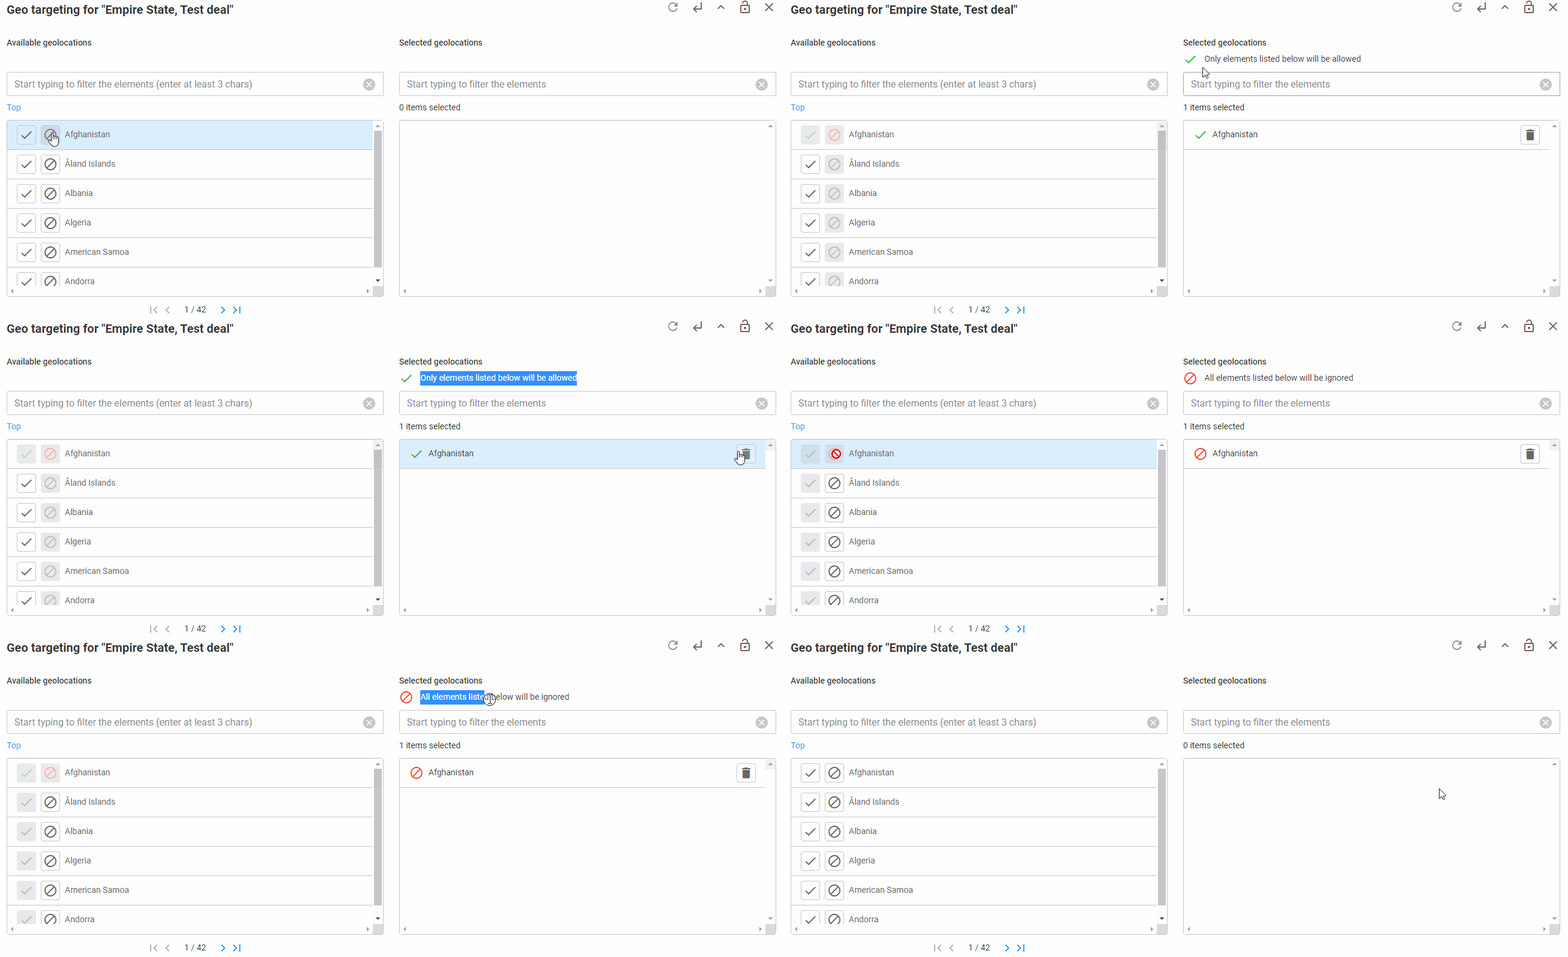
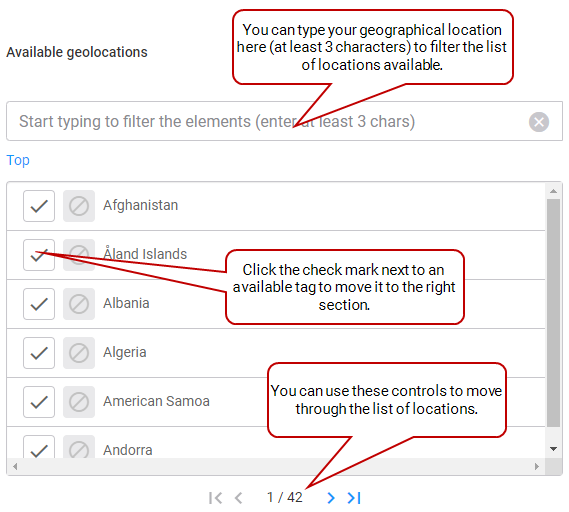
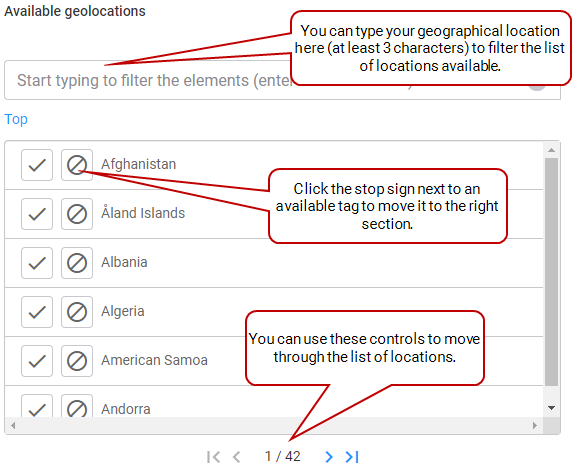
- Move a tag from the left list to the right list.
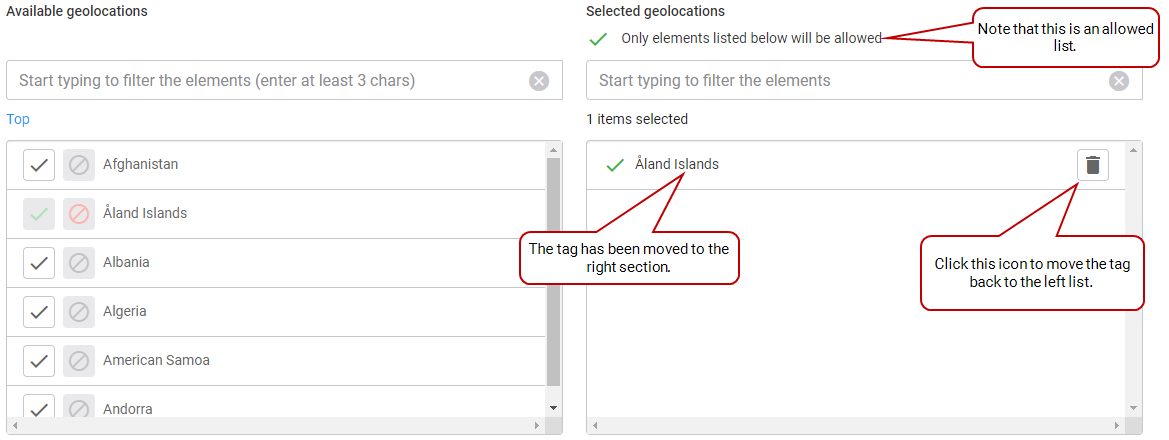
- Allowed list: Create a list of geographical locations that are allowed. Deals can run only in the locations that are listed in the right list. To create an allowed list, click the check mark next to the element to move.
- Ignored list: Create a list of geographical locations that are ignored. Deals are not able to run in the locations that are listed in the right list. To create an ignored list, click the stop sign next to the element to move.
- Click Save & Close.
You can create two types of lists:
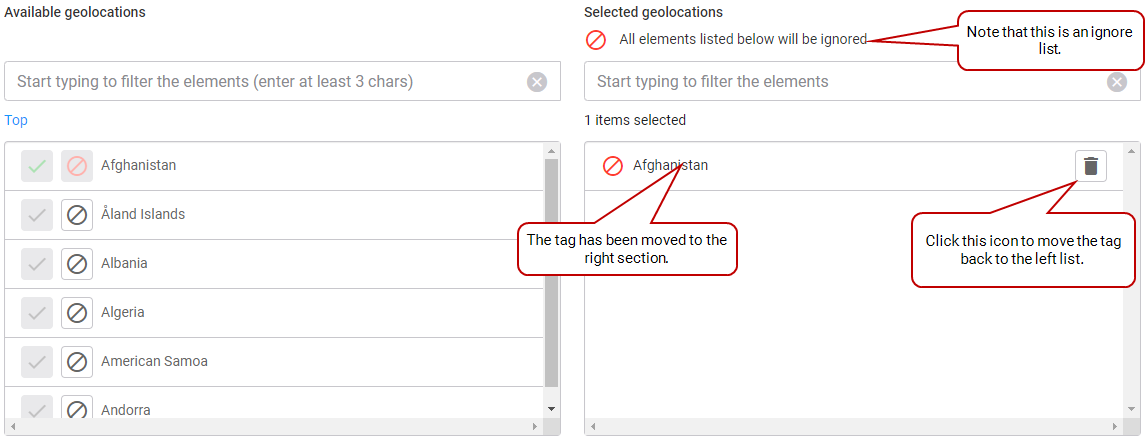
The tag moves to the right list. If you want to move it back to the left list, click the ![]() icon next to it.
icon next to it.
The tag moves to the right list. If you want to move it back to the left list, click the ![]() icon next to it.
icon next to it.
Tip: By default, the left list displays top level tags. However, these tags also contain sub-tags that you can select. To do that, click the tag name, and its sub-tags are displayed. There can be more than two levels. For example, if you click Canada, the sub-tag list contains its provinces and territories. If you click one of the sub-tags, it contains a list of cities in that specific province or territory.
Note: If you move multiple tags to the right list, the list acts as an OR. As soon as the deal encounters a screen with one of these tags, it runs if it is an allowed list, or does not run if it is an ignored list.
Tag targeting is used to target screens based on specific tags. To determine if the tags set up in the tag targeting correspond to screens, they are compared to the tags information set up for the screen. For more information on screen location, see Screen Editing Mode - Tags/Categories.
To set up tag targeting:
- Access the Deals section.
- You can set up tag targeting as follows:
- Create a new deal. In this case, click Create on the top right of the Deal List.
The Creating New Deal card is displayed.
For more details on how to create deals, see Create a Deal.
- Click an existing deal in the Deal List section.
The Editing Deal card for this deal is displayed.
- Click Inventory Targetings.
- Click Tag Targeting.
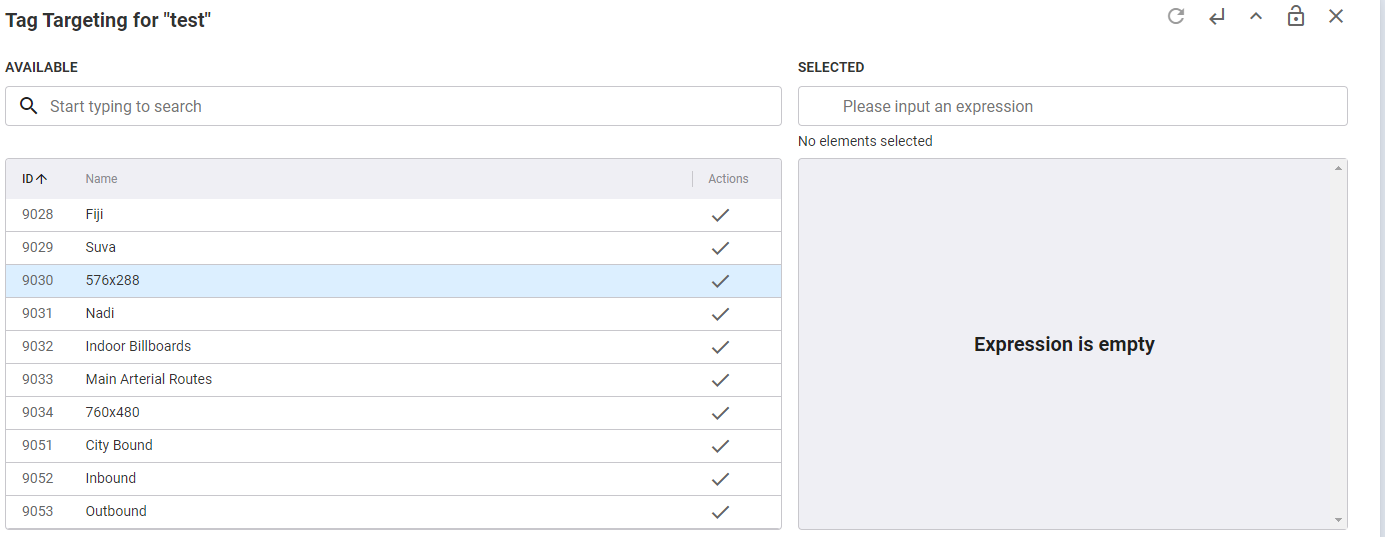
- Available: List of tags that you can use.
- Selected: List of tags that are used. Deals will be able to run only on the screens that have the tags listed in this list.
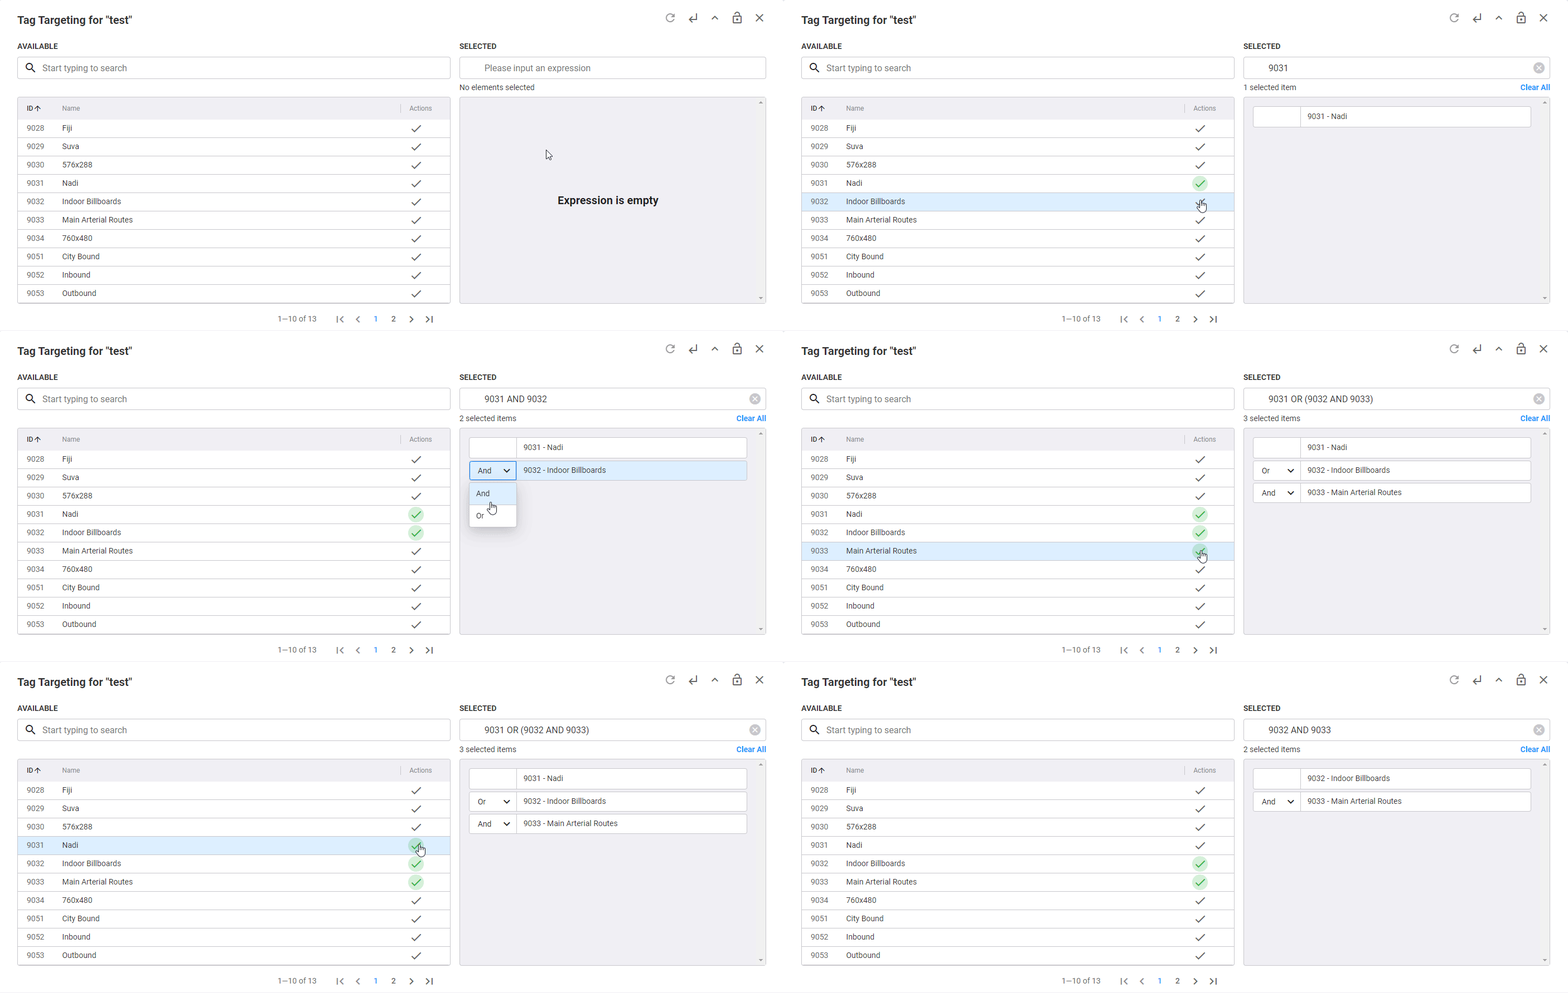
- To move a tag from the Available list to the Selected list, click its check mark on the right.
- OR: As soon as the deal encounters a screen with one of the tags, it will run.
- AND: The deal must encounter all the selected tags to run.
- Click Save & Close.
The Tag Targeting part has two sections:
The tag moves to the Selected list. If you want to move it back to the Available list, click its green check mark in the Available list.
If you move multiple tags to the right list, you have the possibility to select whether the list acts as an OR or an AND.
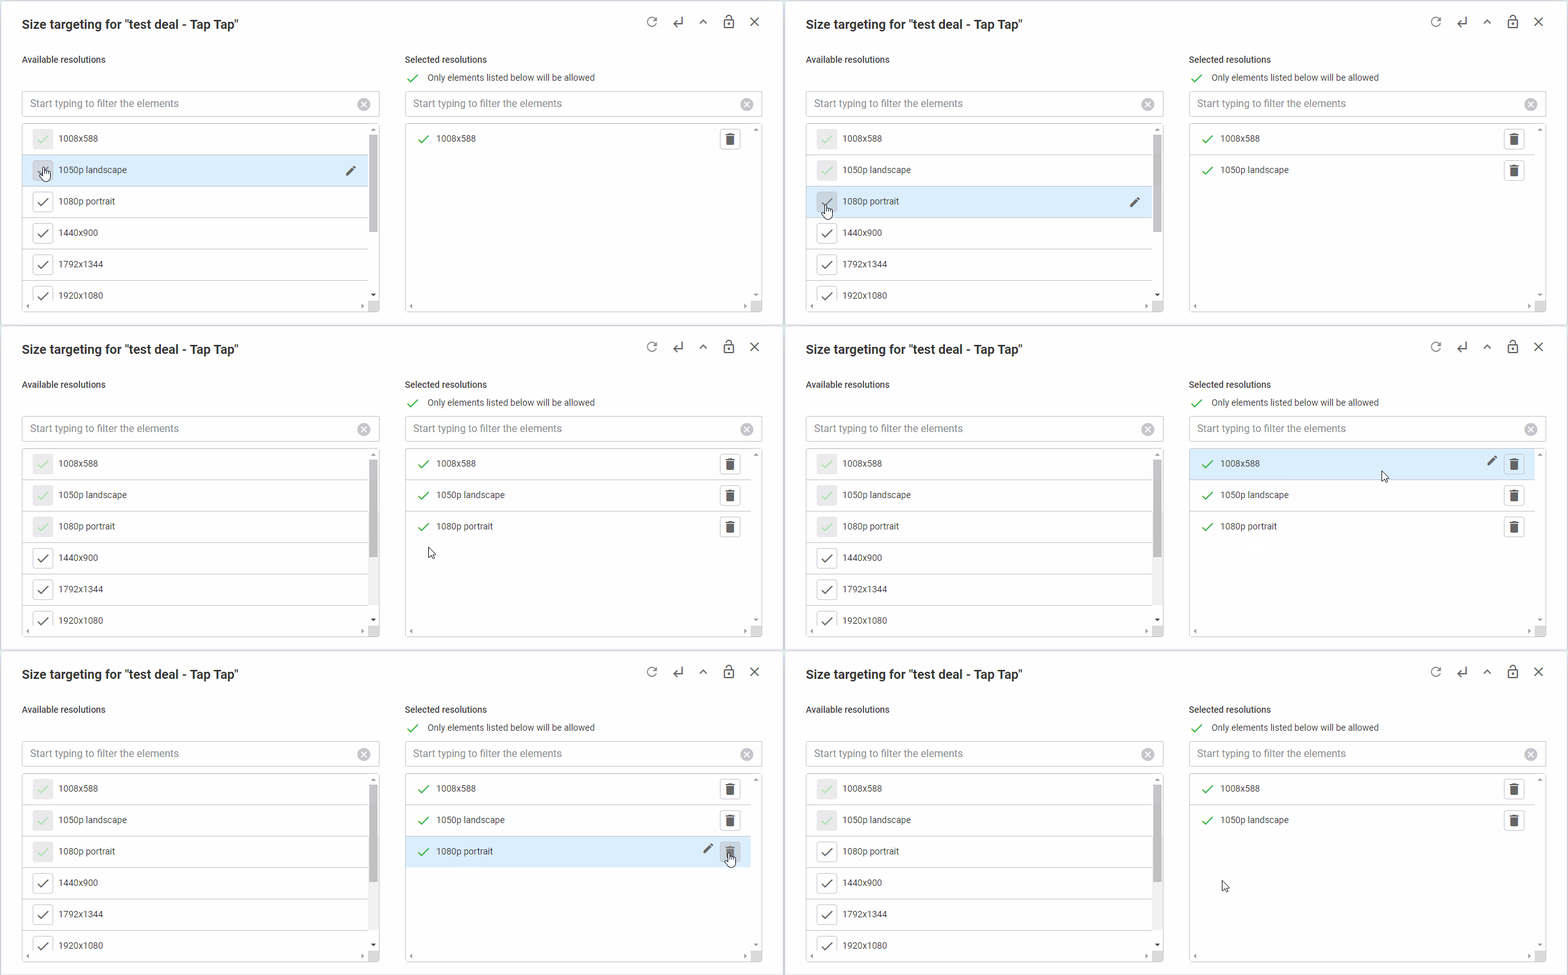
Size targeting is used to target screens based on their size.
To set up Size targeting:
- Access the Deals section.
- You can set up Size targeting as follows:
- Create a new deal. In this case, click Create on the top right of the Deal List.
The Creating New Deal card is displayed.
For more details on how to create deals, see Create a Deal.
- Click an existing deal in the Deal List section.
The Editing Deal card for this deal is displayed.
- Click Inventory Targetings.
- Click Size Targeting.
- Move a size from the left list to the right list.
- Click Save & Close.
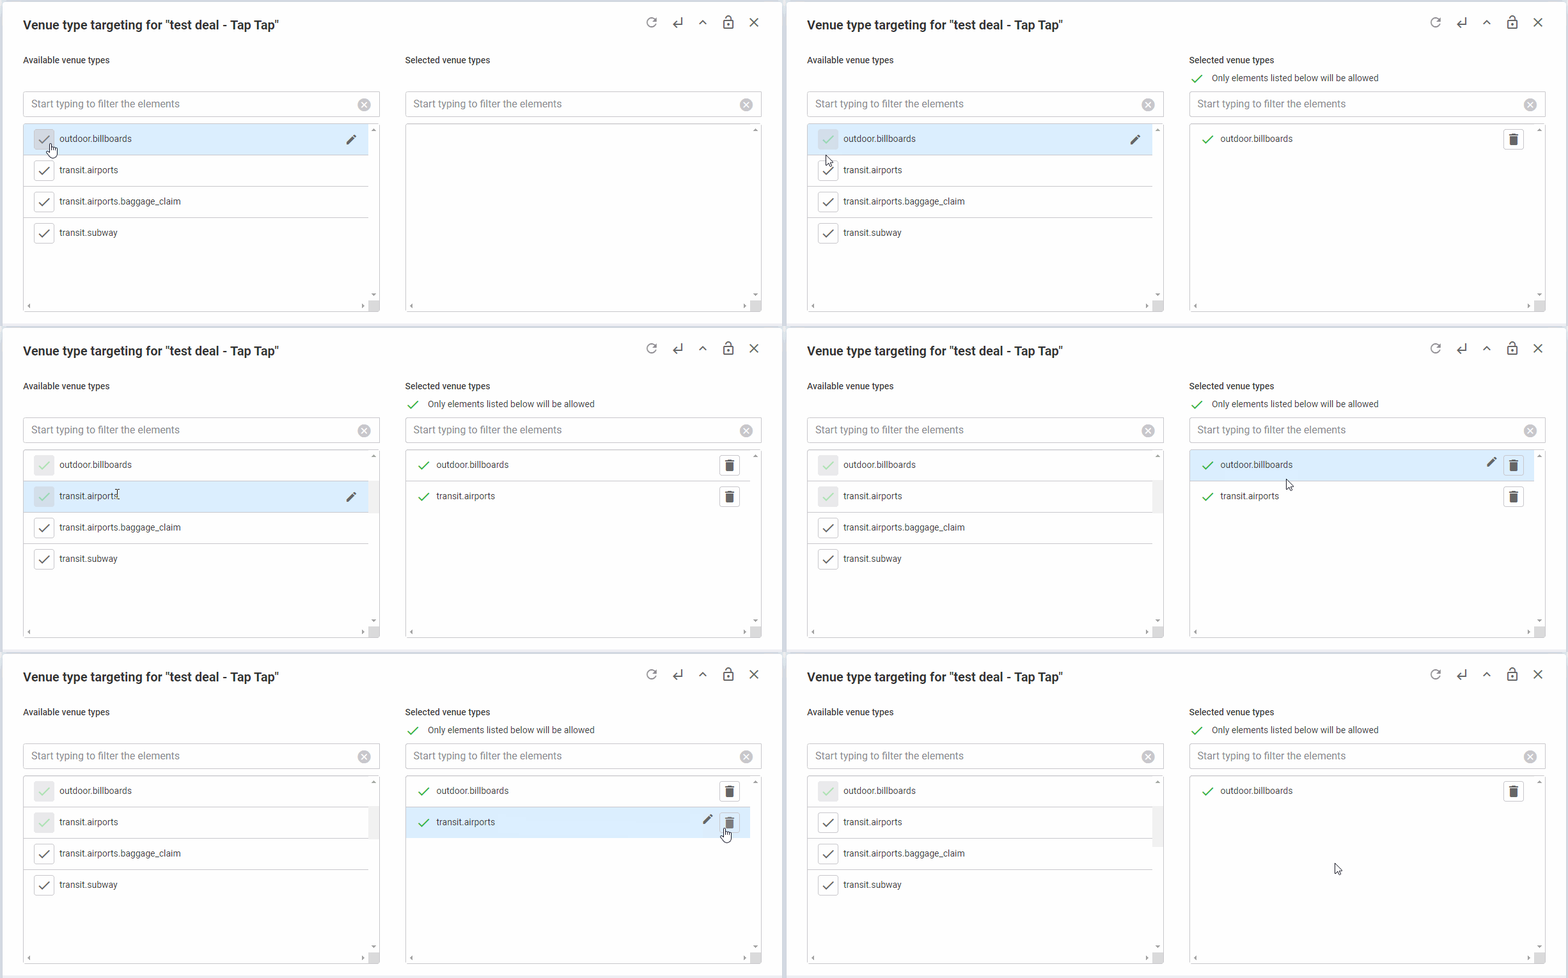
Venue Type targeting is used to target screens based on specific venue types. Only the relevant venue types for the publisher's inventory are available to select. See Screen Venue Types.
To set up Venue Type targeting:
- Access the Deals section.
- You can set up Venue Type targeting as follows:
- Create a new deal. In this case, click Create on the top right of the Deal List.
The Creating New Deal card is displayed.
For more details on how to create deals, see Create a Deal.
- Click an existing deal in the Deal List section.
The Editing Deal card for this deal is displayed.
- Click Inventory Targetings.
- Click Venue Type Targeting.
- Move a venue type from the left list to the right list.
- Click Save & Close.
You can use Screen targeting to select or deselect individual screens to be included into a deal.
Note: A screen may automatically be removed from screen targeting if its device or geo data is changed or updated.
You can bulk upload screens to be targeted in a .csv file by using the Export Device IDs and Upload Device IDs button. Once the .csv file has passed validation, all screens included in the file will be automatically targeted in the deal.
To set up Screen targeting:
- Access the Deals section.
- You can set up Screen targeting as follows:
- Create a new deal. In this case, click Create on the top right of the Deal List.
The Creating New Deal card is displayed.
For more details on how to create deals, see Create a Deal.
- Click an existing deal in the Deal List section.
The Editing Deal card for this deal is displayed.
- Click Inventory Targetings.
- Click Screen Targeting.
- Add or remove screens to be targeted by this deal.
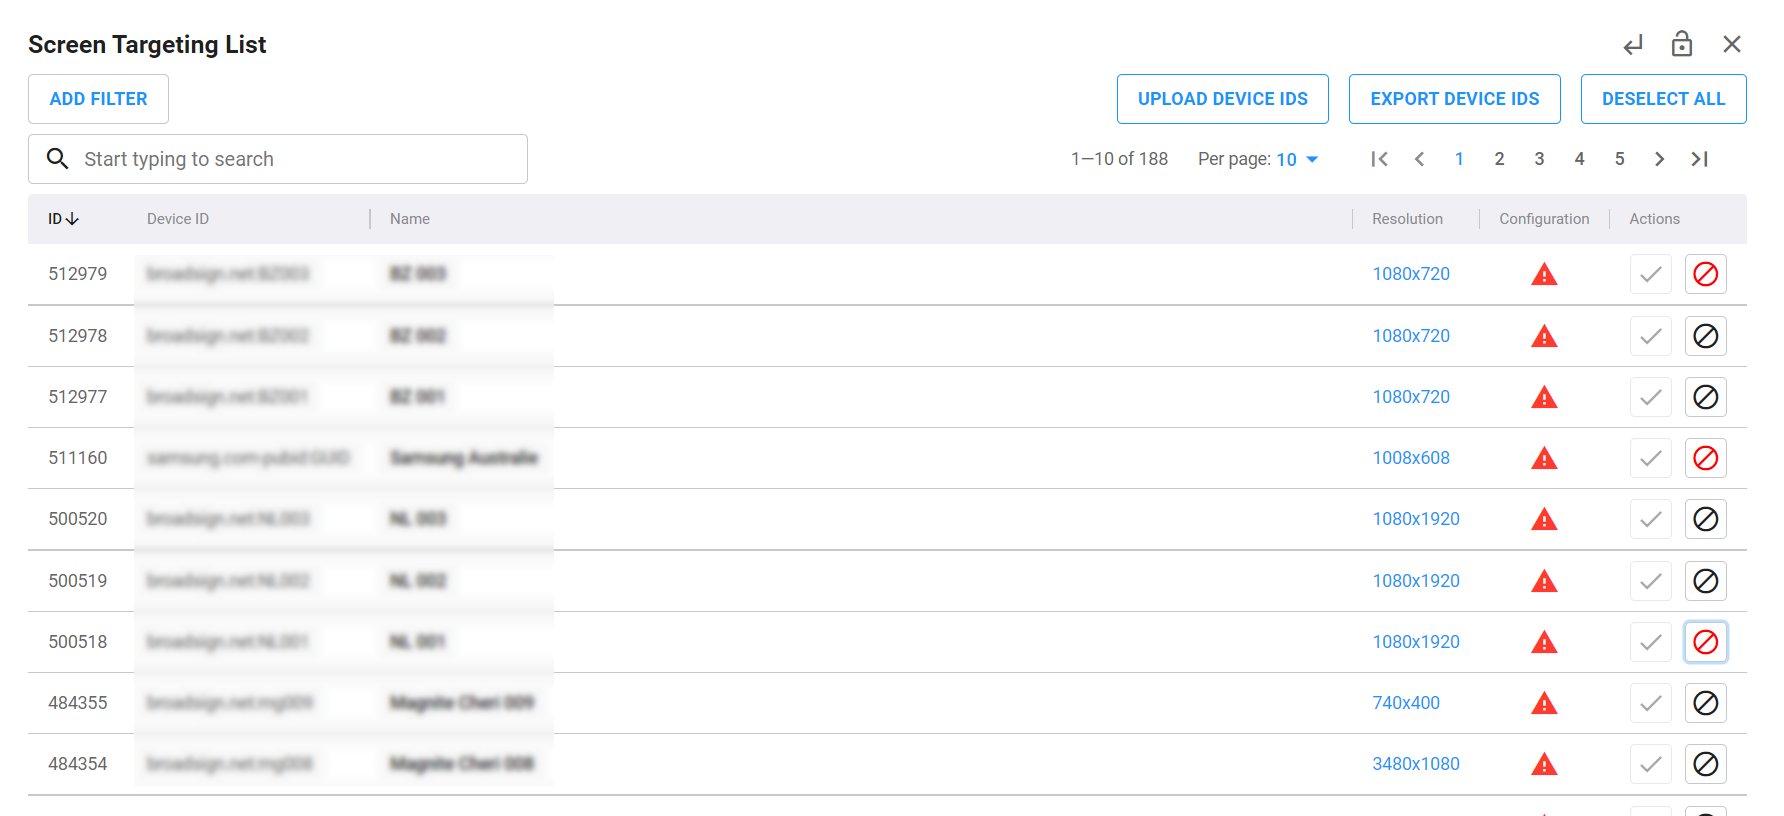
- Select or deselect individual screens by checking or unchecking the check box in the Actions column of each device (screen).
- Select or deselect individual screens to be excluded from the deal by clicking the circle icon in the Actions column of each device (screen).
- Bulk upload screens to be targeted for the deal.
- The Export Device IDs button exports a three-column .csv file of devices that are currently filtered in the Screen Targeting List view.
- Once the .csv file is updated, use the Upload Device IDs to upload the file.
- Deselect all screens by clicking the Deselect All button.
- Click Save & Close.
The Screen Targeting List is displayed. It lists all screens (devices) available for this deal. The targeted screens have a green check mark in the Actions column.
The system auto-sorts the list by the green check mark (which indicates targeted screens) when you open it from the Deal.
You can:
If a screen is targeted with inclusion, you can no longer ‘exclude’ a different screen.
Screens with the red circle are excluded from the deal.
The .csv file contains the Screen Name, the Internal Publisher Screen ID, and the Device ID. You can use this file to add or remove screens to be targeted.
The .csv file can have any number of columns, as long as "device_id" or "internal_publisher_screen_id" is the first column.
The upload process skips any unknown screens.
Once the .csv file has passed validation, all screens included in it will be automatically targeted in the deal.

