You can add data for multiple screens at the same time by importing this data from a .csv file. To add one screen manually, see Creating Screens.
You can add your own screen inventory that includes the location of all of the screens in your network.
You will need to create a .csv file with the appropriate data. Broadsign SSP (Reach) provides a screen data template for you.
To import screen data from csv:
To create the screens file requires three general steps:
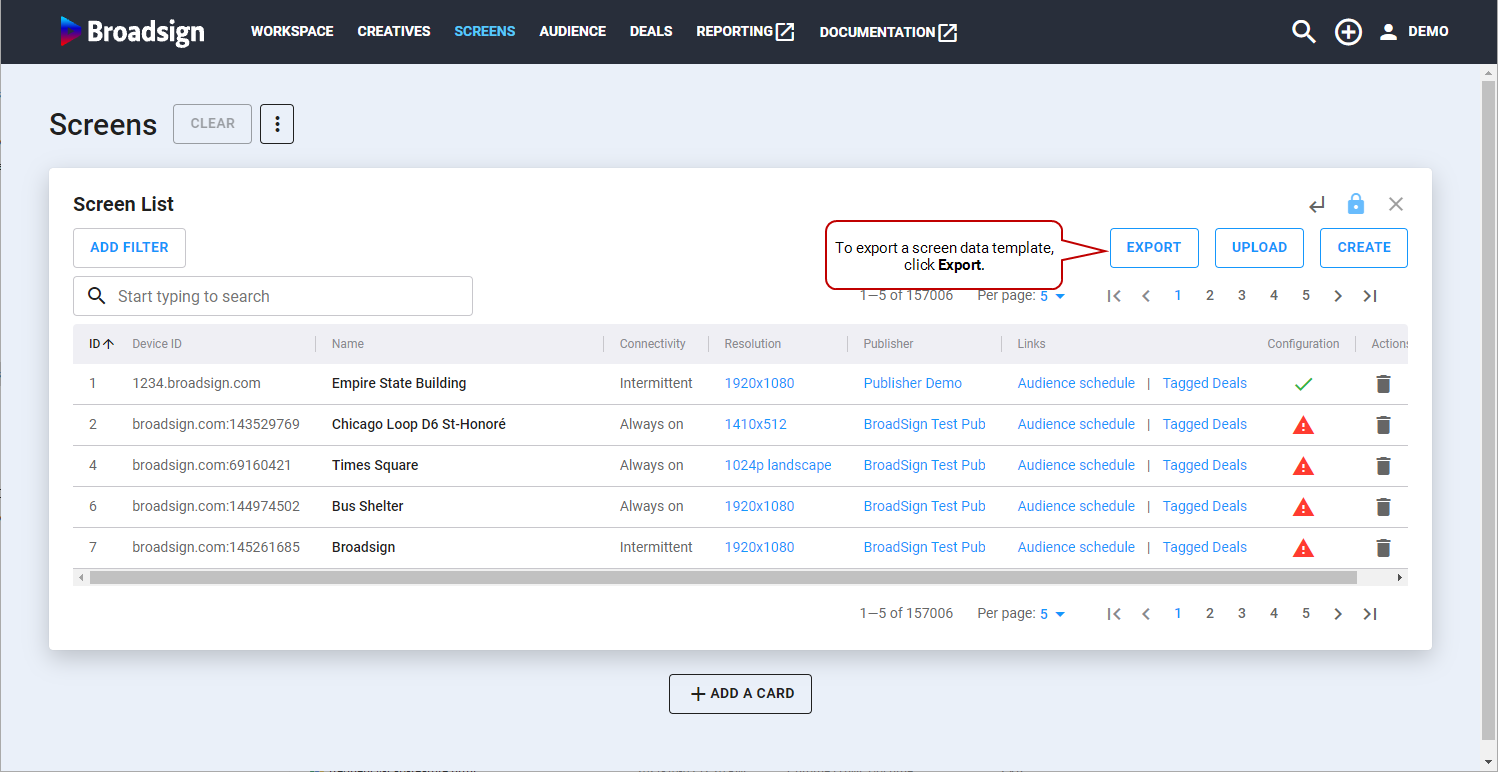
- Export the screen data template from Broadsign SSP (Reach). This file provides you with the allowable columns and correct format. If your publisher has no screens created yet, the columns will be empty.
- Enter your screen data into the file, respecting the format. You can leave existing columns blank; however, you are unable to add columns to the file.
- Import the file, now containing your screen data, back into your network.
Note: You must follow the format of the screen data template. Otherwise, Broadsign SSP (Reach) will consider the file to be invalid.
The screens data template provides you with the allowable columns and correct format. If your publisher has no screens created yet, the columns will be empty.
To export the screen data template:
Note: You must follow the format of the screen data template. Otherwise, Broadsign SSP (Reach) will consider the file to be invalid.
To open the screen data file:
- Open the screen data .csv file that you downloaded (Broadsign recommends Microsoft Excel or similar spreadsheet program).
- Enter your screen data as described in Step 2B: Format the Screens File.
The .csv file can includes several columns (see Column Details).
Supported Encoding
The .csv file must use the UTF-8 encoding format, otherwise you may have issues with importing.
Column Details
| Column Letter | Column Name | Description |
|---|---|---|
| A |
publisher_id |
Your Broadsign SSP (Reach) Publisher ID. The Publisher ID is listed in the Publisher List card, which can be accessed from the Workspace by searching for "publisher-list". Example: 1 |
| B |
device_id |
Unique identifier for your screen. Example: broadsign.com:123456789 |
| C |
name |
A short and descriptive name of the screen (location, specialty, etc.). It must be unique. Example: Times Square Screen |
| D |
resolution |
Screen resolution in the following format: {width}x{height}. Example: 1920x1080 |
| E | latitude |
Latitude coordinate of the screen. Example: 40.755519 |
| F | longitude |
Longitude coordinate of the screen. Example: -73.985766 |
| G | dma_code |
Designed Market Area (Nielsen measurement). Applicable only to US networks. Example: 501 |
| H | tags:id |
Tags associated with the screen, separated by ":". They can be added later. Example: 5:335:336:337:338 |
| I | address |
Address of the screen. Example: 21 Greens Road RD 2 Ruawai 0592 |
| J | bearing_direction |
Facing direction of the screen (N, NW, W, SW, S, SE, E, NE). Example: NW |
| K | diagonal_size |
Diagonal size of the screen in the measurement system defined for your region. |
| L | diagonal_size_units |
Measurement value for the diagonal size of the screen. Possible values are inches, feet, meters and centimetres. Example: inches |
| M | screen_type |
Type of the screen used. The screen type is used to assist with Broadsign’s sustainability efforts. Accepted values are:
Example: 101 |
| N | venue_types:id |
See options in Screen Venue Types. Example: 60 |
| O | allowed_ad_types:id |
Ad types supported by Broadsign SSP (Reach). If more than one type is supported, use a ":" to separate them.
Example: 1:2:4 |
| P | audience_data_sources:id |
ID of the data provider, separated by ":". The data provider ID is listed in the Audience Data Source List card, which can be accessed from the Workspace by searching for "audience-data-source-list". Example: 3:4:7:10 |
| Q | screen_img_url |
URL to fetch an image of the screen. The URL must point to a valid Direct Hosted Image URL and not a link to the website containing the image. You can add multiple URLs by separating them with a semicolon (";"). Valid URL Examples:
Invalid URL Example:
|
| R | min_ad_duration |
Minimum ad slot length in seconds. Example: 10 |
| S | max_ad_duration |
Maximum ad slot length in seconds. Example: 30 |
| T | demography_type |
General descriptor for the type of audience being used:
|
| U | average_weekly_impressions |
Weekly total impressions. Example: 1000 |
| V | internal_publisher_screen_id | Internal Publisher Screen ID if required by the publisher. |
| W | hivestack_id | Screen Identifier in Hivestack. |
| X | vistar_id | Screen Identifier in Vistar. |
| Y | px_id | Screen Identifier in Place Exchange. |
| Z | measurement_partner_id |
Inventory identifier used within the main measurement partner's system. It serves to map Broadsign Device IDs with Measurement Partner IDs. This mapping process is essential for Broadsign SSP (Reach) and Frequency analysis. |
| AA | allows_motion |
Whether or not motion type content is allowed to play on this screen. Example: 0 |
| AB | ox_enabled |
Whether or not a screen is enabled for Broadsign SSP (Reach)'s Open Exchange. Example: 0 |
| AC | is_active |
Whether or not a screen is active. Inactive screens are not visible in deals and will not send bid requests. Example: 0 |
| AD | floor_cpm_usd |
Screen CPM floor in US dollars. These prices are used for the Open Exchange, and are otherwise simply informational. Example: 10 |
| AE | floor_cpm_cad |
Screen CPM floor in Canadian dollars. These prices are used for the Open Exchange, and are otherwise simply informational. Example: 10 |
| AF | floor_cpm_eur |
Screen CPM floor in Euros. These prices are used for the Open Exchange, and are otherwise simply informational. Example: 10 |
| AG | floor_cpm_gbp |
Screen CPM floor in British pounds. These prices are used for the Open Exchange, and are otherwise simply informational. Example: 10 |
| AH | floor_cpm_aud |
Screen CPM floor in Australian dollars. These prices are used for the Open Exchange, and are otherwise simply informational. Example: 10 |
| AI | average_imp_multiplier | Average impression multiplier for the screen, as in the average amount of viewable impressions per ad slot. |
| AJ | screen_count |
Integer value between 1 and 100 that indicates the number of physical screens to which a specific Device ID is hooked up, via any synchronization method. Example: 5 |
Once the screen data file has been properly filled out, you can import it into Broadsign SSP (Reach). If you encounter issues when importing the file, contact Broadsign Services.
The following procedure is summarized here:
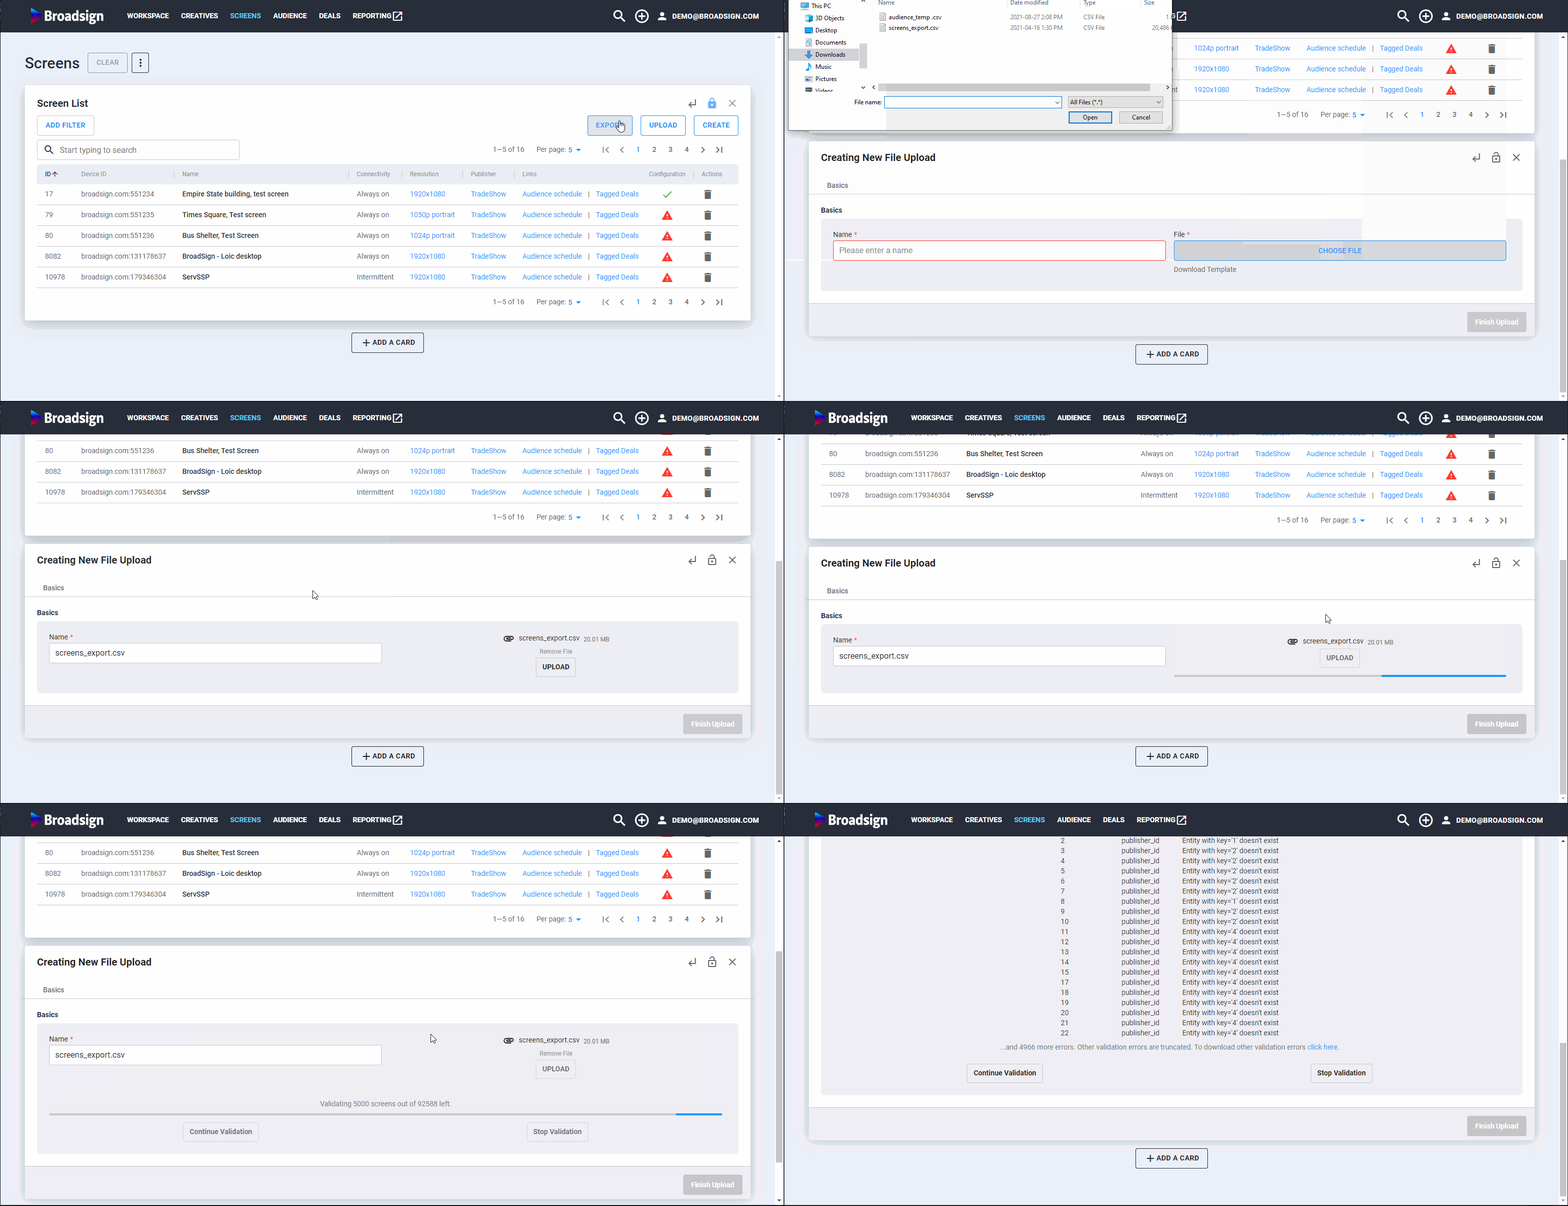
To import the screen data file:
- In the Screens section, click Upload.
- Click Choose File.
- Navigate to your .csv file and select it.
- Click Open.
- Click Upload.
- Click Start Validation.
The Creating New file upload card is displayed.
Once the upload is finished, you can start the validation of the screen import. Broadsign SSP (Reach) will validate by blocks of 5000 rows at a time.
You can either choose to stop or continue the validation every 5000 rows.
You can download a .csv showing any errors after the validation.


