Broadsign Control Player’s device monitoring is done by using a device's external control capabilities through its serial port (RS-232). Not all displays have the same set of control features, but many screens can automatically be put in stand-by mode for off hours and turned on during operating hours.
Reporting Display Errors
When the player detects that a display is not in the desired state, it will communicate with Broadsign Server and report the problem. The problem can be viewed through the incident report of Broadsign Control Administrator. These reports will also be repeated via email to the domain contacts, display unit contacts and the player contacts for the system in question.
Prerequisites
To configure a system for device control and monitoring, some display specifications are required and can be gathered from the manufacturer's manual or web site. The information needed is:
- The pin configuration of the serial connection. The important pins are the Receive Data Pin (RXD), the Transmit Data Pin (TXD) and the Ground (GND). Usually, the TXD pin is pin 3, RXD is pin 2 and GND is pin 5. If this is the case, a null modem cable is needed for connecting the PC to the screen.
- The command codes for the actions that can be performed on the screen.
Configuring your Player for Device Monitoring
When installing the player, it is configured by default to allow remote commands to be scheduled from Broadsign Control Administrator. These commands are configured using the Remote Configuration Profile Resource. For more information, see Configuration Profiles - Players.
Unfortunately, most consumer-grade displays don’t have very robust RS-232 control chips and, as such, frequently fail to execute a command properly. Therefore, Broadsign Control incorporates a very flexible error handling system to reduce the amount of incidents and false positives being generated by your players in the field.
When a player fails to perform a device control operation successfully, there are 5 mechanisms that can be used to resolve the issue:
- Decrement screen count – By enabling this option in the Error Handling tab of the Device Control Properties dialog, the player will decrement the screen count associated to the playback statistics it reports. Seeing as the screen is in an indeterminate state, the player will continue to play content, however the statistics it reports for that screen will not be counted.
- Stop Playing – By enabling this option in the Error Handling tab of the Device Control Properties dialog, the player will stop playing if an error is detected. No playback statistics will be generated and the screen will remain black until the Device Control operation completes successfully. Once the Device Control operation completes successfully, playback will resume automatically.
- Retries – Here you can specify how many times to repeat the Device Control operation before considering it as failed. On each try, the error handler will be executed, bytes will be drained from the command buffer if so configured and the quiet time is observed. Only once all the retries have been exhausted and the Device Control operation has not completed successfully will an incident be recorded.
- Drain Bytes – Some displays will periodically fill the RS-232 command buffer with unwanted garbage bytes that need to be cleaned out. By specifying a certain amount of bytes to drain, the player will read up to that many bytes from the screen and discard the result, creating a clean command buffer to retry the operation.
- Error Handlers – When a Device Control operation fails, you can configure another Device Control operation to execute as a corrective measure. A typical example of this would be to execute a “power on” operation after an “assert power” operation failed.
Let's go through the steps required to schedule several device monitoring actions.
Background
We have a network of players and screens in a grocery store that has the following opening hours:
- Monday – Wednesday: 8:00 AM – 5:00 PM
- Thursday – Friday: 8:00 AM – 9:00 PM
- Saturday: 9:00 AM – 4:00 PM
- Sunday: Closed
We would like all screens to be on strictly during opening hours. Also, while the store is open, we would like to validate that the screen is on every 10 minutes. If the screen is off during the opening hours, we would like to turn it on. All the screens are the same model and will be controlled by the player on communication port 1. All players are associated to the same display unit.
Schedule Device Control Actions
The way we schedule device control actions to a player is by editing the associated display unit’s properties.
To add Time Spans to a player:
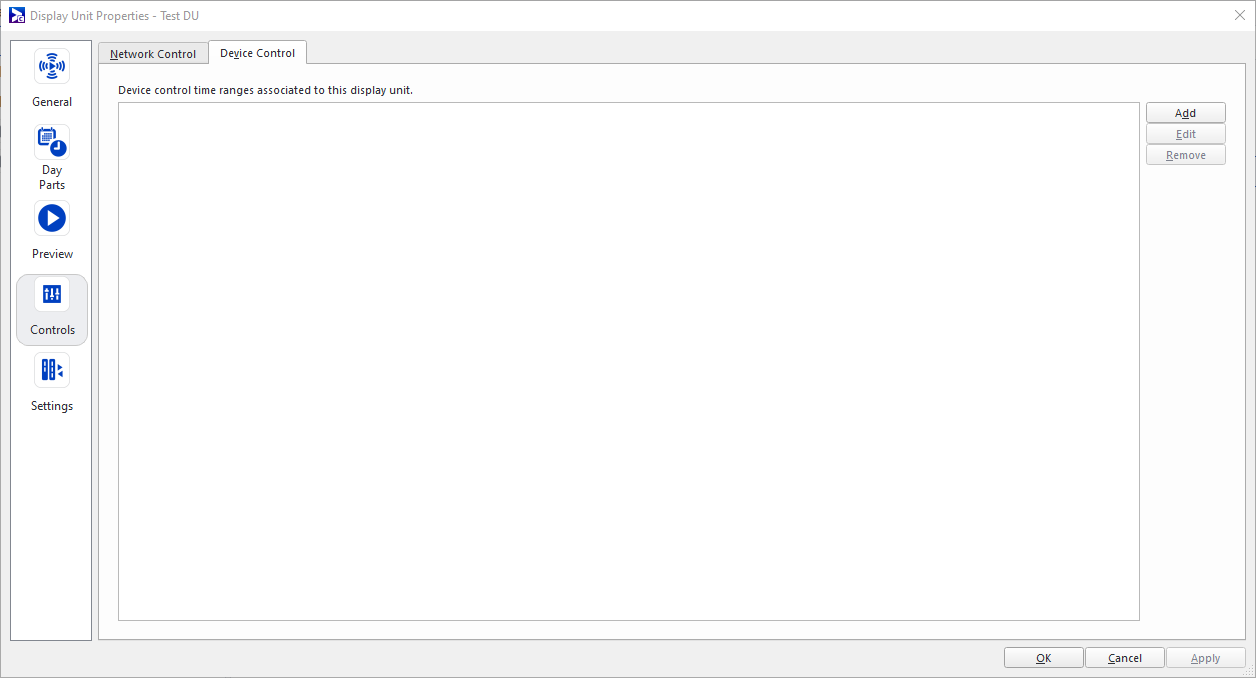
- From the Device Control tab of the Controls tab group, click the Add button yo add a Time Span.
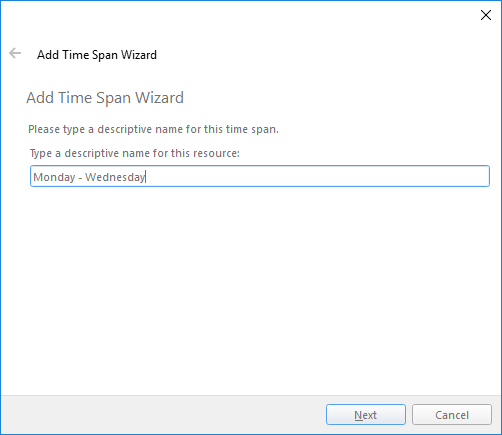
- Enter a descriptive name for the Time Span and click Next.
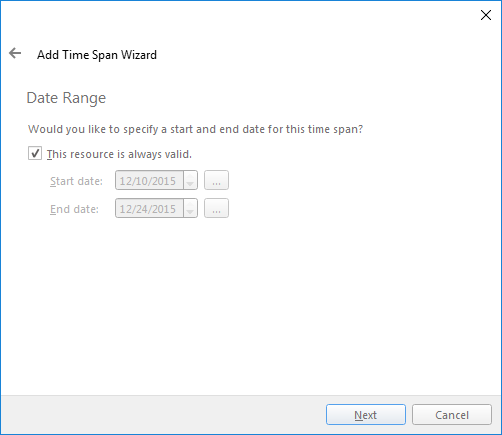
- Enable the check box labeled This resource is always valid since the opening hours of the store have no set end date, then click Next.
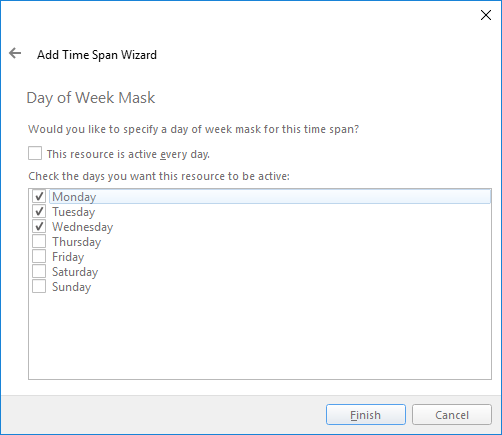
- Enter the days of the week that the Time Span will cover. For our first Time Span, it should only cover Monday to Wednesday. Therefore, clear the check box stating the time span is valid everyday, and select Monday, Tuesday and Wednesday. After selecting the days, we can create the Time Span by clicking Finish.
- Follow the same procedure to create these Time Spans. The only difference is that Time Spans will cover different days of the week as their name specifies.
A Time Span describes the actions that will be executed for specific time period.
The Add Time Span Wizard is displayed.
In our case, we will have 3 different time spans; one for Monday to Wednesday, another for Thursday and Friday and lastly one for Saturday. Let us name the first one “Monday – Wednesday Actions”.
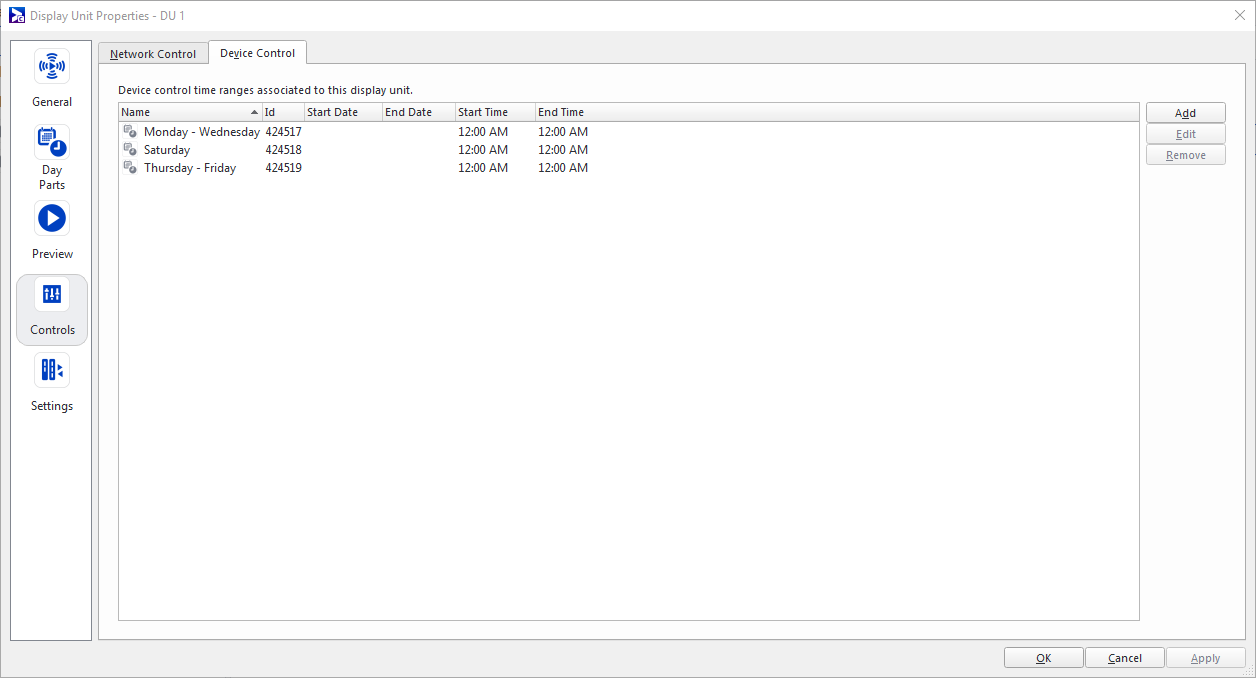
At this point we will have one Time Span specified within the Device Control tab of the display unit. We still need to create the other Time Spans required; Thursday – Friday, and Saturday.
After having created the two other Time Spans, you will now see all three Time Spans within the Device Control tab.
We now have our Time Spans created, but we still need to associate Operations with them. Operations will tell the system which action to execute and at which time. They can also inform the system what actions to take in the case an error occurs.
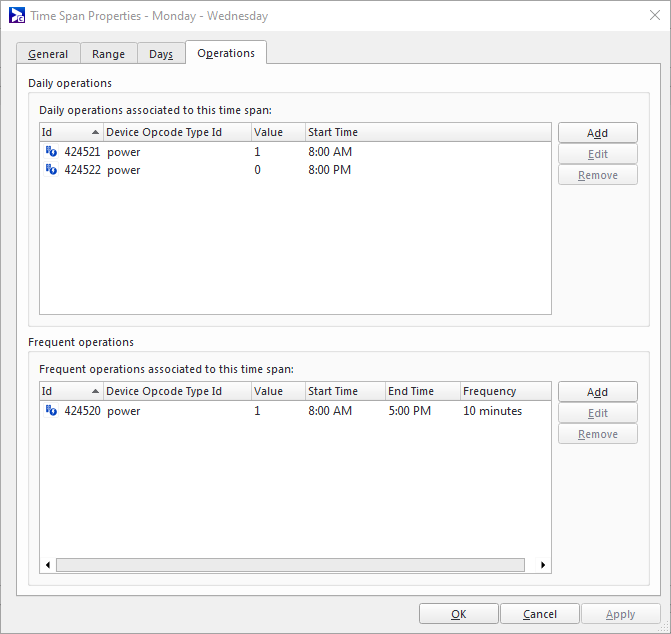
There are two types of Operations: Daily and Frequent. Daily Operations are executed once during the day at the time specified. Frequent Operations will execute at every interval specified. In our example, for "Monday to Wednesday", we will need two Daily Operations (turn on at 8:00 AM and turn off at 5:00 PM) and one Frequent Operation (validate that the screen is on every 10 minutes).
To add Daily Operations to Time Spans:
- Select the "Monday to Wednesday" Time Span from the list of Time Spans and click Edit.
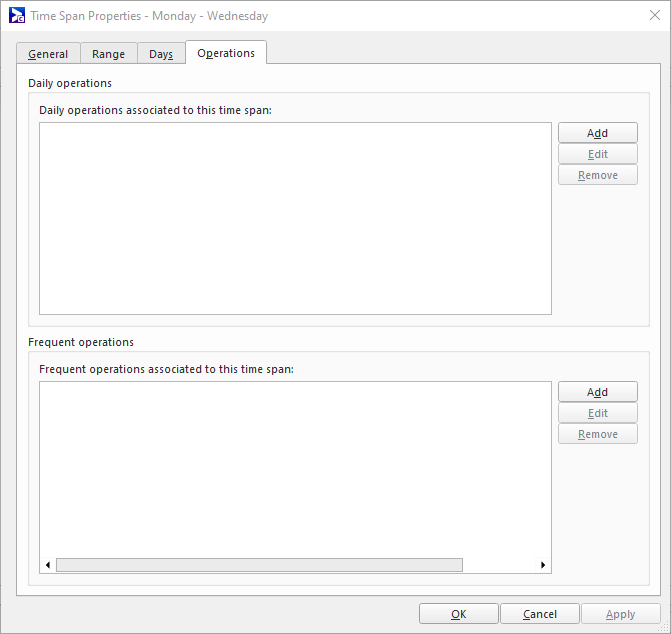
- In the Operations tab of the Time Span Properties, click the Add button in the Daily Operations grouping.
- Select the type of Operation to execute. From the list of selection, select Set Power and click Next.
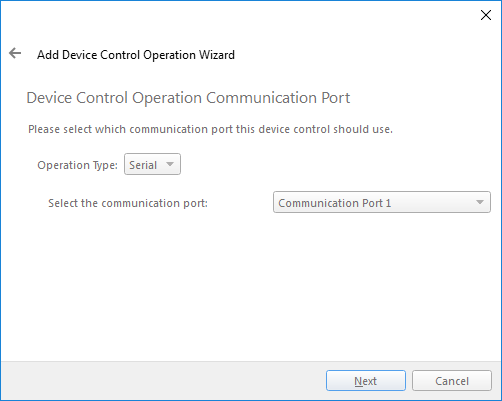
- Select the communication port that will be used. In our scenario, Communication Port 1 was specified in models.xml. Therefore select Communication Port 1 from the choice of communication ports and click Next.
- Set the execution time of the Operation. In our example, all screens should go on at 8:00 AM, therefore enter 8:00 AM and click Next.
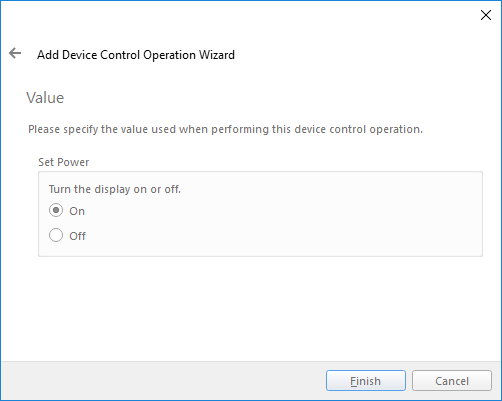
- Specify the value that will be set during the execution of the Operation. In our case, we will be setting the power to on. Therefore select On and click Finish.
- Repeat the steps above to add a Daily Operation for turning the screen off.
The Time Span Properties window is displayed.
We are going to start by adding the first Daily Operation to turn on the screen at 8:00 am.
The Add Device Control Operation Wizard is displayed.
We have now created one Daily Operation. We still need to enter the other Daily Operation to turn the screen off at 5:00 PM.
The only differences are that you'll need to set the time to 5:00 PM when choosing Time of Day, and in the last step of the Add Device Control Operation Wizard you will need to select Off instead of On.
We have now completed entering the Daily Operations. We still need to enter a Frequent Operation.
The Frequent Operation will validate that the screen is on every 10 minutes during the site’s opening hours.
To add a Frequent Operation to Time Spans:
- Click the Add button in the Frequent Operations section.
- Select a type of Operation. In our example, the type will be assert power. Select Assert Power and click Next.
- Select the communication port. As previously performed, select Communication Port 1 and click Next.
- Enter the time interval during which the operation will execute as well the frequency at which it will execute.
- Specify the value for the operation executed. In our example, we would like to confirm that the screen is turned on during the hours specified. Therefore, select On and click Finish.
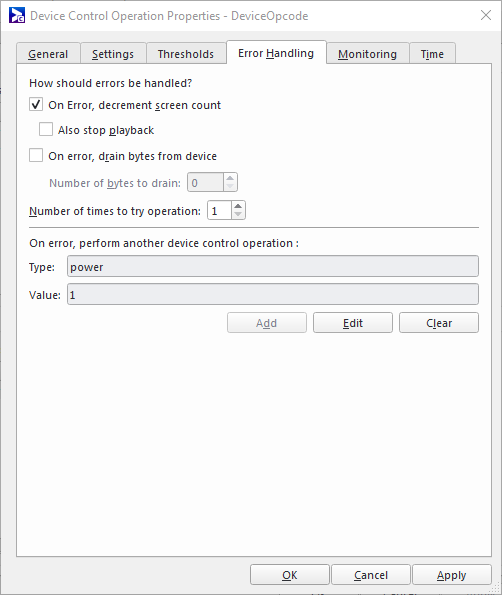
- Select the Frequent Operation and click Edit. Once the Device Control Operation Properties dialog appears, select the Error Handling tab.
- Stop playback – By selecting the property of stop playback, the player will pause when an error is encountered by the operation. The error will create an incident that can be viewed from the Incident Report and when the incident is resolved, the player will resume playback.
- Drain bytes from device – There are certain devices that send extra data on errors that will need to be drained after an error occurs. Selecting this property and entering a number of bytes, will drain the unwanted bytes.
- Follow up Operation – If the error occurs, a follow up operation can be specified.
- Click Add in the Error Handling tab of the Device Control Operation Properties.
- In the first step, select the type of Operation. In this example it would be Set Power.
- The following step requires that you select the communication port. Select Communication Port 1 and click Next.
- Finally, select the value for the Operation specified. For this example, it would be On.
- The final step is to specify the same type of actions for the Thursday-Friday and Saturday Time Spans.
In our example, the opening hours for Monday to Wednesday are from 8:00 AM until 5:00 PM. Therefore, clear the option stating that the resource runs all day and enter the required hours. Also, modify the frequency to 10 minutes instead of 5 minutes. Once the changes have been performed, click Next.
We have now completed entering the Operations required for the Monday to Wednesday Time Span. From the Operations tab of the Time Span Properties, you will now see two Daily Operations entered and one Frequent Operation entered.
However, one of the requirements in our example was to turn on any screen detected as being off during opening hours. This is done by adding an Error Handling property to the Frequent Operation that validates if the screen is on. Please note that Error Handling can also be specified for Daily Operations.
Error Handling is specified for an Operation within the Device Control Operation Properties.
There are three actions that can take place when an error is detected:
In our case, we would like the screen to turn on if an error occurs while executing the assert power Operation, which is a follow up Operation.
The Add Device Control Operation Wizard is displayed.
The wizard will then take you through the process of adding the follow up Operation. The steps involved are the same steps performed when creating a Daily Operation without specifying the time of the execution. That is:
If the screen is detected as being off and stop playback is specified as an error handler, the manner in which playback will resume when the screen is turned on is dependent on the type of media currently being played. Playback of a still image will restart from the beginning. Therefore, if you have an image scheduled to be shown for 15 seconds, the image will be played for a full 15 seconds once the screen is turned on. Video files, however, will be skipped and the next scheduled ad copy will begin playing as soon as the screen is turned on.
We have now completed setting up all device controls required for the Monday to Wednesday Time Span.
Once this is done, the desired device controls have been completely set. All of our screens located in our grocery store will now be turned on during the opening hours of the site turned off during the closing hours of the site. If one of the screens is turned off during the opening hours of the store, the system is configured to turn it back on.
To validate that device control is functioning properly, Broadsign Control has reporting capabilities implemented where email notifications will be sent in case of an incident. Incident reports are also available to view all the open incidents or even a list of the history of resolved incidents.
For more information, see the Incident Report.

