In this section, we describe how to set up static inventory on your domain that will be displayed in the Static Line Item page. We also describe the steps needed to import or update a static plan.
Note: Guaranteed Campaigns settings are available only to users assigned the Admin or Direct Sales Admin role.
Static inventory refers to traditional, non-digital, advertising faces (posters, billboards, bus wraps, etc.).
A "face" is the surface area on an OOH (Out of Home) unit where clients display advertising copy. A structure may have more than one face.
Note: In the Guaranteed Campaigns module, static inventory operates differently than digital inventory. See Inventory.
You can add your own static inventory that includes the location of all of the faces in your network. Static inventory will show only after it is imported.
Note: A new import overwrites existing inventory.
By default, the menu item is hidden.
You will need to create a .csv file with the appropriate data. The Guaranteed Campaigns module provides a static inventory template for you. To create the file requires three general steps:
- Export the static inventory template from the Guaranteed Campaigns module. This file provides you with the allowable columns and correct format. On a new domain, the columns will be empty.
- Enter your static inventory data into the file, respecting the format. You can leave existing columns blank; however, you are unable to add columns to the file.
- Import the file, now containing your inventory data, back into your domain.
Tip: If you want to remove faces from your inventory, remove the row or information of the faces from the .csv file, and then import the file. See Remove Static Faces from Inventory.
To export the template:
- Access the Settings page.
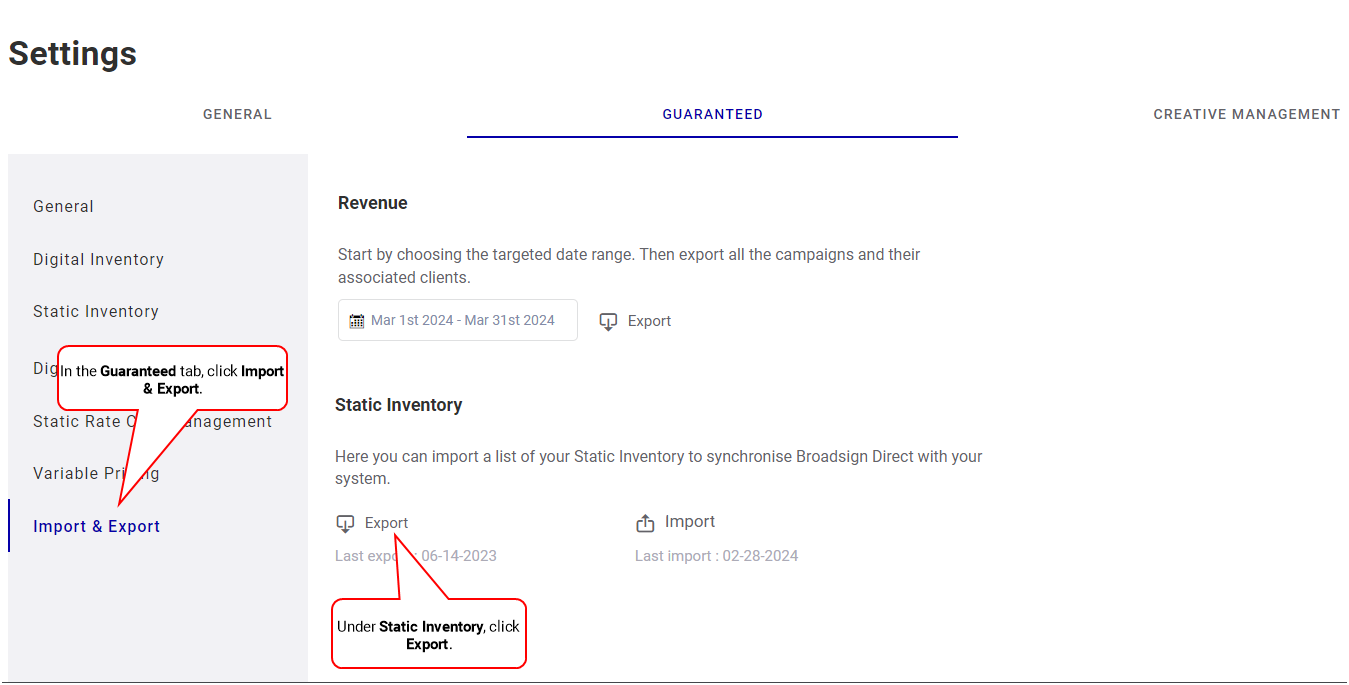
- In the Guaranteed tab, click Import & Export.
- In the Static Inventory section, click Export.
- Your system will download a .csv file.
- The file name is in this format: screens_[year]-[month]-[day]. For example: screens_2018-03-02.
Note: You can leave existing columns blank; however, you are unable to add columns to the file.
Tip: If you want to remove faces from your inventory, remove the row or information of the faces from the .csv file, and then import the file. See Remove Static Faces from Inventory.
Remove Static Faces
You can remove static faces from your inventory by removing the corresponding rows from the .csv file, and then import the file. Since a new import of the static inventory data file overwrites the existing inventory, the static faces will be removed from the Static Line Item page.
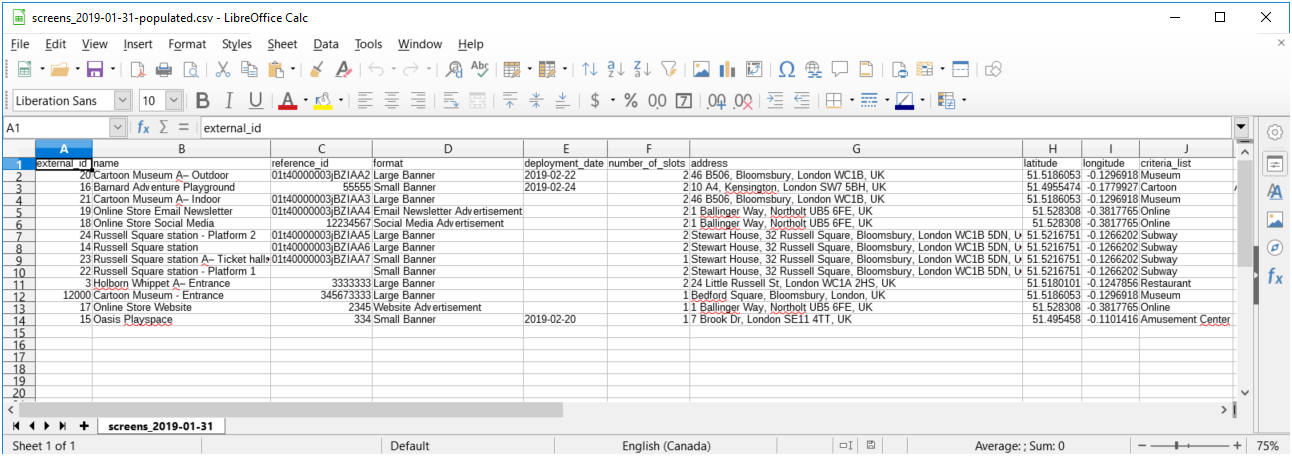
The .csv file includes 10 columns (see below).
Supported Encoding
The .csv file must use one of the encoding formats that the Guaranteed Campaigns module supports:
- ASCII
- UTF-8
- UTF-8-BOM
- ISO-8859-1
- ISO-8859-14
Column Details
| Column Letter | Name | Content |
|---|---|---|
|
A-D: Screen identification columns These columns contain information imported from Broadsign Control Administrator. They help to identify the screen on your domain and its location in the field. |
||
| A | external_id | Use this field to store an external identifier from your own system. |
| B | name | The name of the face or structure (for example, "NY Bus 0097", "Toy Store UK0014", etc.). |
| C | reference_id | Use this field to store an external identifier that you want to map to an integration with third-party software. |
| D | format | The type of face or structure (for example, shelter, billboard, etc.). |
| E | deployment_date |
The date on which the static face will be deployed. A future date. Note: Date format is "yyyy-mm-dd". |
| F | number_of_slots | The number of slots available on the face or structure. |
| G | address | The physical address of the face or structure. |
| H | latitude | The latitudinal data of the face or structure. |
| I | longitude | The longitudinal data of the face or structure. |
| J | criteria_list | A list of the criteria that apply to the face or structure. Criteria must be separated by the ";" character. For example: Airport;Coffee Shop. See The Filter Panel. |
Note: Remember to save the file in .csv format, otherwise Guaranteed Campaigns will be unable to import your data.
To import inventory data:
- Access the Settings page.
- In the Guaranteed tab, click Import & Export.
- In the Static Inventory section, click Import.
- Navigate to your .csv file and select it.
-
Click Open.
A new Static Line Item page will appear containing a list of your static faces.


