 minute read
The Inventory page allows you to view the digital screens and static faces (sellable units) currently available in your inventory. You can find these listed under two separate tabs, Digital and Static.

If you have only one inventory type (either Digital or Static), the system displays your inventory directly on the Inventory page without showing any tabs.

Note: The Inventory page is available to users with the Admin, Direct Sales Admin, Programmatic Admin, and Static Admin roles.
Inventory Management
You can access your inventory by either clicking the Inventory module in the navigation bar, or the Inventory navigation widget in the workspace. The Inventory list is displayed.

Note: The Inventory page is available to users with the Admin, Direct Sales Admin, Programmatic Admin, and Static Admin roles.
The Inventory page allows you to view the digital screens and static faces (sellable units) currently available in your inventory. You can find these listed under two separate tabs, Digital and Static.
For more information, see Digital vs. Static Inventory.
If you have only one inventory type (either Digital or Static), the system displays your inventory directly on the Inventory page without showing any tabs.
The following are the features of the Inventory section interface.
In the Search box, enter part (or all) of the Internal Screen Name, Buyer Facing Name, Address, or Reference ID of a screen or face that you want to find.

You can define how many screens and faces are displayed at a time on the page.

You can use one or more of the filters available to display your inventory.
Filter Screens by Activity Status
You can filter your screen list by using the Activity Status menu. You can decide to display only Active screens, only Inactive screens, or both Activity statuses.

Filter Screens by Transactability Status
You can filter your screen list by using the Transactability Status menu. You can decide to display only Transactable screens, only Not Transactable screens, or both Transactability statuses.

For more information, see Transactable vs. Non Transactable Screens and Edit Screens Programmatic Transactability Status.
Filter Screens by Criteria
You can filter your screens by using the Criteria menu. This menu displays the list of Criteria associated with each screen in the inventory view.
Each screen inherits the Criteria associated with its Display Unit and its frame(s) in our Content and Network Management solution. For screen groups, the screens inherit the Criteria associated with the Display Units that make up the group. For more information on Criteria, see Criteria and Conditions in the Content and Network Management documentation.

Tip: Criteria are displayed in the Criteria column of the Digital Inventory tab. This column is not visible by default, but you can display it by using the Customize Columns menu.
Filter Screens by Audience Calculation Method
You can filter your screens by using the Audience Calculation Method menu. You can decide to display only screens using the Dwell calculation method, only screens using the Prorated calculation method, or screens using any of both calculation methods.

- dwell: The audience is calculated as follows:
- prorated: The audience is calculated as follows:
audience per hour / number of loop per hour
Each ad within a loop gets the same number of delivered impressions.
audience per hour / number of seconds per hour (3600) * Ad Slot length
The audience per hour should be prorated proportionally to the actual slot length. In other words, a prorated formula takes into account variable slot lengths and their impact on impressions calculation.
Note: The Audience Calculation method is set in our Content and Network Management solution at the Loop Policy level. For more information, see Loop Policy Variables in the Content and Network Management documentation.
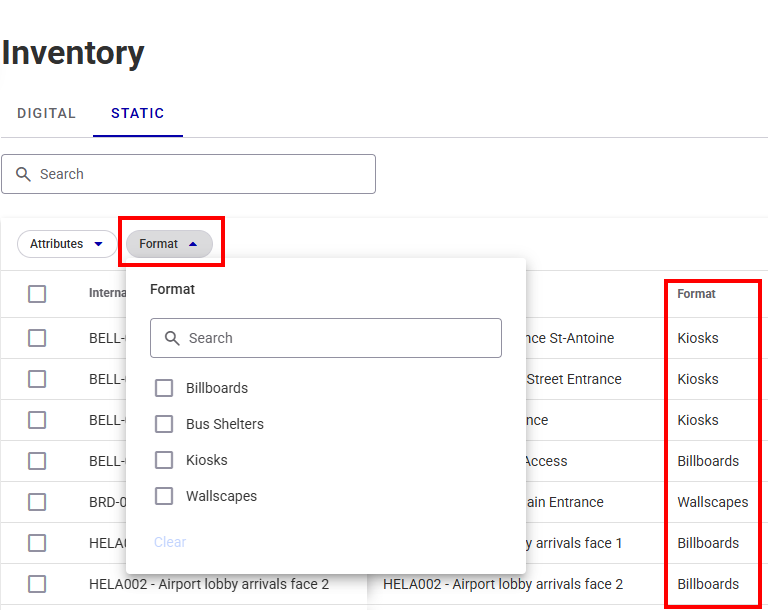
Filter Faces by Attributes
You can filter your faces by using the Attributes menu. This menu displays the list of Attributes associated with each face in the inventory view.
Proper setup of these Inventory Attributes is essential for the Campaigns to function as intended. Incorrectly configured Inventory Attributes can lead to Campaigns targeting the wrong Faces or failing to target the right Faces. For more information, see Inventory Attributes.

Tip: Attributes are displayed in the Attributes column of the Static Inventory tab. This column is not visible by default, but you can display it by using the Customize Columns menu.
Customize Columns
Select which columns to display in the workspace, and the order in which they are displayed. For more information on the columns available, see Digital Inventory Information and Static Inventory Information.

See if your digital inventory contains screen groups. See Screen Groups.
Update your list of screens and faces by clicking the Update inventory button. For more details, see Update the Screens or Faces Inventory.
Update your audience information by clicking the Update Audience button. For more details, see Update the Audience Information.
Download your selected screens and faces inventory in .csv format. For more details, see Download Selected Screens.
Get a URL that allows you to synchronize audience data with our Content and Network Management solution. For more details, see Copy Audience URL.
In the Broadsign Platform, a screen can be a single screen, a specific frame on a screen, or a group of screens, such as a video wall.
You cannot directly define a screen within the Broadsign Platform; instead, the system imports screen definitions.
When importing Display Units, Frames, and Day Parts from our Content and Network Management solution, the system translates them into screens within the Broadsign Platform. For more information on this process, see On-Board Screens in the Guaranteed Campaigns Module.
Screen Naming Rules
The Broadsign Platform generates screen names based on the information provided in our Content and Network Management solution. The platform applies the following rules:
- If there is one Frame, or if there is more than one Frame but only one is sellable:
- Broadsign Platform Screen Name = Display Unit Name
- If there is more than one Frame:
- Broadsign Platform Screen Name = Display Unit Name _ Frame Name
You cannot edit screen names directly in the Broadsign Platform. You must make all name changes within our Content and Network Management solution.
Screen Naming Scenarios
For more specific examples of screen naming, refer to these detailed scenarios:
Programmatic Transactability Status
Digital Inventory
To ensure that screens can be transacted programmatically, you need to provide and validate certain information. The Programmatic Transactability Status column in the workspace will indicate the status of each screen, whether it's Transactable or Not Transactable. If a screen is marked as Not Transactable, you can hover over the status to see which information needs to be updated to make it transactable.
A screen is automatically not transactable if the user has set it as inactive.
The following are the requirements for screens and screen groups to be transacted programmatically:
For Individual Screens:
- Buyer Facing Name: Provide a buyer-facing name for the screen.
- Venue Type: Specify the venue type where the screen is located.
- Allowed Ad Types: Define the types of ads allowed on the screen.
- Minimum Ad Duration: Set the minimum ad duration allowed.
- Maximum Ad Duration: Set the maximum ad duration allowed.
- Audience Source(s): Include information about the audience source(s). Audience information must be valid (not expired).
- Latitude/Longitude (Lat/Long): Provide the geographical coordinates in decimal degrees.
- Width/Height: Specify the screen's dimensions.
- Average Weekly Impressions: Report the average weekly impressions.
- CPM Floor: Set the CPM floor in the main currency.
For Screen Groups:
- Uniform Screen Resolutions: Ensure that all screens within the group have the same screen resolutions.
- Lat/Long Proximity: The Lat/Long coordinates of all screens in the group should be within 2 degree decimals, which is approximately within a 2 km radius (this may vary depending on geographical location).
- Audience Information: Include information about the audience source(s). Audience information must be valid (not expired).
See Update the Screens or Faces Inventory for more details.
Note: The Lat/Long information can only be modified in our Content and Network Management solution.
Screen Groups
By following these steps, you can ensure that programmatic transactions are correctly configured for screen groups (also called sync set in our Content and Network Management solution) and that DSPs receive accurate information about the screens' transactability and audience numbers, depending on their synchronization status. This approach helps streamline the programmatic buying and selling of ad space on screen groups in your inventory.
When providing audience numbers for the screens groups, consider the sync set configuration:
- For the hours when the screens are synchronized (playing the same content), provide the audience number for the entire group of screens in that sync set.
- For the hours when the screens are not synchronized (playing independent content), provide the audience number that will be delivered by that specific independent screen.
Audience
The Audience for that screen or screen group must be provided. Audience information must be valid (not expired). See Update the Audience Information for more details.
Screen Groups
Digital Inventory
It is possible to sell multiple screens as a single entity, called screen group, as opposed to individual screens. They are particularly useful when you want to ensure consistent content across a group of screens, such as screens within a specific location or vehicle.
Note: Multi-frame screens are not supported in screen groups.
Create Screen Groups
Screen groups are created in and imported from our Content and Network Management solution. They cannot be created in the Broadsign Platform. They are display units (screens) that have been assigned the same display unit criteria type, which must be Grouping. All other criteria types are not supported.
For more information on how to create a screen group, see the Screen Groups tutorial in the Content and Network Management documentation.
Association with Criterion
When creating a screen group in our Content and Network Management solution, you associate one or more display units with a specific criterion. For example, you might create a grouping criterion called Car 12345 and assign screens to it.
Screens assigned to a grouping criterion will no longer appear as individual screens in the Broadsign Platform.
Representation in the Platform
In the Broadsign Platform's Inventory page, screen groups are represented with a blue chip icon that shows the number of screens in the group.

The number in the chip ![]() represents the number of screens in that group. You can click the blue chip to open a window that will list all screens of the group.
represents the number of screens in that group. You can click the blue chip to open a window that will list all screens of the group.

Playing Content
Screens within a screen group play the same content at the same time. For example, this can be useful for screens in a subway car where you want consistent content across all screens in that car. When using a screen group, all screens within the group are targeted together; you cannot target individual screens within the group.
Information
Screen groups have similar information to individual screens, except for orientation and resolution, as these fields are specific to physical screens and may vary among screens within the group.
Inventory Management
You can sell and filter screen groups just like individual screens, making it easier to manage and sell inventory in bulk.
Now that you are familiar with the Inventory page, you can do the following:

