You can use the Bulk Update flow to update a large number of your screen inventory by using a .csv data file.
Note: You can update up to 10,000 screens at the same time.
Tip: If you want to quickly update a limited number of information directly from the interface, you can use the Quick Screens Inventory Update flow.
Note: The Inventory page is available to users with the Admin, Direct Sales Admin, Programmatic Admin, and Static Admin roles.
The screens inventory is synchronized with our Content and Network Management solution. Some of the information is already pre-filled when accessing the inventory for the first time. See Screen Information Origin.
For missing or wrong information for a large number of screens, you can update the information of all of the screens in your network by using a .csv file. We provide a screen data template for you.
To bulk update screens inventory:
Digital Inventory
Creating the .csv file requires three general steps:
- Select and export the screen data template from the Inventory list.
This template contains all the current screen information. See Step 1 – Export the Screen Data Template.
- Complete or update the screen data information by respecting the format.
You don't need to enter the information all at once. You can enter a part of the information and enter the rest later. See Step 2 – Enter Your Screen Data.
-
Import the file, now containing your screen data, back into your network. See Step 3 – Import the File into Your Domain.
Note: You must follow the format of the screen data template. Otherwise, Broadsign will consider the file to be invalid.
The screens data template provides the allowable columns and correct format. If your publisher has no screens created yet, the columns will be empty.
To export the screen data template:
Digital Inventory
- In the Inventory list, select the screens that you want to update.
- Click Update Inventory.
- In the window that is displayed, select Bulk Update, then click Continue.
- In the Update Inventory window, click Download Inventory CSV to download a
.csvfile of your selected inventory. - Your system will download a
.csvfile. - The file name is screen_export.csv.


Note: You must follow the format of the screen data template. Otherwise, Broadsign will consider the file to be invalid.
Some parameters must be properly defined so that your screen can be programmatically transactable. See Transactable vs. Non Transactable Screens.
To open the screen data file:
- Open the screen data
.csvfile that you downloaded (Broadsign recommends Microsoft Excel or similar spreadsheet program). - Enter your screen data as described in Step 2B – Format the Screens File.
The screens data file includes several columns (see Inventory CSV File Column Details).
Inventory CSV File Column Details
| Column Letter | Column Name | Description |
|---|---|---|
|
A-D: Screen identification columns These columns contain information imported from our Content and Network Management solution. They help to identify the screen on your domain and its location in the field. Note: You cannot modify columns A-D. If you try to edit them in the file, Broadsign will revert them to what was imported from our Content and Network Management solution. |
||
| A |
id |
Unique identifier for your screen. This parameter cannot be edited in the Broadsign Platform. Changes must be done in our Content and Network Management solution. Example: 0a123b4c-56de-7f89-8043-26f93626bf03 |
| B | display_unit_id |
The ID of the corresponding display unit screen in our Content and Network Management solution. This information is optional. This parameter cannot be edited in the Broadsign Platform. Changes must be done in our Content and Network Management solution. |
| C | address |
Address of the screen taken from the Display Unit. This parameter cannot be edited in the Broadsign Platform. Changes must be done in our Content and Network Management solution. Example: 21 Greens Road RD 2 Ruawai 0592 |
| D |
internal_name |
Name of the screen autogenerated based on the Display unit name and Frame name. See Screen Naming. This parameter cannot be edited in the Broadsign Platform. Changes must be done in our Content and Network Management solution. |
| E | buyer_facing_name |
A short and descriptive name of the screen or face (location, specialty, etc.). It must be unique. Example: Times Square Screen |
| F | venue_type_id |
Venue type ID. See options in Venue Types. Example: 80701 |
| G | allowed_ad_types |
Ad types supported by the Broadsign Platform. If more than one type is supported, use a ";" to separate them.
Example: static;video;html |
| H | motion_allowed |
Whether or not motion type content is allowed to play on this screen. Example: true |
| I | min_ad_duration_ms |
Minimum ad slot length in milliseconds. It must be a value higher than 0. Example: 10000 |
| J | max_ad_duration_ms |
Maximum ad slot length in milliseconds. It must not be lower than the Min Ad Duration value. Example: 30000 |
| K | floor_cpm_usd |
Screen CPM floor in US dollars. This is an information field where the publisher should add an average CPM for the screen. Actual pricing will be set at the deal ID level. Example: 10 |
| L | floor_cpm_eur |
Screen CPM floor in Euros. This is an information field where the publisher should add an average CPM for the screen. Actual pricing will be set at the deal ID level. Example: 10 |
| M | floor_cpm_gbp |
Screen CPM floor in British pounds. This is an information field where the publisher should add an average CPM for the screen. Actual pricing will be set at the deal ID level. Example: 10 |
| N | floor_cpm_aud |
Screen CPM floor in Australian dollars. This is an information field where the publisher should add an average CPM for the screen. Actual pricing will be set at the deal ID level. Example: 10 |
| O | floor_cpm_cad |
Screen CPM floor in Canadian dollars. This is an information field where the publisher should add an average CPM for the screen. Actual pricing will be set at the deal ID level. Example: 10 |
| P | open_exchange_enabled |
Whether this screen is transactable on our Programmatic Campaigns solution's Open Exchange. If enabled, floor prices are taken directly from the screen object, screens will be visible to integrated DSPs and transactable without a Deal ID. Supported enable values are:
Supported disable values are:
|
| Q | audience_sources |
Name of the audience data source, separated by ";". See Audience Sources for supported sources. Example: ACI;Blimp |
| R | audience_type |
General descriptor for the type of audience being used:
|
| S | average_weekly_impressions |
Estimated average weekly total impressions. It must be a value higher than 0. This value is calculated automatically by using the next four weeks worth of data to calculate how many impressions are delivered on a weekly (7 days) basis. This value is used by DSPs to plan their campaigns. Example: 1000 |
| T | average_impression_multiplier |
Average impression multiplier for the screen, as in the average amount of viewable impressions per ad slot. |
| U | dma_code |
Designated Market Area (Nielsen measurement). Applicable only to US networks. Example: 501 |
| V | bearing |
Facing direction of the screen or face, in degrees. Select between N, NE, E, SE, S, SW, W, and NW. Example: NE |
| W | diagonal_size |
Diagonal size of the screen in the measurement unit defined in Diagonal Size Unit. It must be a value higher than 0. |
| X | diagonal_size_unit |
Measurement unit for the diagonal size of the screen. Select between:
Example: in |
| Y | screen_image_urls |
URL to fetch an image of the screen. The URL must point to a valid Direct Hosted Image URL and not a link to the website containing the image. You can add multiple URLs by separating them with a semicolon (";"). Valid URL Examples:
Invalid URL Example:
|
| Z | reference_id |
Field available to the Publisher in which they can insert a reference ID for this screen. The field is limited to 255 characters. |
| AA | screen_type_id |
Type of the screen used. The screen type is used to assist with Broadsign’s sustainability efforts. Accepted values are:
Example: 101 |
| AB | reach_device_id |
The original Reach Device ID available in the Programmatic Campaigns module before migrating to the Broadsign Platform. |
Once the screen data file has been properly filled out, you can import it into the Broadsign Platform. If you encounter issues when importing the file, contact Broadsign Services.
The Upload screen allows you to select your screen data file and upload it in the system.
To upload the screen data file:
- In the Update Inventory window, click Continue to Upload.
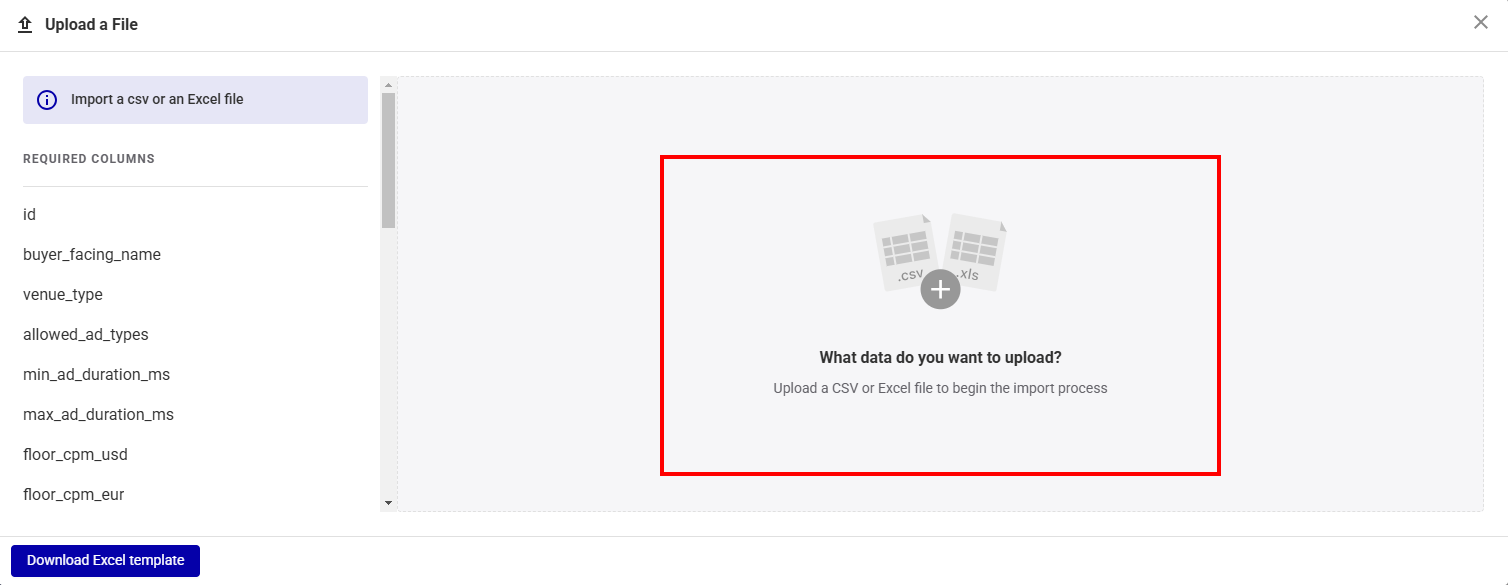
- Click anywhere in the right, grey part of the window.
- Navigate to your data file and select it.

The Upload a File window is displayed.
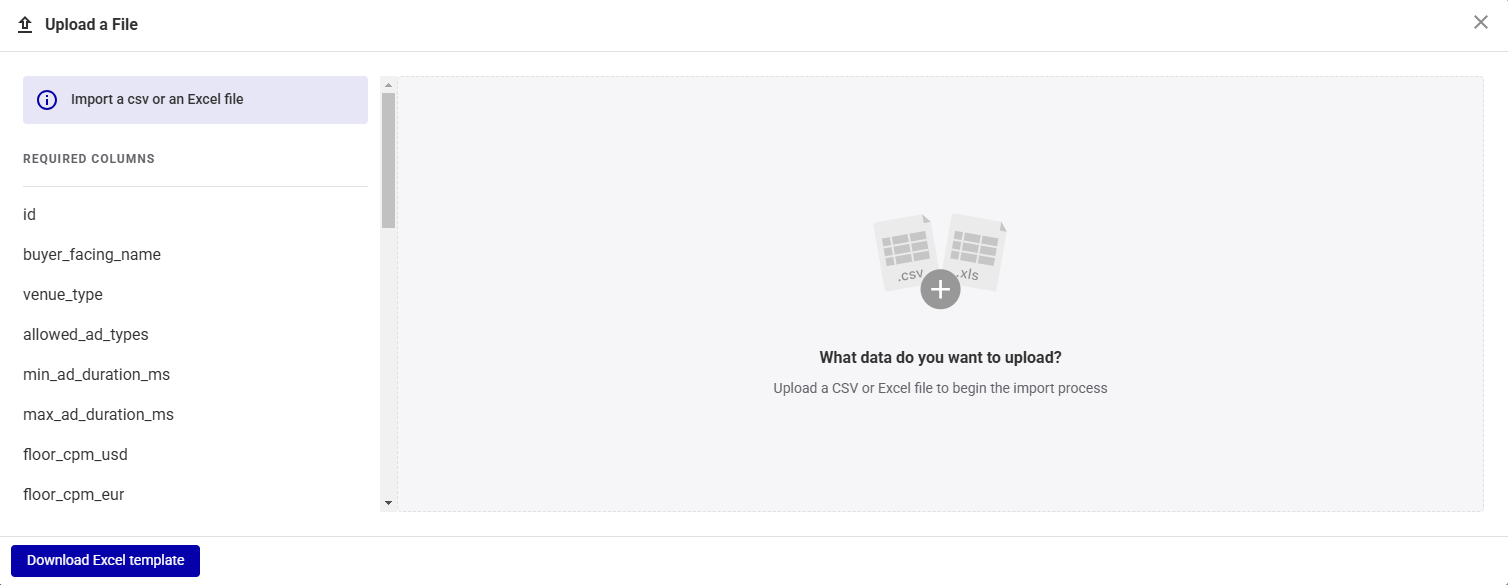
You can upload any .csv, .xls, or .xlsx file with any set of columns, as long as it has one record per row.
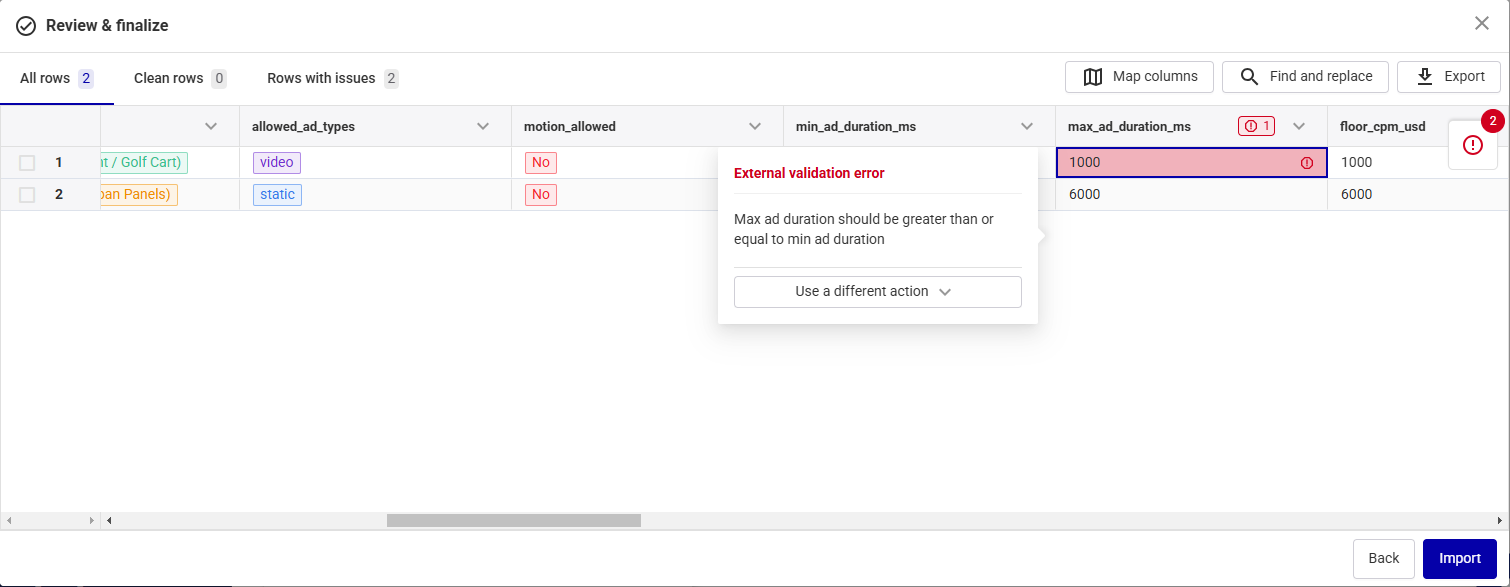
The Review & Finalize screen allows you to check the imported screen data to ensure accuracy

Review and Edit Data
You can do the following in the Review & Finalize screen:
- Edit Screen Data – Make changes to the screen data in the table by double-clicking the cell to edit. For information on the values accepted for each cell, see Inventory CSV File Column Details.
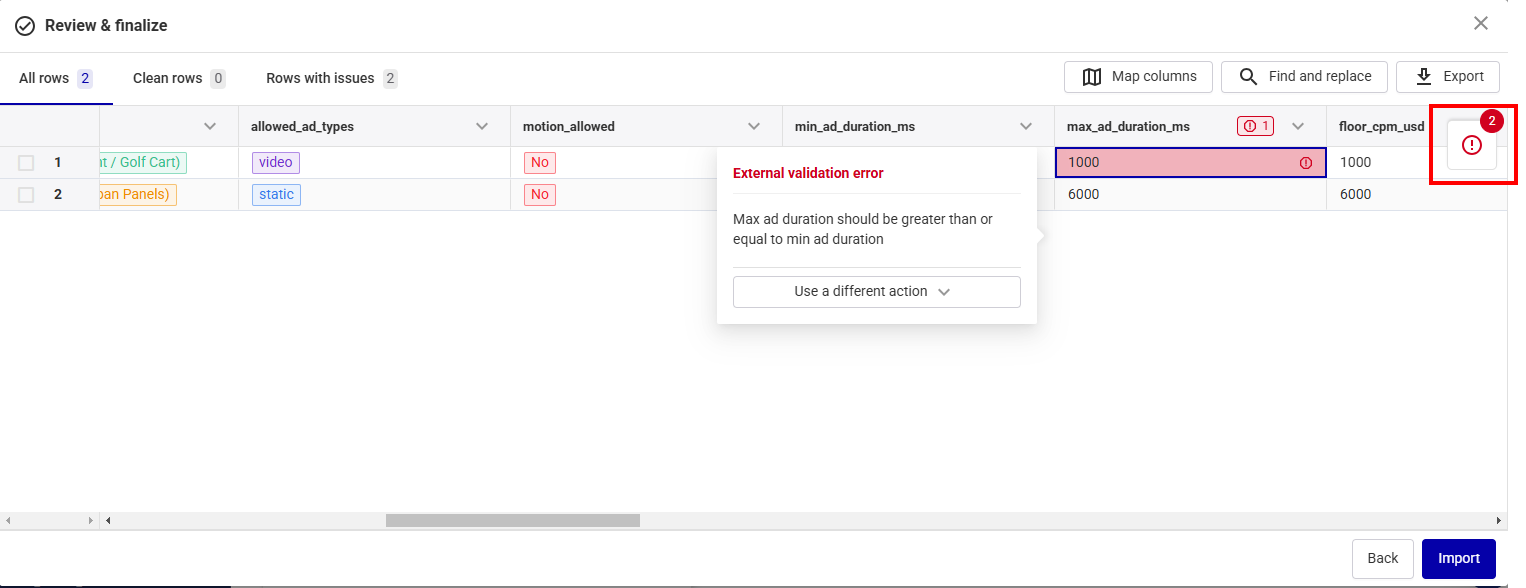
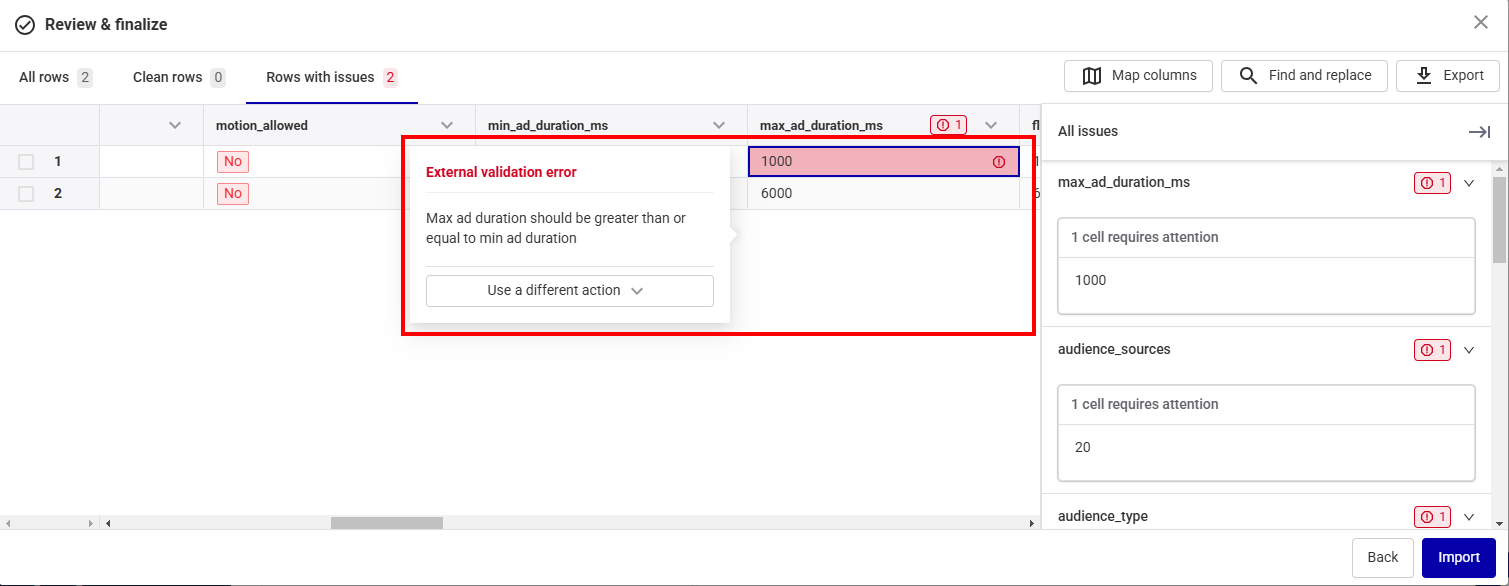
- Display Issues – Show only the rows with issues by clicking Rows with issues.
- In the main part of the Review & Finalize screen, where problematic cells are highlighted.
- In the All issues pane after clicking the red circle icon, which lists all issues. Clicking an issue automatically takes you to the corresponding cell in the imported file to fix it.
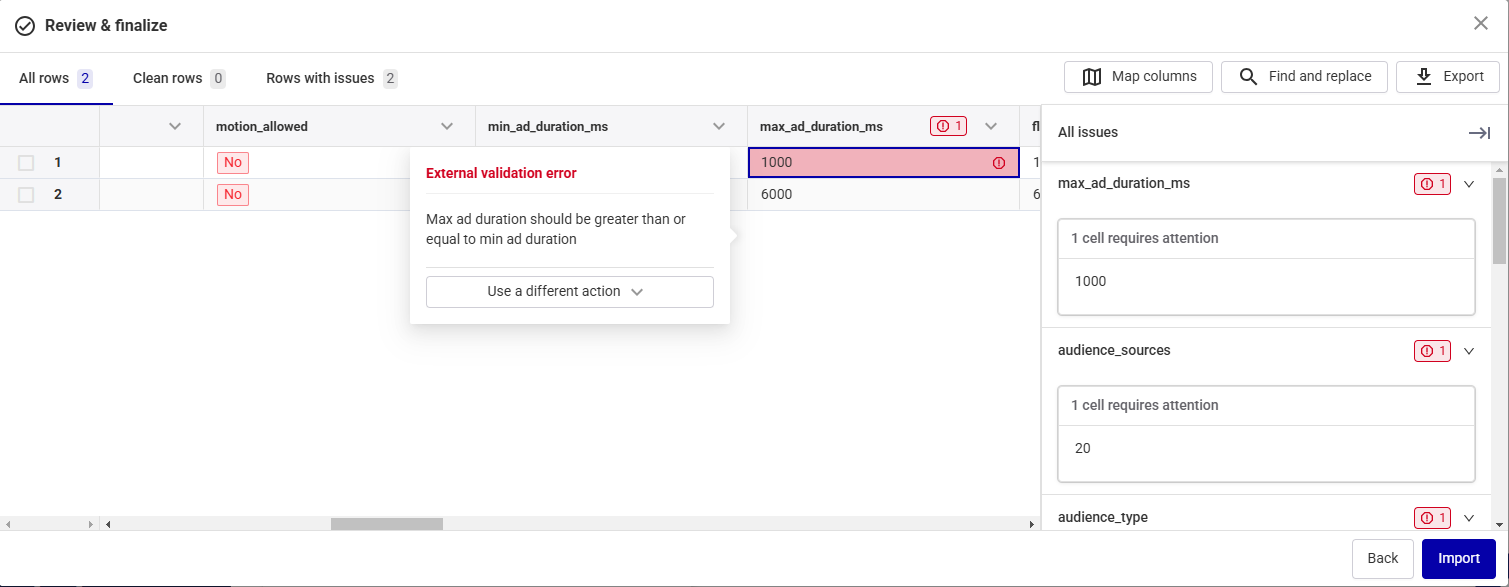
- Correct Errors – Correct a problematic cell:
- Click a cell with an issue to get information on the problem and correct it.
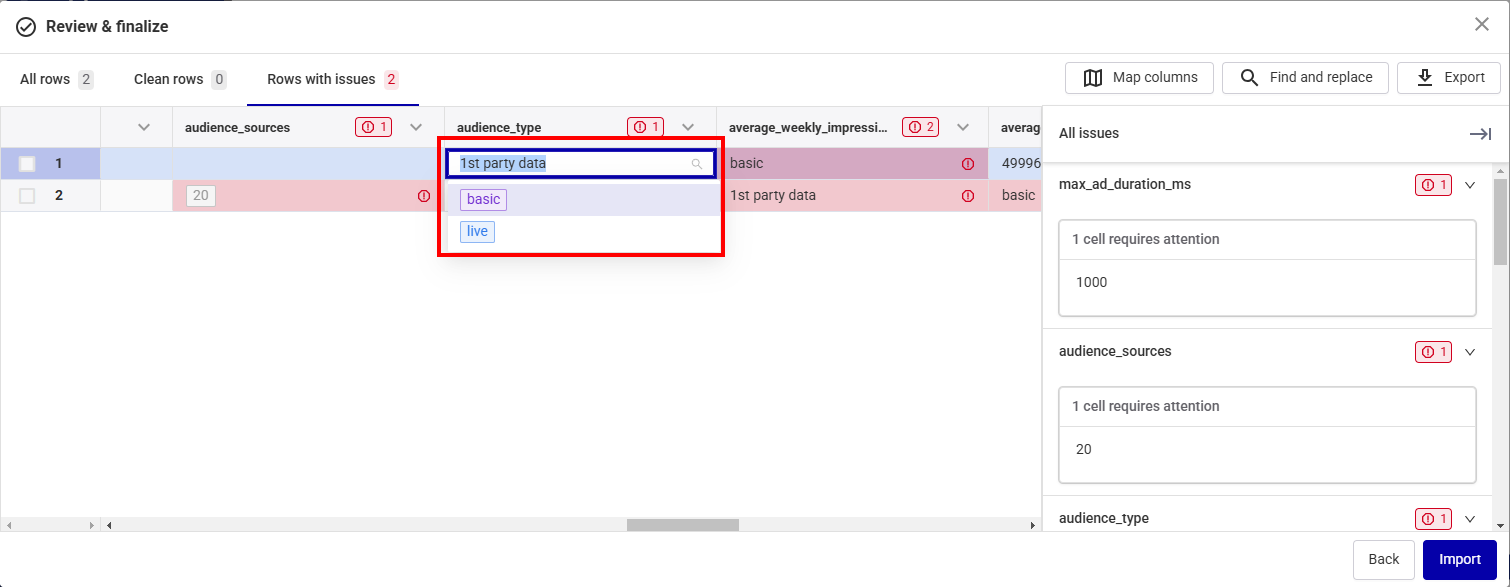
- Double-click a problematic cell to edit it. The cell displays the possible values.
- Enter Missing Data – If information is missing, type the correct value in the corresponding cell. The cell is displayed in red if you enter an incorrect format. A pop up explaining the issue appears. Use the pop up to correct the error.
- Map Columns – If one or more columns are not properly mapped, see Map Columns.

Issues in your imported file are displayed in red in two locations:
Map Columns
If columns are not mapped correctly, use the Map columns button. The Map columns pane shows if your data columns match the required template columns.
- If all columns match, click the Apply mappings button at the bottom of the screen.
- If columns do not match, select the corresponding column from the Template Columns drop-down menu and click Apply mappings.
-

- To exclude a column from your file, click the Delete icon next to it and then click Apply mappings.
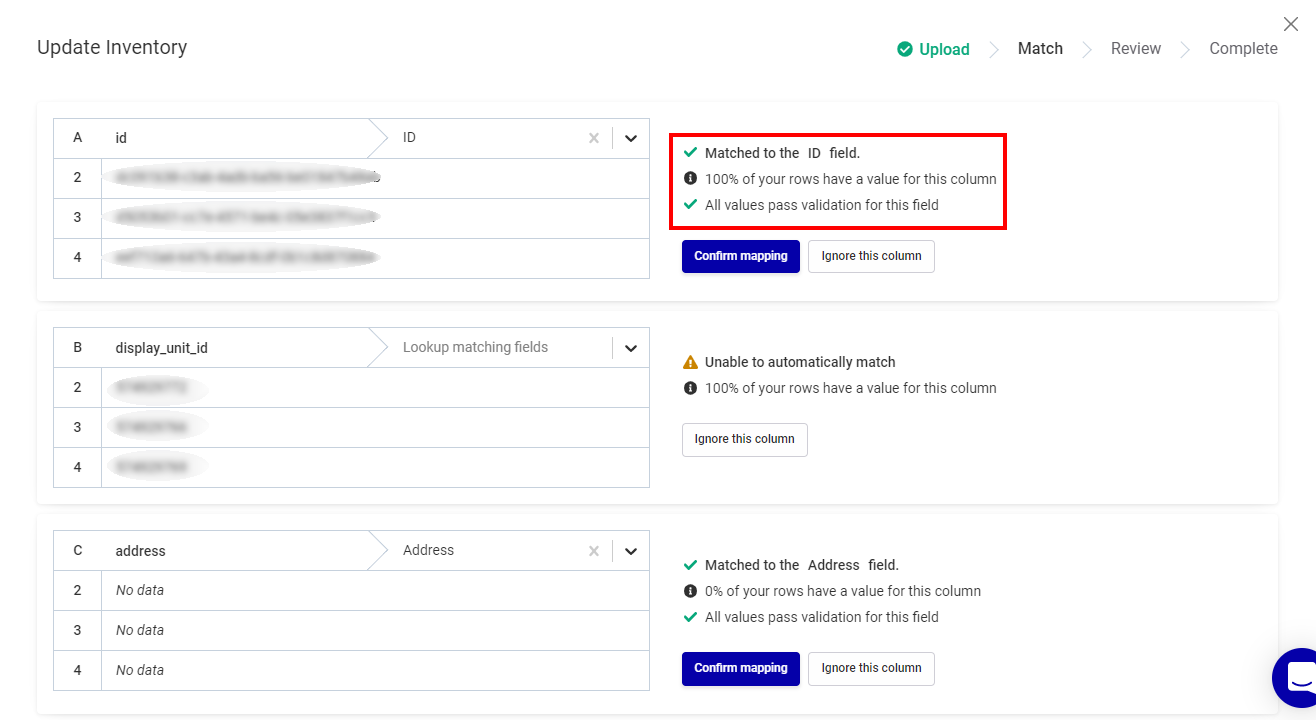
This is useful for templates with extra columns that are not provided by Broadsign.
Import Data
When finished, click the Import button.
If you still have issues in your data, the following window is displayed:

- Click Fix remaining errors to return to the Review & FInalize page and fix the issue.
- Click Import rows to go on with the import process. The row that contains the problematic data will be discarded and will not be imported. The valid rows will be imported.
The Broadsign Platform finishes the import process and displays your updated screen inventory.
Now that you have updated your screens inventory, you can do the following:

