This page describes how to manage Time groups in Broadsign Publish.
Note: The Domain Admin page can only be accessed by users assigned the Administrator page access. See Level of Access.
Note: Only users with the Can add time groups permission can create groups. By default, Network Operators have the permission. If you need this permission, contact your domain administrator. For more information, see Users and Groups Permissions.
Time Groups
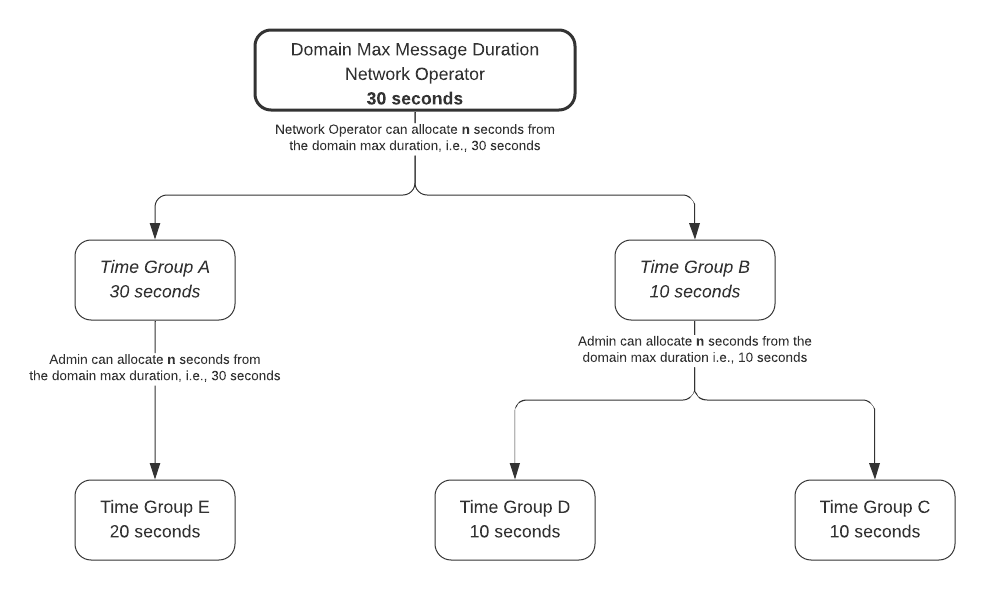
Time Groups allow Network Operators to control the maximum duration of messages that different users can create. This helps manage screen time and ensures fair usage across the network.
By default, Network Operators have the Can add time groups permission, which is required to create groups. These groups are typically assigned to Local Administrators, who can then redistribute the allocated time to their users.
Key Features
- Maximum Duration – Time Groups set a limit on the length of messages a user can create.
- Time Allocation – Network Operators can allocate different maximum durations to different users or user groups.
- Exclusive Membership – A user can belong to only one Time Group at a time. You can check a user's Time Group in the User settings (Manage Users)
- Duration Inheritance – The message duration value will be replaced by the Time Group value.
- Unused Time – If a user doesn't use all the allocated time in a message, the remaining time is still available for them in the loop.
- Domain Maximum – Users without a Time Group assigned can create messages up to the domain's maximum message duration. See Set the Maximum Message Duration for more details.
Note: Messages created for Broadsign Control campaigns are not affected by the Time Group feature. For more details, see Manage Client Groups.
Example
Let's say that the Network Operator allocates 30 seconds to the Local Administrator. The Local Administrator can then redistribute 30 seconds in different scenarios, as illustrated below:
| Admin | Store-A | Store-B | Store-C |
| 30 s | 10 s | 10 s | 10 s |
| 30 s | 20 s | 5 s | 5 s |
| 30 s | 15 s | 1 s |
1 s |
If Store-A does not use all of the 20 seconds allocated in a message, more messages can play in the loop.
| Message-1 | Message-2 | Message-3 | Message-4 |
| 20 s | 0 s | 0 s | 0 s |
| 10 s | 5 s | 5 s | 5 s |
| 5 s | 5 s | 5 s | 5 s |
Any Network Operator and user with the Can add time group permission can identify users and assign them to a Time group.
To add a Time group:
-
On the Broadsign Publish interface, click the Publish Admin link at the top right of the window.
The Domain Dashboard opens:
-
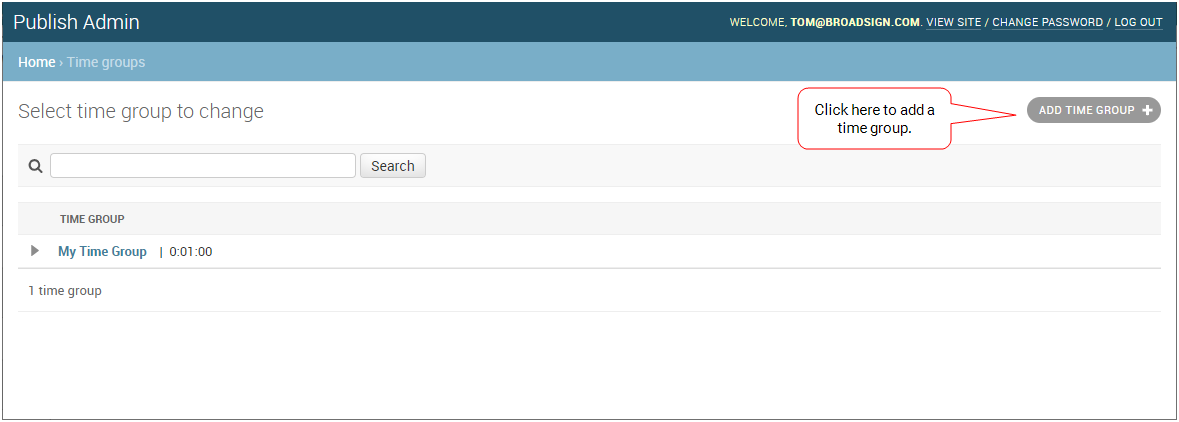
Under Resources, click Time Groups. The Time Groups page opens. If you have existing time groups and child time groups, they are listed here. You can click the arrow on the left to see child time groups.
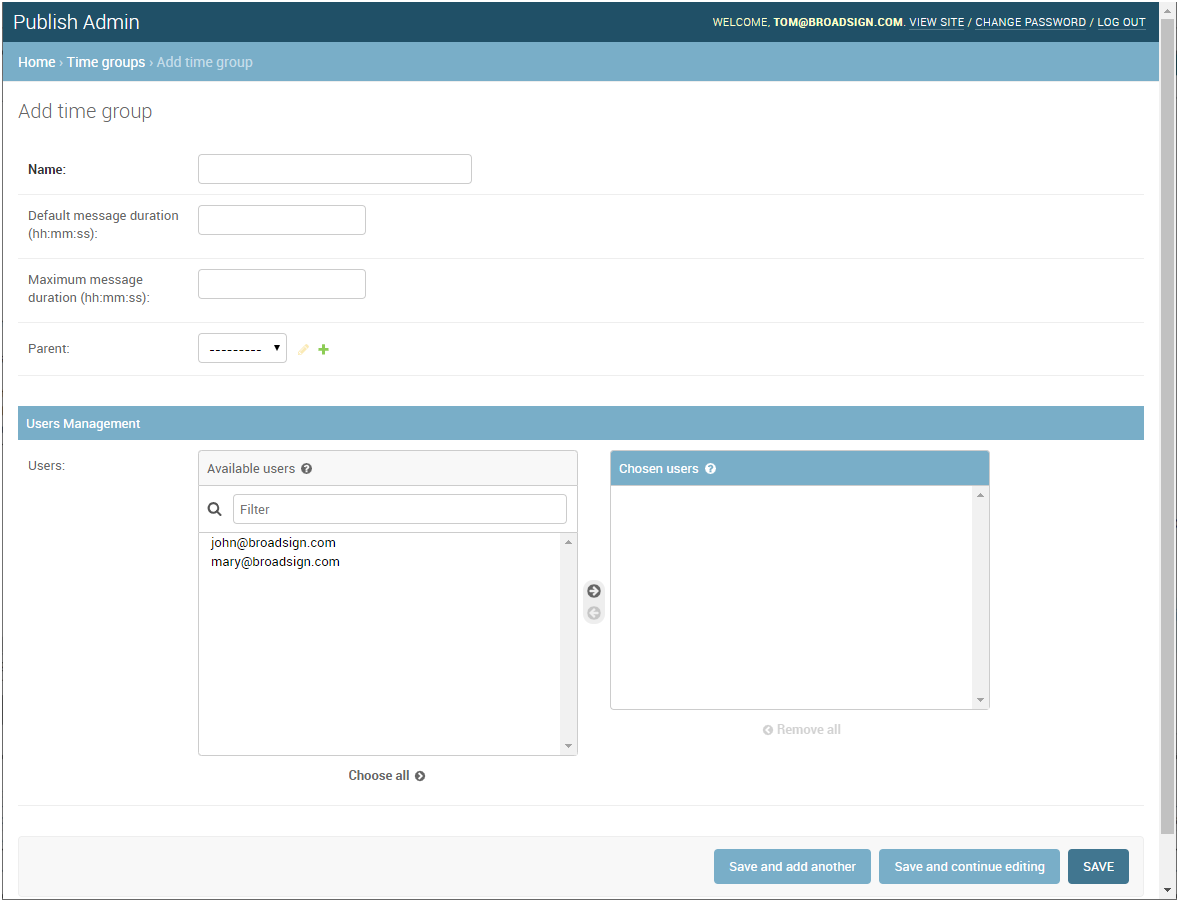
- To add a group, in the top-right corner click Add Time Group. The Add Time Group page opens.
- Enter the Name of the group.
- Set the following parameters for this group:
- The Maximum message duration of the parent time group, or
- The maximum message duration of the domain, if there is no parent time group. See Set the Maximum Message Duration for more details.
- Add Users to the group by using the right arrow or double-clicking the user. If you want to add all users, click Choose all.
- Click one of the Save buttons:
- Save and add another: Saves the current group settings and prompts you to add another.
- Save and continue editing: Saves the current group settings and allows you to continue editing it.
- Save: Saves your changes and returns you to the Groups page.
| Parameter | Description |
| Default message duration | This is the message duration that is assigned to messages created by the users of the group. This value must have the following format: hh:mm:ss. It cannot exceed the Maximum message duration. |
| Maximum message duration |
Ensures that content uploaded by users does not run longer than the allocated duration in Broadsign Publish. The duration must be equal to or shorter than the maximum duration that has been allocated, which is either: |
If a user is not listed, that is because this user is already in a time group. A user can be in only one time group at a time. You can check to which time group this user belongs in the User settings (Manage Users).
You can edit a Time group's information at any time.
To edit a group:
-
On the Broadsign Publish interface, click the Publish Admin link at the top right of the window.
The Domain Dashboard opens:
- Under Resources, click Time Groups. The Time Groups page opens. If you have existing time groups, they are listed here.
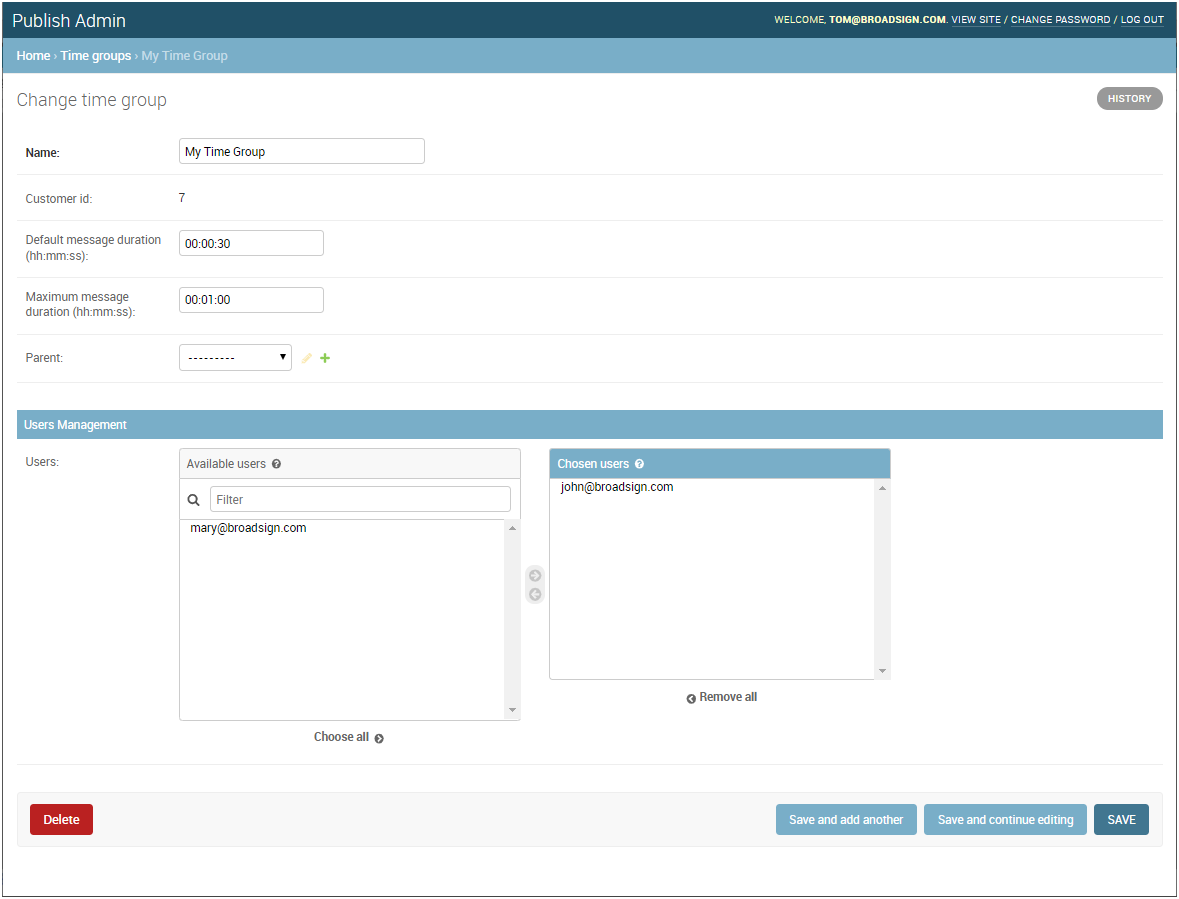
- Click the name of the group that you want to modify. The Change Time Group page opens.
- Change the following information, if applicable:
- Name: Name the group.
- Default message duration: Default message duration value in the following format: hh:mm:ss.
- Maximum message duration: Maximum message duration value in the following format: hh:mm:ss.
- Users: Modify users in the group by using the left and right arrows. If you want to add all users, click Choose all.
- If you want to delete the group, click Delete.
- Click one of the Save buttons:
- Save and add another: Saves the current group settings and prompts you to add another.
- Save and continue editing: Saves the current group settings and allows you to continue editing it.
- Save: Saves your changes and returns you to the Groups page.
You can delete a Time group at any time. When a Time group is deleted, the users associated with it are released and available for other Time groups.
To delete a time group:
-
On the Broadsign Publish interface, click the Publish Admin link at the top right of the window.
The Domain Dashboard opens:
- Under Resources, click Time Groups. The Time Groups page opens. If you have existing time groups, they are listed here.
- Click the name of the group that you want to delete. The Change Time Group page opens.
- Click the Delete button.
A confirmation page is displayed. Review the impacts of removing the group. If everything is correct, click Yes, I'm sure.
The group is deleted.


