This page describes how to change the domain settings.
Note: The Domain Admin page can only be accessed by users assigned the Administrator page access. See Level of Access.
It is possible to change some of your domain configuration parameters:
- The default duration of a message in Broadsign Publish (see Set the Default Message Duration)
- The maximum duration of a message in Broadsign Publish (see Set the Maximum Message Duration)
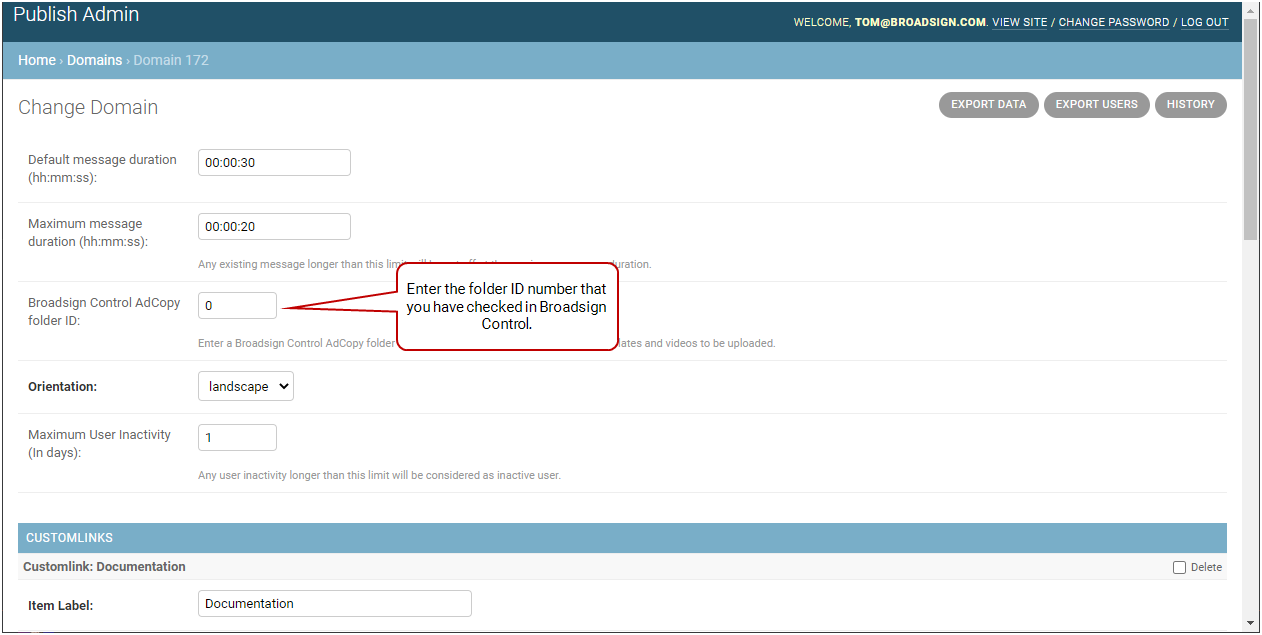
- The Broadsign Control Ad Copy folder where uploaded content in Broadsign Publish is placed (see Define the Broadsign Control Ad Copy Folder ID)
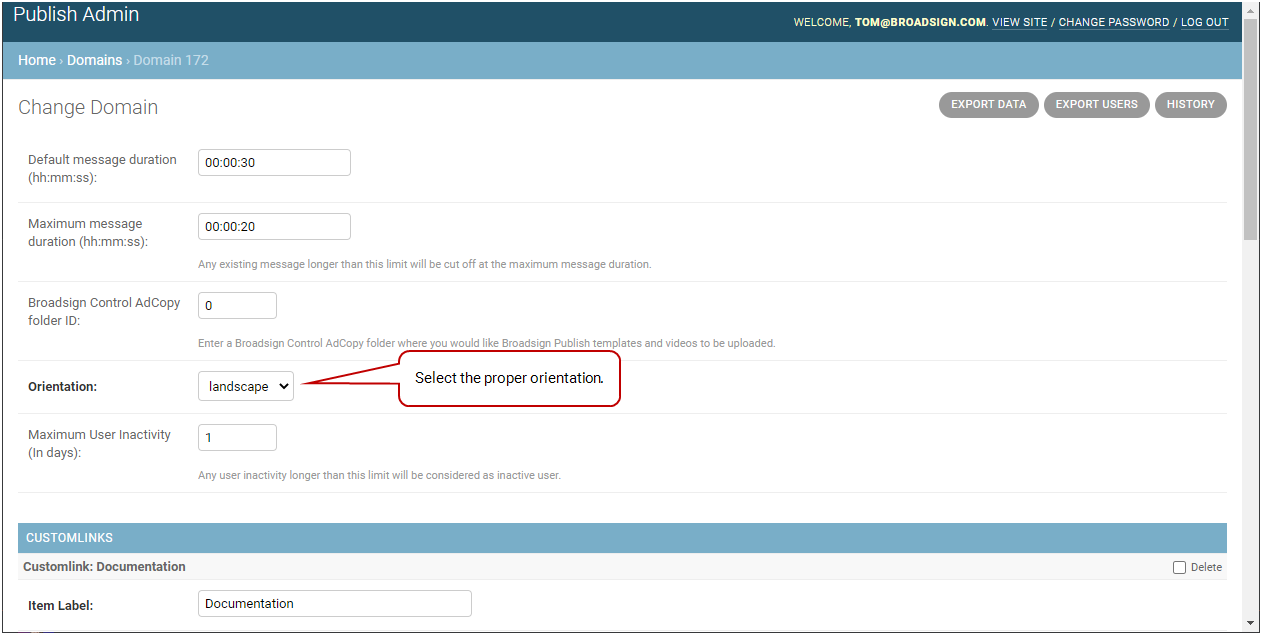
- The default preview orientation for your domain (Set the Default Preview Orientation)
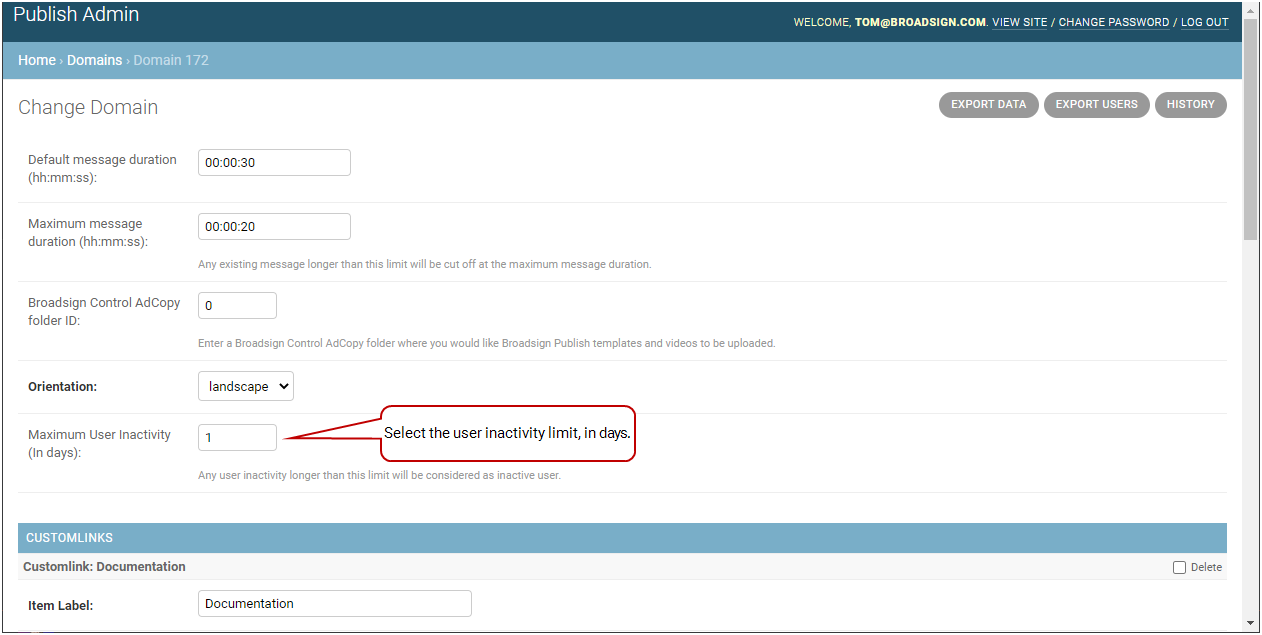
- The user inactivity limit (Set the User Inactivity)
- Enable or disable content that can be tagged as available when scheduling messages (Enable Content to be Tagged for Message Creation)
- Enable or disable Multi-Factor Authentication (MFA) support (Enable MFA Support)
- Add custom links (such as a link to Broadsign Publish Documentation) in the Broadsign Publish interface (see Add Custom Links)
- Add a list of email contacts that will receive a notification when an emergency message is activated (see Emergency Messaging Contact List)
When a user creates a message, Broadsign Publish offers a default message duration value in the Schedule page:
It is possible to change that default value.
For more details on message creation, see Message Creation Tutorial.
To change the default message duration:
-
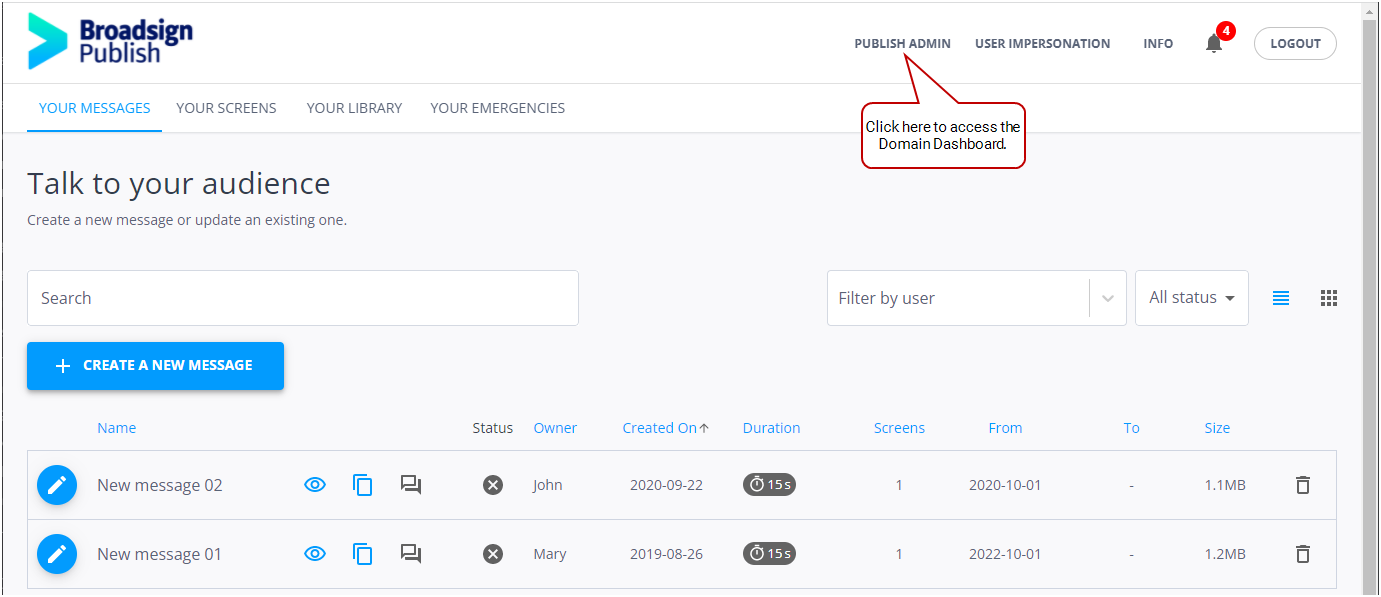
On the Broadsign Publish interface, click the Publish Admin link at the top right of the window.
The Domain Dashboard opens:
- Under Accounts, click Domains.
- Click your domain.
- Enter a new value in the Default message duration field.
-
Click one of the Save buttons:
- Save and continue editing: Saves the current domain settings and allows you to continue editing it.
- Save: Saves your changes and returns you to the Select Domain to change page.
The Select Domain to change page is displayed.
The Change Domain page is displayed.
This value must have the following format: hh:mm:ss.
Maximum Message Duration
The maximum message duration ensures that content uploaded by users does not run longer than the allotted duration in Broadsign Publish. Any existing message longer than this limit will be cut off at the maximum message duration.
Note: The maximum message duration does not apply to emergency messages and messages created for Broadsign Control campaigns. For more details, see Manage Client Groups.
When scheduling a message with content that is longer than the maximum message duration value, or uploading content that is longer than the maximum message duration value, the following warning is displayed:
Warning: Your message playback will be cut off at the maximum message duration ([Maximum Message Duration Value] seconds).
When scheduling a message with content that is shorter than the maximum message duration value, or uploading content that is shorter than the maximum message duration value, the message plays according to its shorter version, and then the next message plays in turn.
To change the maximum message duration:
-
On the Broadsign Publish interface, click the Publish Admin link at the top right of the window.
The Domain Dashboard opens:
- Under Accounts, click Domains.
- Click your domain.
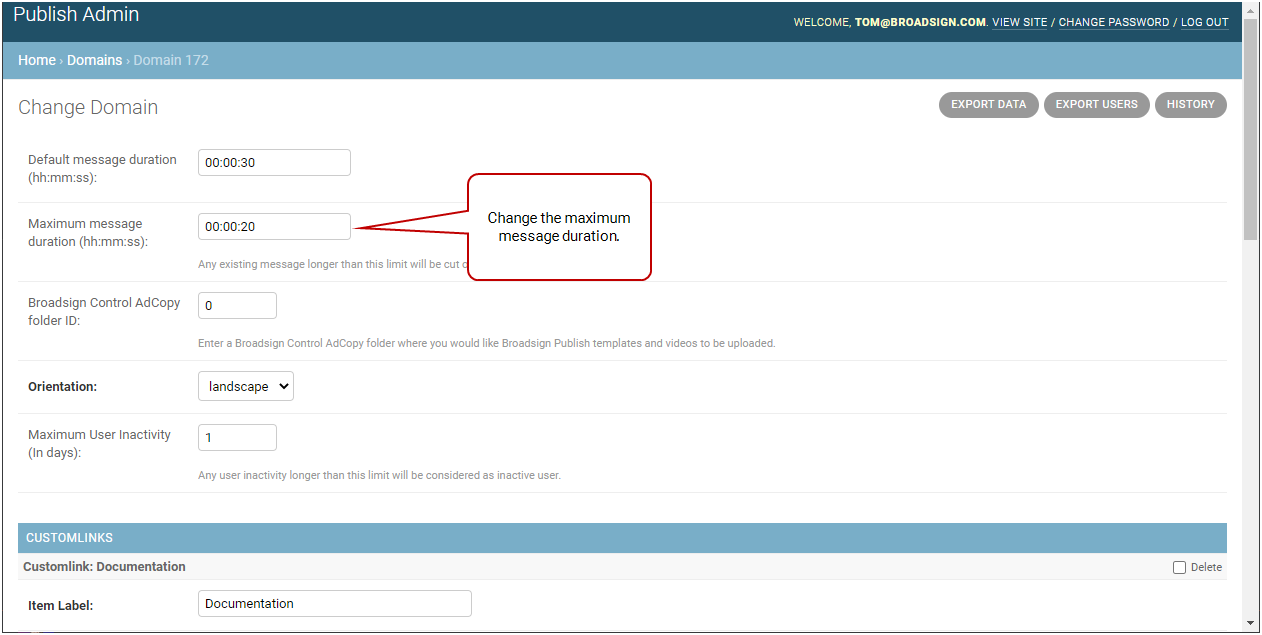
- Enter a new value in the Maximum message duration field.
-
Click one of the Save buttons:
- Save and continue editing: Saves the current domain settings and allows you to continue editing it.
- Save: Saves your changes and returns you to the Select Domain to change page.
The Select Domain to change page is displayed.
The Change Domain page is displayed.
This value must have the following format: hh:mm:ss.
By default, all templates and videos uploaded in Broadsign Publish are also uploaded to the root Ad Copy folder in Broadsign Control. You can create your own Ad Copy folder in Broadsign Control and instruct Broadsign Publish to upload the content there.
You will need the ID number of an Ad Copy folder in Broadsign Control.
Note: Only new content uploaded after you set the folder ID will be uploaded to the folder. Existing content will not be moved.
To find the Ad Copy folder ID in Broadsign Control:
- Open Broadsign Control.
- From the resource tabs on the left, select Ad Copies.
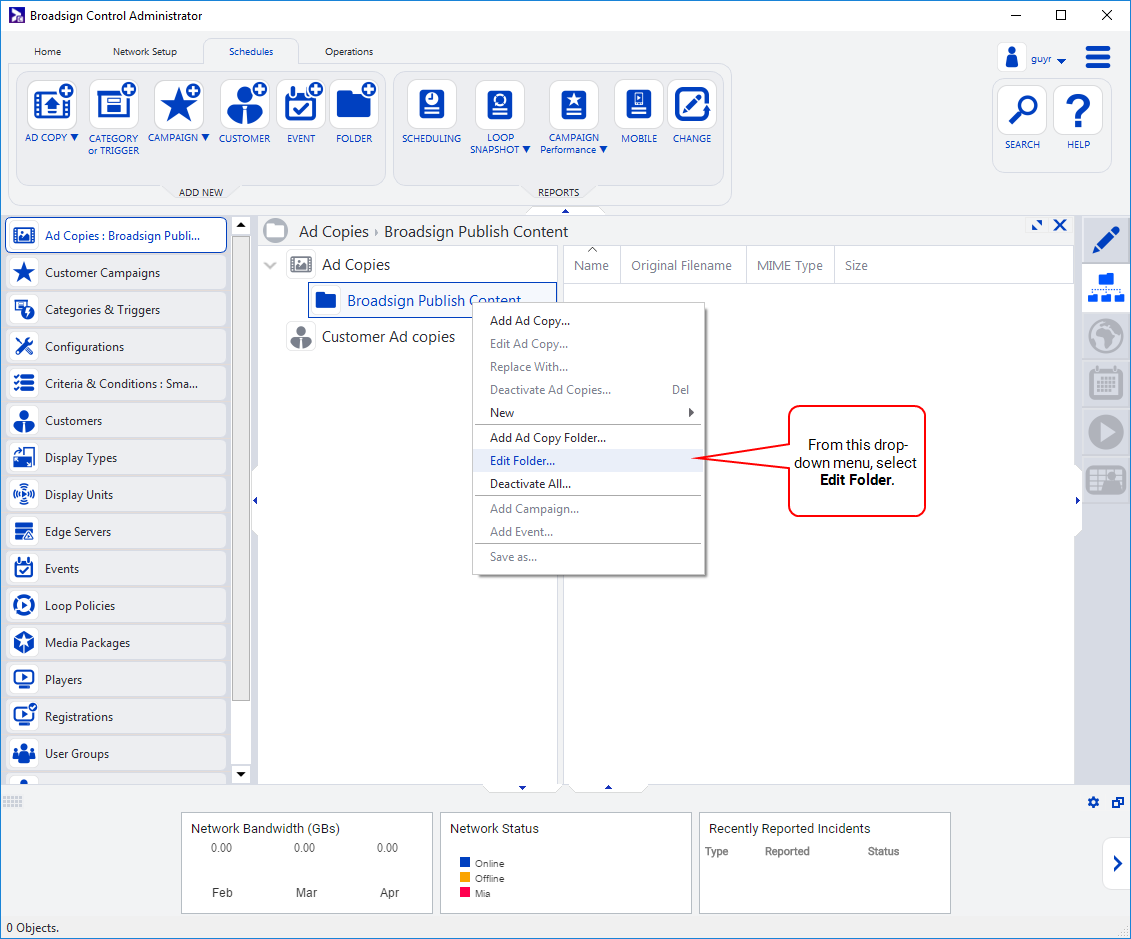
- In the work area, right-click the folder where you want the Broadsign Publish content to be uploaded. From the contextual menu, select Edit Folder.
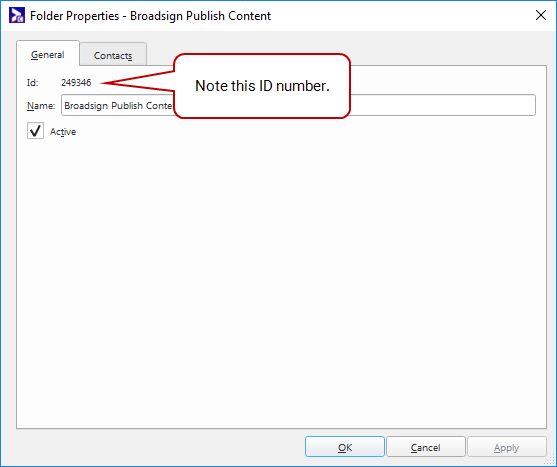
- Note the Id number of the folder.
The Folder Properties window is displayed.
If you need to create a folder, see Ad Copies in the Broadsign Control documentation for more details.
To define the Ad Copy folder ID in Broadsign Publish:
-
On the Broadsign Publish interface, click the Publish Admin link at the top right of the window.
The Domain Dashboard opens:
- Under Accounts, click Domains.
- Click your domain.
- Enter the Ad Copy folder ID that you have checked in Broadsign Control in the Broadsign Control Ad Copy folder ID field.
-
Click one of the Save buttons:
- Save and continue editing: Saves the current domain settings and allows you to continue editing it.
- Save: Saves your changes and returns you to the Select Domain to change page.
The Select Domain to change page is displayed.
The Change Domain page is displayed.
When your users are previewing messages (Preview a Message) and content (Preview Content), they can switch from Portrait to Landscape mode.
However, if your users have displays exclusively in Portrait or Landscape, you can configure the default orientation for your domain. Landscape mode is the default mode.
To set the default preview orientation for your domain:
-
On the Broadsign Publish interface, click the Publish Admin link at the top right of the window.
The Domain Dashboard opens:
- Under Accounts, click Domains.
- Click your domain.
- Set the Orientation drop-down menu with the proper value.
-
Click one of the Save buttons:
- Save and continue editing: Saves the current domain settings and allows you to continue editing it.
- Save: Saves your changes and returns you to the Select Domain to change page.
The Select Domain to change page is displayed.
The Change Domain page is displayed.
The Insight page lists users that have not logged in or published a message in a number of months (Inactive Users). You can define this period of inactivity.
To set the user inactivity limit:
-
On the Broadsign Publish interface, click the Publish Admin link at the top right of the window.
The Domain Dashboard opens:
- Under Accounts, click Domains.
- Click your domain.
- Set the Maximum User Inactivity field with the proper value in days.
-
Click one of the Save buttons:
- Save and continue editing: Saves the current domain settings and allows you to continue editing it.
- Save: Saves your changes and returns you to the Select Domain to change page.
The Select Domain to change page is displayed.
The Change Domain page is displayed.
Any user inactivity longer than this limit will be considered as inactive user.
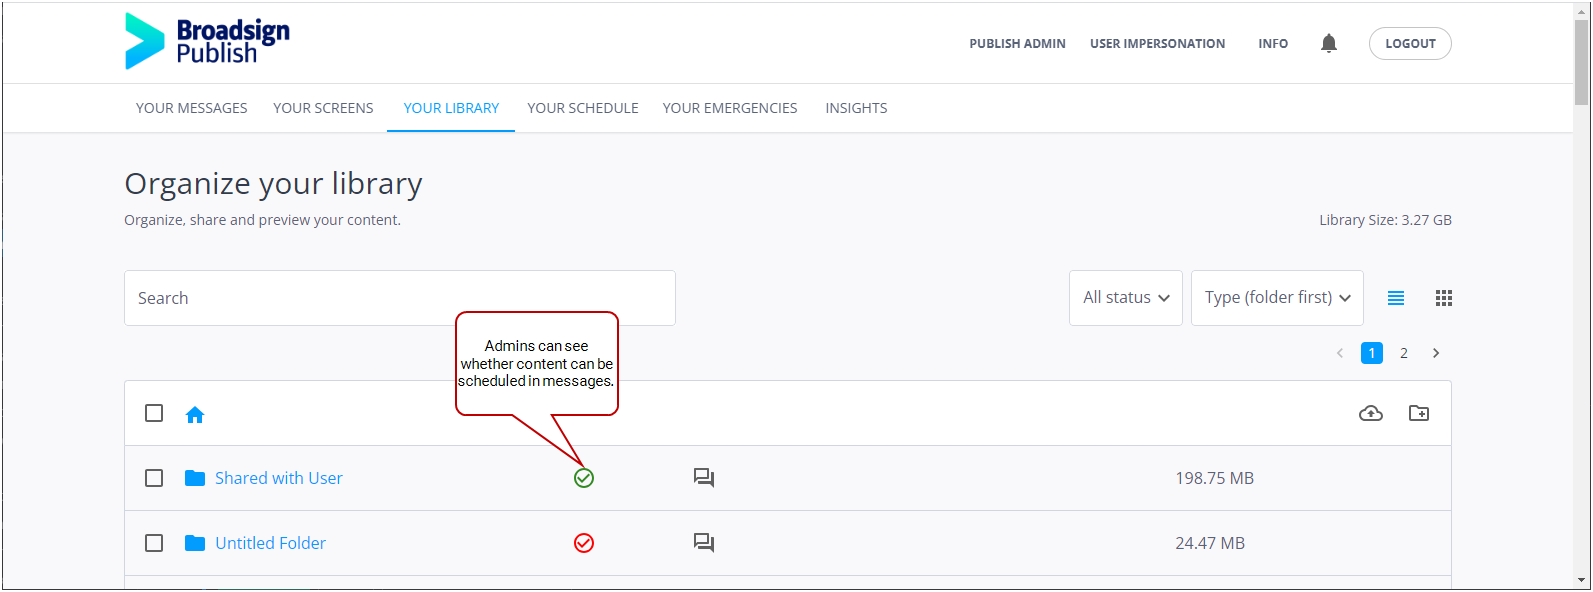
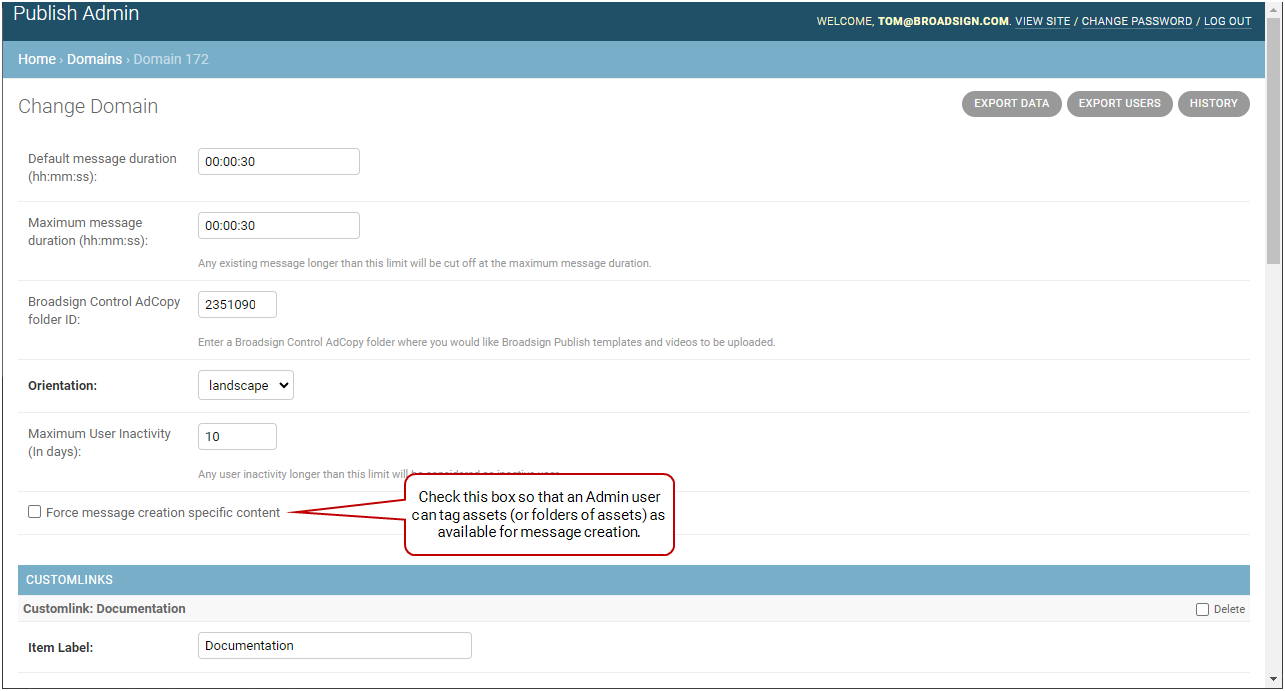
You can define whether it is possible for an Admin user to tag folders of assets, so that all assets in the folder can be used when creating messages.
When the Admin's users create messages, they will be able to use only the content that was allowed. For example, an Admin could decide to make only specific templates available.
For more details on how an Admin can set content to be available when creating messages, see Tag Content that can be Scheduled in Messages.
For more details on message creation, see Create a Message in an Existing Campaign.
To enable content to be tagged for message creation:
-
On the Broadsign Publish interface, click the Publish Admin link at the top right of the window.
The Domain Dashboard opens:
- Under Accounts, click Domains.
- Click your domain.
- Check the Force message creation specific content box.
-
Click one of the Save buttons:
- Save and continue editing: Saves the current domain settings and allows you to continue editing it.
- Save: Saves your changes and returns you to the Select Domain to change page.
The Select Domain to change page is displayed.
The Change Domain page is displayed.
Multi-Factor Authentication (MFA)
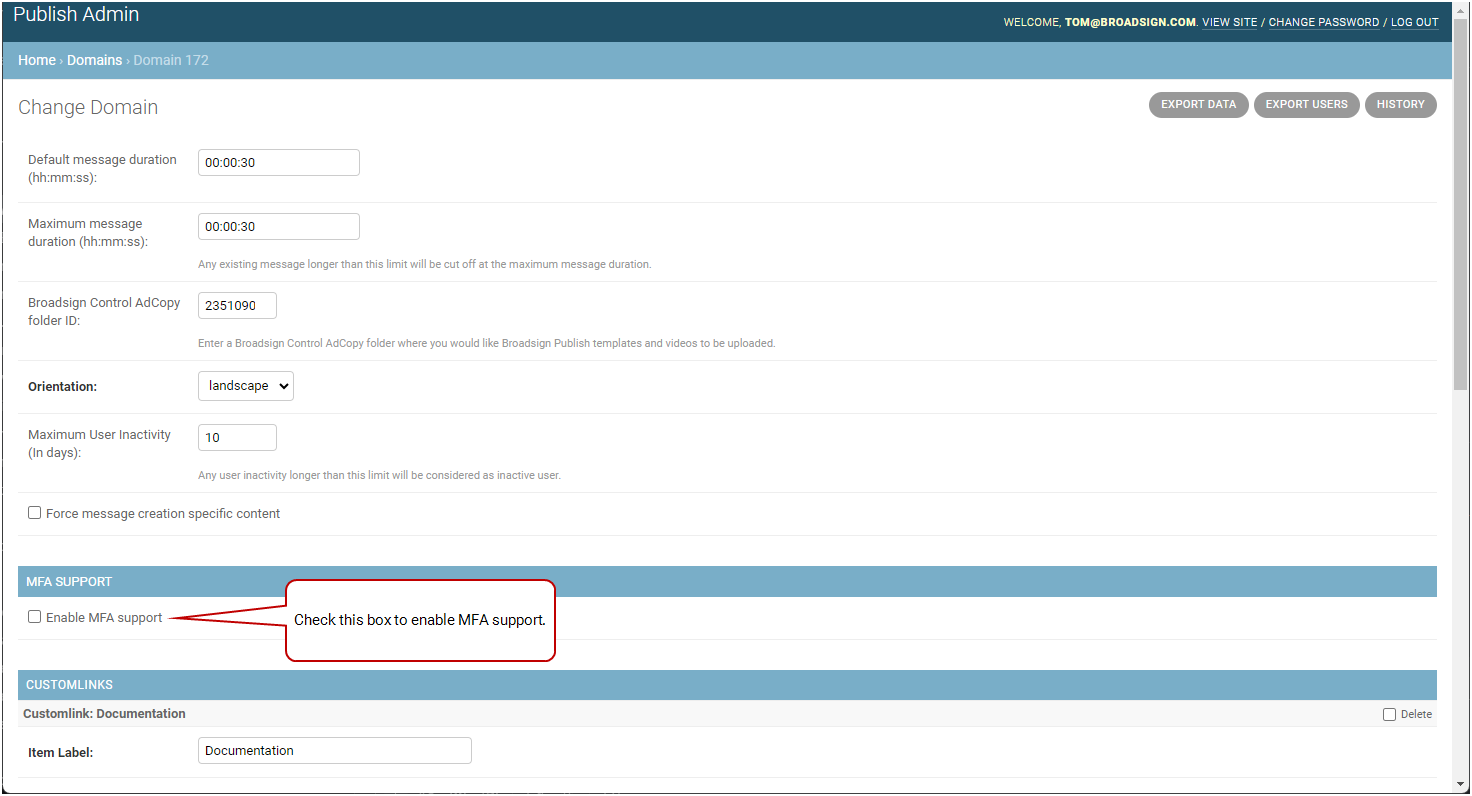
Multi-Factor Authentication (MFA) adds an extra layer of security to a user's account by requiring more than just their password to log in. You can enforce MFA, prompting users to enter a unique one-time code sent to their mobile phone via SMS. This helps prevent unauthorized access even if someone obtains your password.
Warning: Standard carrier fees may apply depending on your region or contract.
For more information, see Multi-Factor Authentication (MFA).
To enable MFA support:
-
On the Broadsign Publish interface, click the Publish Admin link at the top right of the window.
The Domain Dashboard opens:
- Under Accounts, click Domains.
- Click your domain.
- Check the Enable MFA support box.
-
Click one of the Save buttons:
- Save and continue editing: Saves the current domain settings and allows you to continue editing it.
- Save: Saves your changes and returns you to the Select Domain to change page.
The Select Domain to change page is displayed.
The Change Domain page is displayed.
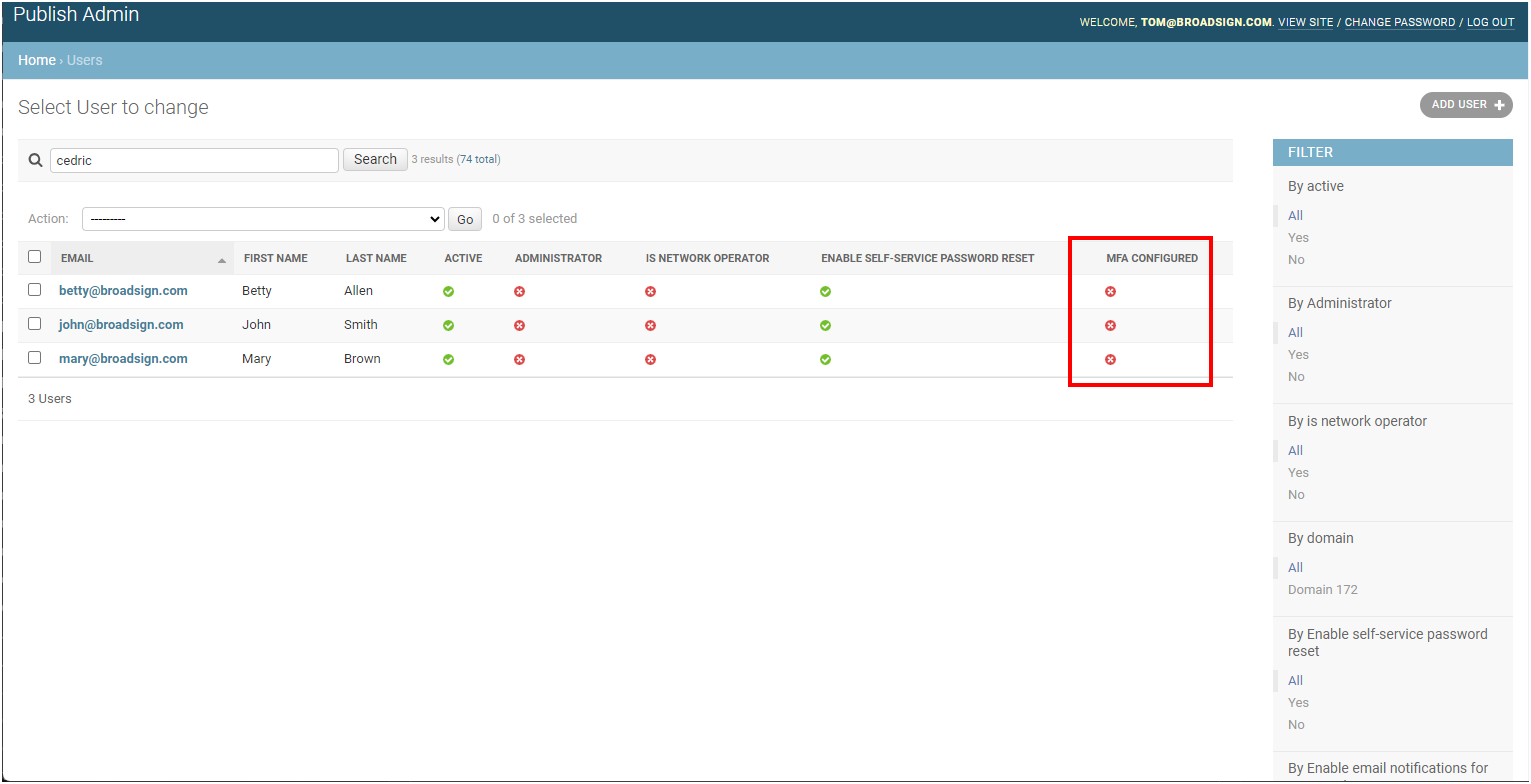
You can check which users have MFA configured by accessing the Users list page (see Manage Users for more details). The MFA Configured column displays whether users are using MFA.
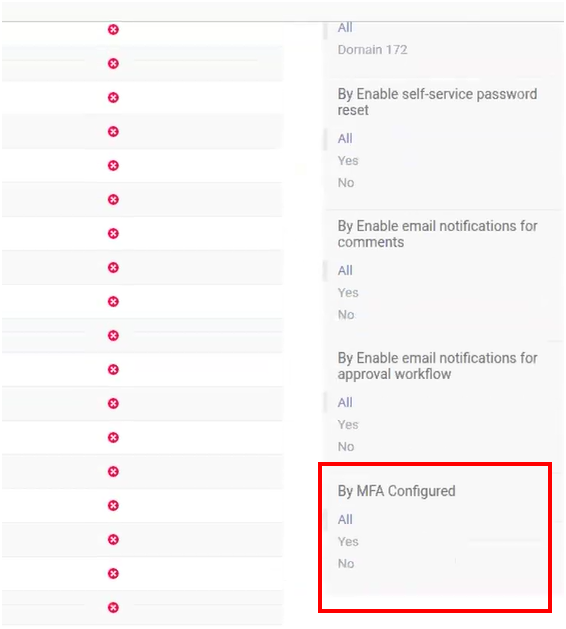
You can also use the By MFA Configured filter on the right to filter your users.
It is possible to add custom web links to the Broadsign Publish interface, for example:
- A link to the documentation.
- A link to an email address using the
mailto:<emailaddress>format. This may be used, for example, to email the Network Administrator for assistance.
The custom links are displayed in the top-right part of the interface under a drop-down menu called Info.
If an email address is clicked, the system will open the default email client with the correct email address in the To field, or open the system dialog to select an email client.
If there are no custom links defined, the Info drop-down menu is not displayed.
To add custom links:
-
On the Broadsign Publish interface, click the Publish Admin link at the top right of the window.
The Domain Dashboard opens:
- Under Accounts, click Domains.
- Click your domain.
- In the Custom Links section, enter the following information:
- Item Label: Name of the custom link, for instance, "Documentation".
- Item URL: Web or email address of the custom link.
- If you want to add another custom link, click Add another Custom Link and repeat the previous step.
-
Click one of the Save buttons:
- Save and continue editing: Saves the current domain settings and allows you to continue editing it.
- Save: Saves your changes and returns you to the Select Domain to change page.
The Select Domain to change page is displayed.
The Change Domain page is displayed.
For an email address, use the mailto:<emailaddress> format. For example, mailto:demo@abc.com.
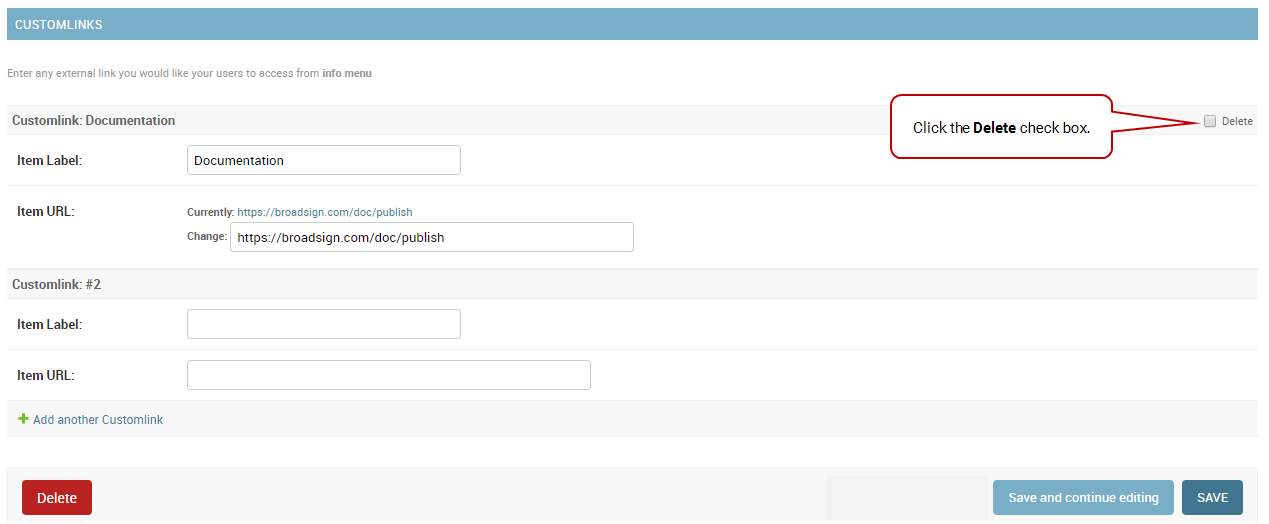
To delete a custom link:
- In the Custom Links section, click the Delete check box of the custom link that you want to remove.
-
Click one of the Save buttons:
- Save and continue editing: Saves the current domain settings and allows you to continue editing it.
- Save: Saves your changes and returns you to the Select Domain to change page.
It is possible to create a list of email contacts that will receive a notification when an emergency message is activated or deactivated (see Activate an Emergency Message). You can put any email contact, not just active Broadsign Publish users.
To add an email contact:
-
On the Broadsign Publish interface, click the Publish Admin link at the top right of the window.
The Domain Dashboard opens:
- Under Accounts, click Domains.
- Click your domain.
- In the Emergency Messaging section, enter the email of the contact that you want notified.
- If you want to add another contact, click Add another Contact and repeat the previous step.
-
Click one of the Save buttons:
- Save and continue editing: Saves the current domain settings and allows you to continue editing it.
- Save: Saves your changes and returns you to the Select Domain to change page.
The Select Domain to change page is displayed.
The Change Domain page is displayed.
To delete a contact:
- In the Emergency Messaging section, click the x icon of the contact that you want to remove.
-
Click one of the Save buttons:
- Save and continue editing: Saves the current domain settings and allows you to continue editing it.
- Save: Saves your changes and returns you to the Select Domain to change page.

