This quick start tutorial aims to introduce you to the process of creating messages in Broadsign Publish. By following these steps, you will be able to schedule a single piece of content on one of your screens.
Message
A message is piece of content assigned to a screen on a certain schedule. A message can target one or many screens at once; each message has its own schedule of when it will play.
You will be using the message wizard to schedule your content. If you need more information about the message wizard, refer to About the Message Wizard .
Note: Before you proceed with this tutorial, your administrator should have already completed the Quick Setup Tutorial.
Let's begin the tutorial to create your first message in Broadsign Publish!
To access the message wizard:
- Log in to Broadsign Publish with the credentials your Admin provided.
-
On the Messages or Emergencies page, select Create a new message.

The wizard opens on the Content page. You must select the content that you want to use for your message to continue with the wizard. For more information, see Step 1 – Select Content.

Tip: If the wizard opens on the Campaign, page, see Create a Message in an Existing Campaign.
Note: Once you have accessed a page in the message wizard, you can advance and reverse pages as needed with the Previous and Next buttons.
The Content page displays a list of content that you can use. Your admin has set up the list of available content for you in a shared folder.
For information on templates, see What is a Template?
For information on asset collections and how they can be useful, see What is an Asset Collection?.
To add content:
-
On the Messages or Emergencies page, click Create a new message.

The message wizard opens to the Content page.
-
Using the search function, narrow down your list of choices.
If the content you need is not in your library, do one of the following:
- If you lack the permissions to upload content, ask your domain Administrator to add the content on your behalf.
- If you have the permissions to upload content, add it yourself by clicking the
 icon to access content on your computer.
If you add content and you don't have the Can upload without approval permission, then your content will need to be approved before you can use it.

-
Select the content that you want.
- You can select one image, video, audio, or template for your message.
- When selecting a template, the editable information fields corresponding to this content are displayed on the right.

-
Update the fields, as required.

- If you have selected a template in which it is possible to enter text, you can use the [enter] key to put text on a new line.
- If you have selected a template in which it is possible to choose between the default video, image or audio file or pick a new one from your library, see New Video, Image or Audio Choice.
- If you have selected a template in which it is possible to choose an image or audio file from a list, see Image or Audio Choice from a List.

- When you have finished updating your fields, in the lower-right, click Next. The Screens page appears.
You can check how the content displays under various aspect ratios. See Aspect Ratio.
If the media file does not match the selected aspect ratio, it is cropped or white spaced.
Next, you will select a screen.
If your administrator has shared a template in which it is possible to choose between the default video, image or audio file, or pick a new one from your library, the Browse button is available.

Do the following:
- Click Browse.
- In the window that is displayed, select a video, image or audio file from your library.
If the content you need is not in your library, do one of the following:
- If you lack the permissions to upload content, ask your domain Administrator to add the content on your behalf.
- If you have the permissions to upload content, add it yourself by clicking the icon to access content on your computer.
If you add content and you don't have the Can upload without approval permission, then your content will need to be approved before you can use it.

- If you are using an image, use the top-right image thumbnail called Original to crop the image and move the result around to have the best fit possible. The result is previewed in the Preview thumbnail below.
- When you are satisfied with the result, click Use this One.
If your administrator has shared a template in which it is possible to choose a image or audio file from a list, a Image or Audio drop-down list is available.

Do the following:
- Click the drop-down menu.
- Select a image or audio from the list, depending on the template that you have selected.

The Screens page displays the screens available to you. Your message will appear on the screens you select.
Note: If you are unable to see a screen that you think should be on the list, contact your Administrator.
To select screens:
- Ensure that you are on the Screens page.
-
From the list of available screens, select the ones that you want.

You can:
- Select an individual screen by clicking its check box.
- Select an individual screen group that has been setup by your Network Operator by clicking its check box.
- Select multiple screens or screen groups by clicking each of their check boxes.
- Select multiple consecutive screens or screen groups by clicking the first screen, pressing Shift, and clicking the last screen.
- Select a folder by clicking its check box. All the screens in that folder will be selected.
- Select all screens and screen groups by clicking the check box above the list of screens.
- Filter screens based on their selection status (Selected & Unselected, Selected, and Unselected).

Your message will appear on the selected screens.
- To advance to the Schedule page, click Next.
Next, you will schedule the message.
The Schedule page differs depending on if you are creating a regular message or an Emergency message.
The Schedule page allows you to set the following information:
- The dates, times, and days of the week during which your message is scheduled to play.
- The message duration.
- The frequency of how often the message will play in comparison to others in the schedule.
To schedule your message:
- Ensure that you are on the Schedule page.
- Specific Dates (Default) – Set a specific start and end date by clicking the Specific button.
- No End Date – Click the No end button if you want your message to play indefinitely until you either provide specific start and end dates or choose to delete it.
- For this example, schedule the message with the following settings:
- Duration: 30s
- Custom Schedule: 01 July 2026 - 31 July 2026 (or whatever date range you prefer)
- Specific days: Sa-Su
- Hours: 9 - 5
- Set the playback frequency to "3".
- A
- B
- C
- A
- B
- A
- C
- A
- To advance to the Confirm page, click Next.

You have the following choice:
Note: If the message duration is read-only, it means that the template you are using has a predefined message duration already set by your administrator. For more information, see params.json Reference.
Note: You are unable to select a date in the past.

Message Playback Frequency
Message playback frequency is the number of times that the message will play per playlist compared to other messages, which play once by default.
Note: Only users with the Network Operator access or the Can manage message frequency permission can see the frequency selector. If you need this permission, contact your domain administrator. For more information, see Message Permissions.
This message will play 3 times per playlist while other messages play once.
For example, an Ad slot with the following messages:
If Message A has a playback frequency of 3 and the playlist order is set to random, the resulting playlist may look like:
If the playlist order is set to specific order, Message A will still play 3 times per playlist, but the placement will follow the defined sequence rather than being distributed randomly.
You can set the frequency from 1 to 6.
When scheduling a message with content that is longer than the maximum message duration value, or uploading content that is longer than the maximum message duration value, the following warning is displayed:
Warning: Your message playback will be cut off at the maximum message duration ([Maximum Message Duration Value] seconds).

When scheduling a message with content that is shorter than the maximum message duration value, or uploading content that is shorter than the maximum message duration value, the message plays according to its shorter version, and then the next message plays in turn.
Note: If your message is not playing according to the schedule that you have set up, contact your administrator.
When creating an emergency message, the Schedule page allows you to set the message duration, that is, when the emergency message should stop by itself.
Note: You can stop the emergency message manually at any time.
To schedule your emergency message:
-
Ensure that you are on the Schedule page.

- Specify when, in minutes, the emergency message should stop by itself.
- To advance to the Confirm page, click Next.
Note: If your message is not playing according to the schedule that you have set up, contact your administrator.
The Confirm page allows you to preview the message, check the number of screens, check the play frequency, and review the schedule.
If you are preparing an emergency message, you can also define an activation code in the Emergency SMS activation code field. This code is used to activate the emergency message by SMS. The activation code needs to be smaller than 100 characters. The code could be, for instance, FIRE.
For more information, see Activate an Emergency Message by SMS.

Note: The buttons offered at the bottom of the page differ depending on the permissions that have been assigned to you.
If you are satisfied with your message and its schedule, click one of the following buttons, depending on what is available on your screen:
Publish
You have the permission to publish a message without approval.
The Messages page opens and your new message appears in the list.

Approve & Publish
You have the permissions to approve a message and publish it.
The Messages page opens and your new message appears in the list.

Send for Approval
You do not have the permission to publish a message without approval. The Messages page opens and your new message appears in the list with the ![]() icon. Your admin will need to approve the message before it is published.
icon. Your admin will need to approve the message before it is published.

Prepare Message
You are preparing an emergency message. You cannot publish it right away. It can only be saved for later publishing when it is activated. For more information, see Activate an Emergency Message.
You can use the mobile version of Broadsign Publish to create a message directly from your mobile.
The message wizard steps are similar to those of the regular Broadsign Publish web page.
You will be able to upload a photo or video from your mobile and use it to create a message, as described in Upload a Photo or Video from a Mobile.
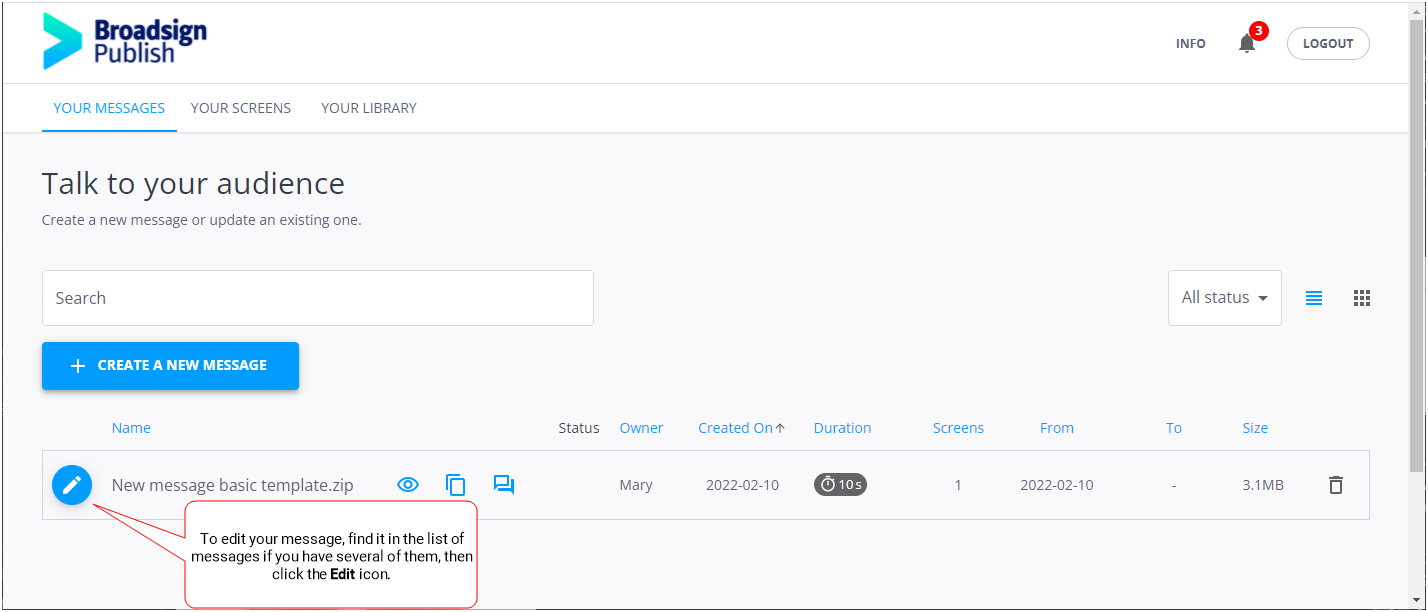
You can edit an existing message by clicking the ![]() icon next to it. The message wizard opens on the Content page. You can go through the four pages of the wizard and make any changes required.
icon next to it. The message wizard opens on the Content page. You can go through the four pages of the wizard and make any changes required.


