The purpose of this quick setup tutorial is to describe the basic steps in setting up your domain on Broadsign Publish.
Note: Only users assigned the Local Administrator or Network Operator role can access the domain dashboard. For more information, message your Broadsign contact.
Broadsign suggests to follow these best practices when setting up your domain:
- When creating a folder, use a clear and meaningful name. For more information, see Add Folders.
- Share this folder with a user or a group of users. For more information, see Share Content.
- Use one group per site. For example, a folder per shopping mall, per airport, or per medical clinic. This will facilitate managing the content, managing permissions, and sharing that content with the right users.
Once Broadsign Publish has been activated on your domain, you will be able to log in and see your screens from your network (as they appear in Broadsign Control Administrator). These screens (players) must be on a player configuration that has the Broadsign Publish Integration enabled. This will allow Broadsign Control to grab content from Broadsign Publish. For more information, see Configure Broadsign Publish in Broadsign Control.
Registered screens are also used to create screen groups. For more information, see Manage Screen Groups.
Note: You can also unregister one or more screens. The screens will no longer be accessible to anyone using them. In addition, messages will stop playing on them. Messages previously on the unregistered screens will be dissociated from them.
To register players:
-
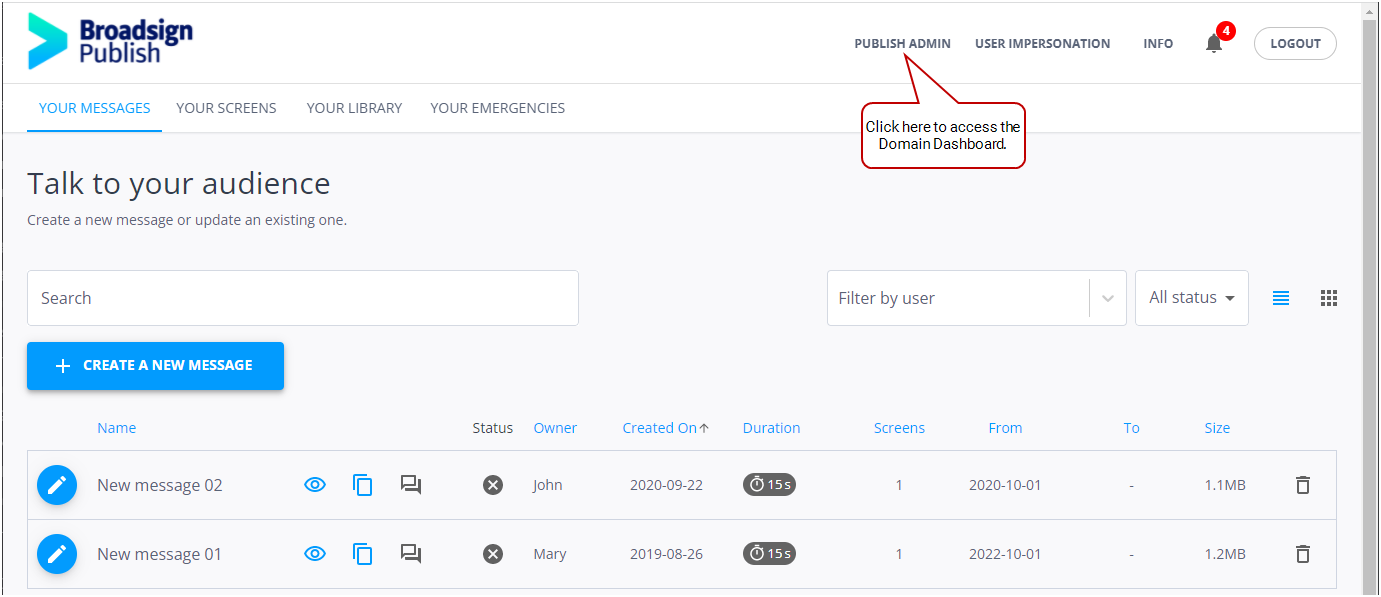
On the Broadsign Publish interface, click the Publish Admin link at the top right of the window.
The Domain Dashboard opens:
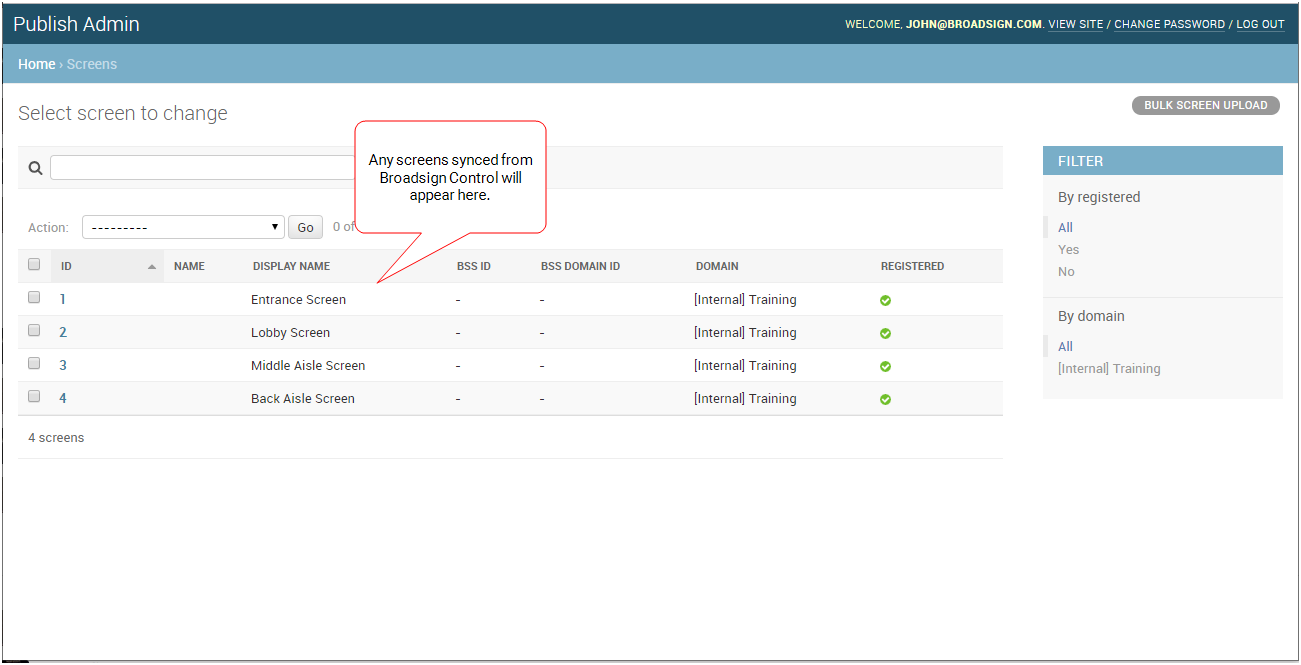
- Under Resources, click Screens. The Select Screen to change page opens. If you have synced players from Broadsign Control Administrator, they will appear here.
- To see only those screens that need to be registered, under Filter, select No.
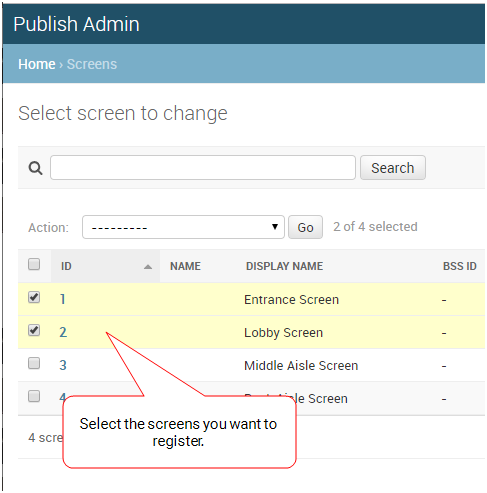
- Select the player or players you want to register.
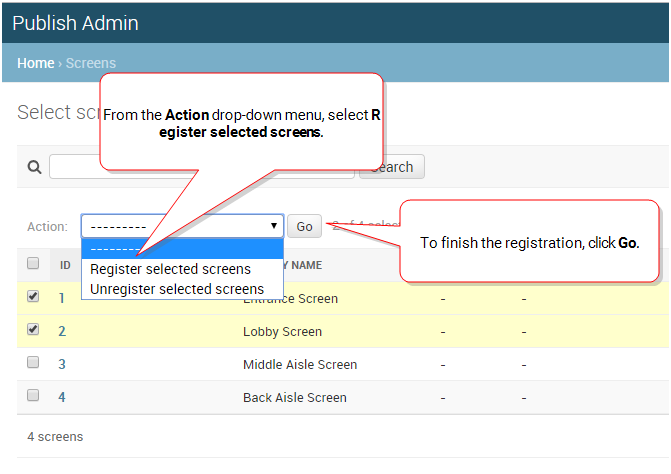
- From the Action drop-down menu, select Register selected screens. Then click Go.
In Broadsign Publish, you can create groups to assign permissions and access to specific users.
To add a user group:
-
On the Broadsign Publish interface, click the Publish Admin link at the top right of the window.
The Domain Dashboard opens:
- Under Accounts, click User Groups. The User Groups page opens.
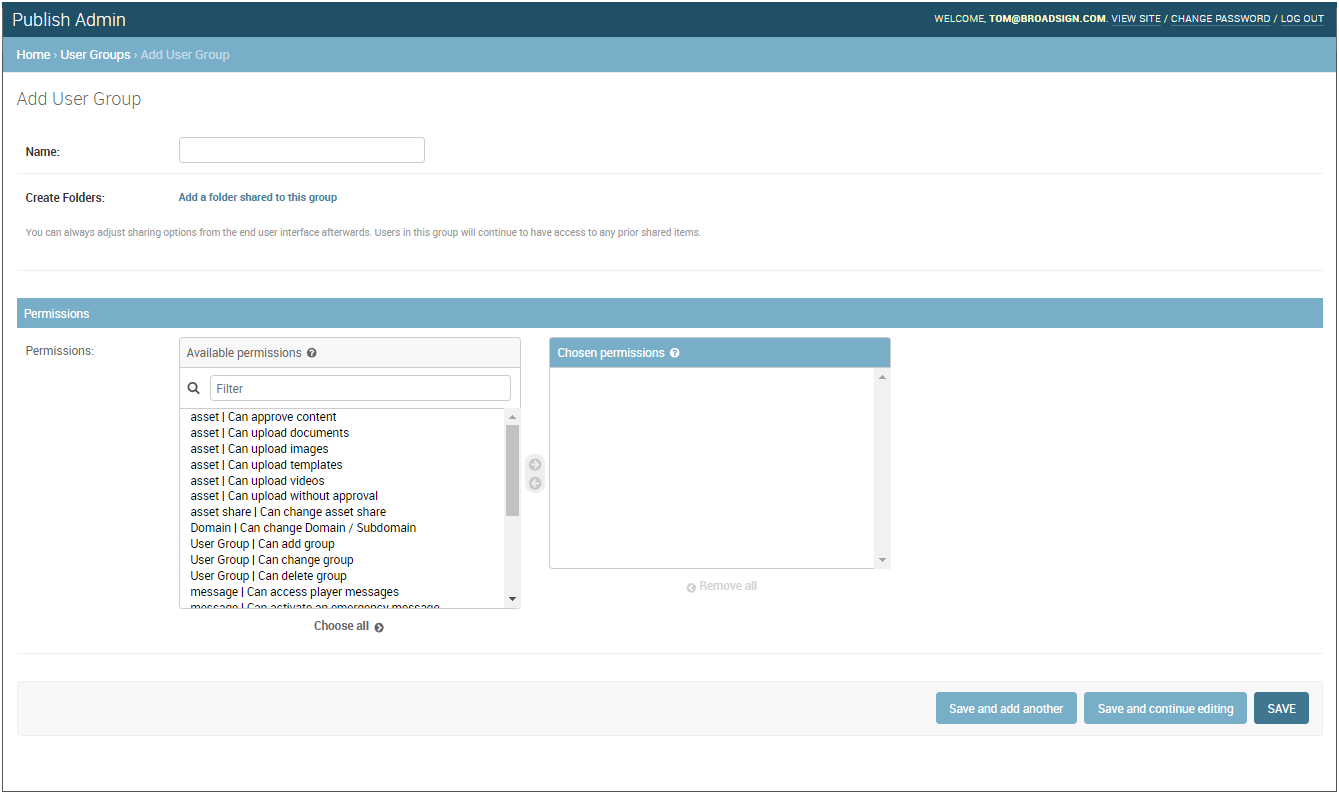
- To add a group, in the top-right corner click Add User Group. The Add User Group page opens.
- Enter the Name of the user group (e.g., "France - Local Operators").
- If applicable, click the Add a folder shared to this group link.
- A Screen folder in which you can put screens you want to share with the group.
- A Library folder in which you can put content you want to share with the group.
- Add Permissions to the user group by using the right arrow or double-clicking the permission. If you want to add all permissions, click Choose all. Every member of this user group will inherit the permissions that are set in this box. For more information on the permissions available, refer to Users and Groups Permissions.
- Click one of the Save buttons:
- Save and add another: Saves the current user group settings and prompts you to add another.
- Save and continue editing: Saves the current user group settings and allows you to continue editing it.
- Save: Saves your changes and returns you to the Groups page.
The Group Share Folder section is displayed. You can create and name the following folders that will be shared with the new user group:
Note: You can always adjust sharing options from the Broadsign Publish interface afterward. Users in this group will continue to have access to any prior shared items. For more information, see Add Content Sharing.
As a user with Admin credentials, you can add new application users and edit other existing users. You can also provide a user Admin credentials.
To add an application user:
-
On the Broadsign Publish interface, click the Publish Admin link at the top right of the window.
The Domain Dashboard opens:
-
Under Accounts, click Users.
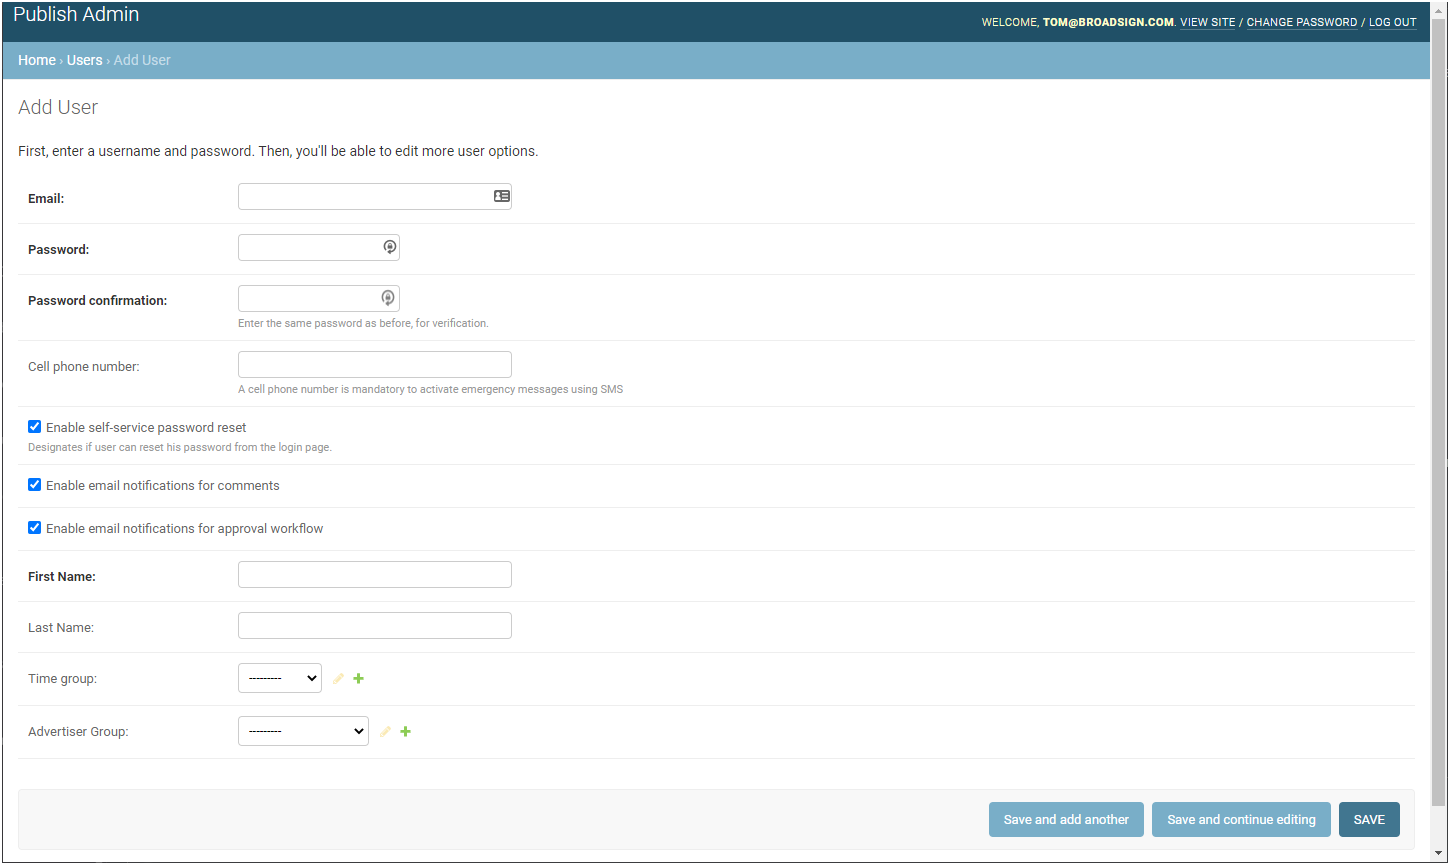
- To add a user, in the top-right corner click Add User. The Add User page opens.
- Enter the following details:
- +15143991184
- +33123456789
- Do one or more of the following:
- Assign this user to one or more groups (see Assign a User to User Groups)
- Assign this user to one or more client groups (see Assign a User to Client Groups)
- Assign specific permissions to this user (see Assign Permissions to a User)
- Define any user or group management (see Define Groups and Users Management)
- Click one of the Save buttons:
- Save and add another – Saves the current user settings and prompts you to add another.
- Save and continue editing – Saves the current user settings and allows you to continue editing it.
- Save – Saves your changes and returns you to the Users page.
The Users page opens.
| Parameter | Description |
| User's email address. | |
| Password | User's password. |
| Password confirmation | Same password as before, for verification. |
| Cell phone number |
Mobile number that will only be used to activate emergency messages by SMS. The number must use the International Dialing format, without spaces or special characters: [country code][area code][phone number] For example: For more information, see Enable Emergency Message Activation by SMS. |
| Enable self-service password reset |
Whether this user can reset their own password. This option is checked by default. If you choose to uncheck this box, the user will no longer have the capability to initiate the Reset Password procedure independently. Instead, they will be required to contact you for assistance with password recovery. |
| Enable email notifications for comments | Enables this user to receive email notifications when comments are posted. If you uncheck the box, that user will not receive email notifications. However, comments notifications will still be published in the Notification Center. |
| Enable email notifications for approval workflow | Enables this user to receive email notifications when the approval workflow is required. If you uncheck the box, that user will not receive email notifications. However, approval workflow notifications will still be published in the Notification Center. |
| First name | First name of the user. |
| Last name | Last name of the user. |
| Time group | If applicable, add the user to a specific time group. A time group allows network operators to allocate time to different users on the same screen. For more information, see Manage Time Groups. |
A user with Admin privileges can add and edit users, add groups, etc. In other words, they can set up and edit a domain.
To give Admin access:
-
On the Broadsign Publish interface, click the Publish Admin link at the top right of the window.
The Domain Dashboard opens:
-
Under Accounts, click Users.
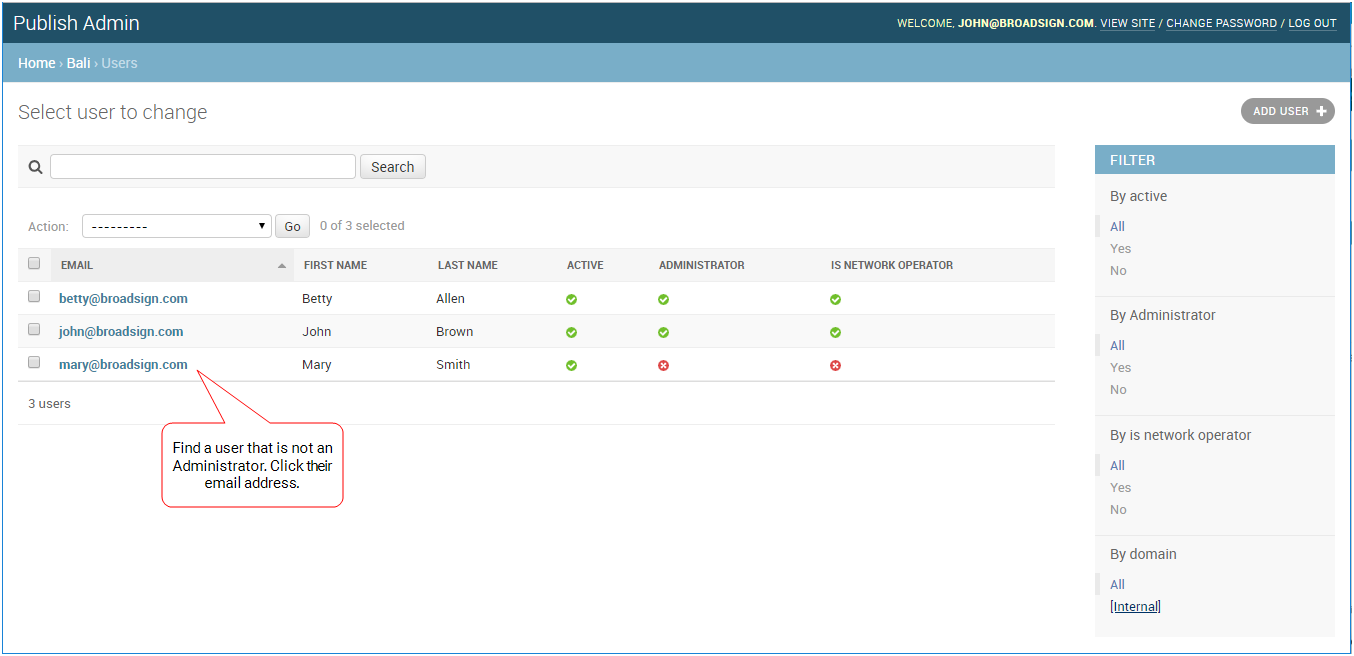
- On the Users page, find a user that is not an Administrator and click on their email address.
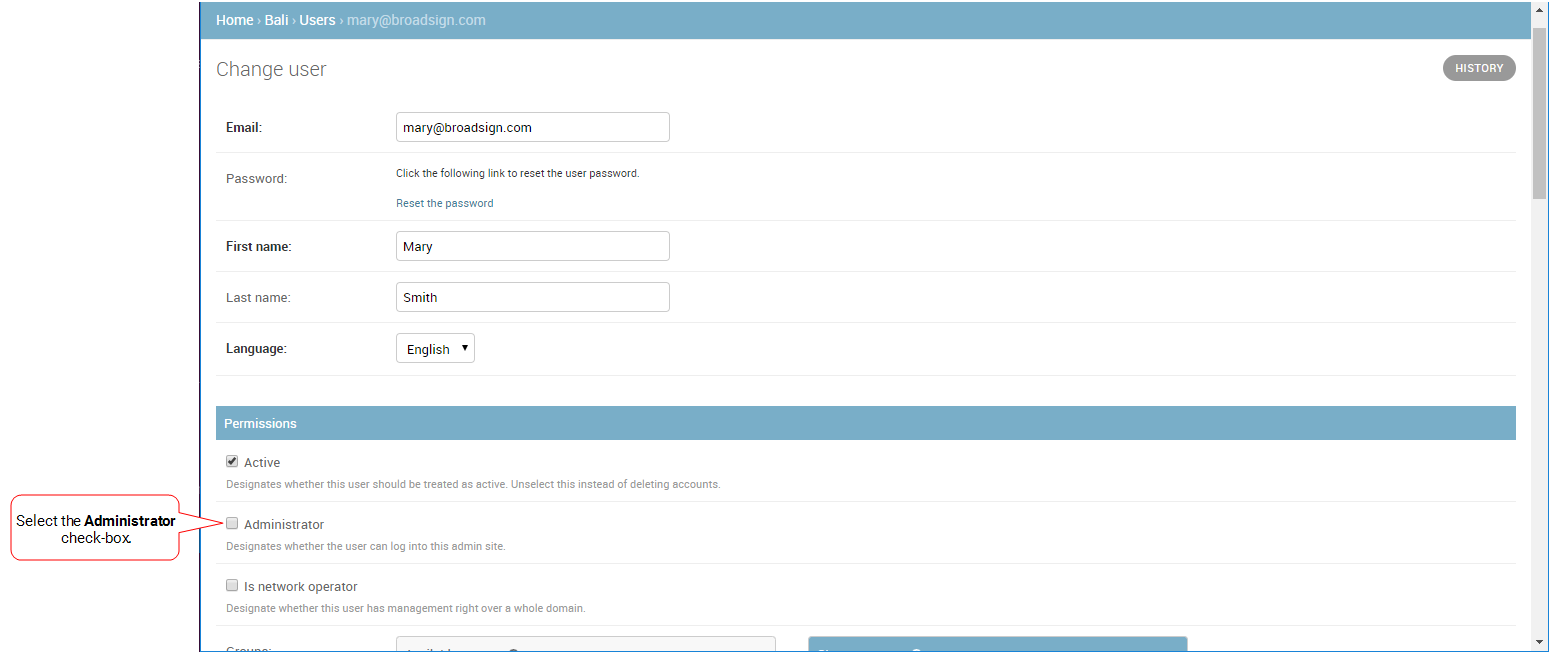
- Under Permissions, find and select the Administrator check-box.
- Click one of the Save buttons:
- Save and add another – Saves the current user settings and prompts you to add another.
- Save and continue editing – Saves the current user settings and allows you to continue editing it.
- Save – Saves your changes and returns you to the Users page.
The Users page opens.
The Change user page opens.
For a detailed tutorial about modifying templates, see Set up an HTML5 Template for Broadsign Publish.

