The Devices and Triggers section of the Configuration Profile Properties window allows you to define how the player interacts with RS232 devices, for example, attached screens or barcode scanners, and Broadsign Control Player API.
Note: This section is one of several under Configuration Profile Properties for players. For general information, see Configuration Profiles - Players. For edge server profiles, see Configuration Profiles - Edge Servers.
In the Devices tab, you can toggle between basic or advanced mode:
- Basic mode – Presents a graphical user interface.
- Advanced mode – Can be useful if you want to copy and paste a complicated configuration into another without having to recreate it through the interface. See Advanced Mode.
The Devices tab has two further sub-sections: Devices and Actions.
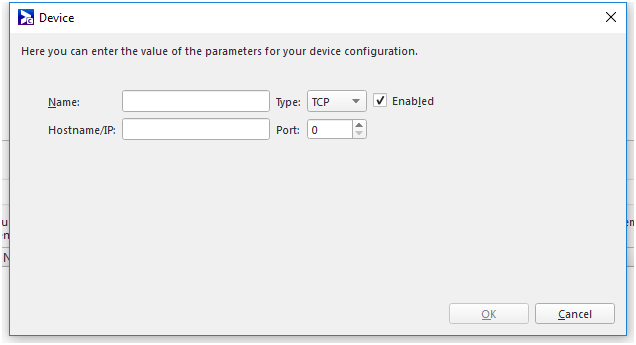
In this tab, you can configure the serial or TCP port configurations required to control RS232-attached devices:
- Name – Name the Device.
- Type – Serial or TCP (see images)
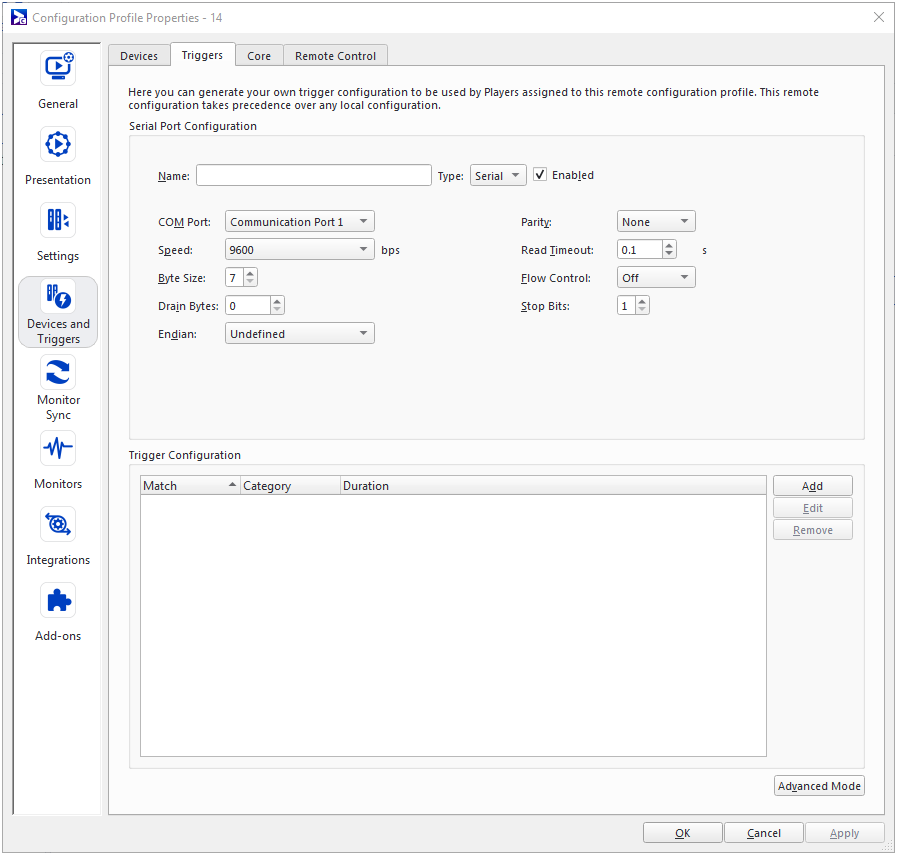
- COM Port – Select the correct COM port, speed, byte size, parity, read timeout, flow control, and stop bits for your device. The exact settings depend on the capabilities of your serial or TCP port, and the attached device. Default settings work for most devices. Consult the user manuals of your devices for further details.
- Drain Bytes – Drains the specified number of bytes from the serial port before executing any RS232 command, making sure it is clean. Some screens periodically fill the RS232 command buffer with garbage data, preventing the Player from correctly identifying the expected response for a given command.
- Endian – Interprets routines related to Query Temperature and Query Luminosity commands.
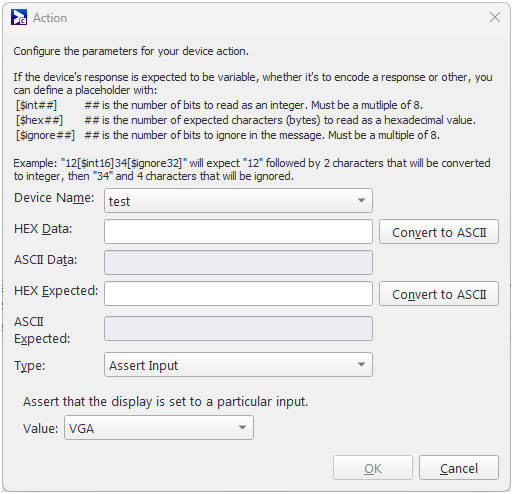
Once your devices have been configured, you must add the RS-232 actions you would like to perform. You can add RS-232 actions by clicking the Add button in the Actions part of the Devices tab.
When dealing with RS-232 screen control, by far the most commonly used actions are:
- Set Power On – Ensures that a screen is correctly powered on at the beginning of a day.
- Assert Power On – Verifies, throughout the day, that a screen is on.
- Set Power Off – Ensures that a screen is powered off at the end of the day.
In order for the player to issue such commands, hex or ASCII codes need to be defined for each possible action.
- Start by consulting your device’s user manual.
- The commands and their expected responses are usually supplied in ASCII or HEX format.
- Click on “Convert to Hex” or “Convert to Ascii” to enter the command codes in the desired format.
- The expected response can be left blank if need be.
- If specified, the player will use it to ensure the command has executed successfully. If it fails, the player will open an incident.
- Query Temperature and Query Luminosity fetch values from sensors, that is, the expected responses have portions that are variables. Auto-brightness can use the result of the Query Luminosity to set the brightness. See "Auto-Brightness" and "Temperature Monitoring" in Add a Device Control Operation Type.
The markup string uses one of following formats:
- [$intX] – This command decodes the integer value of X and makes it available to the rest of the application. X represents the number of bits, between 0 and 999, inclusive (1-3 digits), to read as an integer. It must be a multiple of 8.
- [$hexX] – This command interprets the following X ASCII characters as a chain of case-insensitive hexadecimal values, and then decodes the integer value and makes it available to the rest of the application. X represents a number between 0 and 999, inclusive (1-3 digits).
- [$ignoreX] – This command instructs the player to ignore the value of X, between 0 and 999, inclusive (1-3 digits), which represents the number of bits to ignore in the message. It must be a multiple of 8.
For example, [$hex2] indicates a sequence of 2 ASCII characters, and [$hex4] indicates a sequence of 4 characters. For example, the string "4A" with the instruction [$hex2] will be decoded into the integer 74.
Only the "int" and "hex" commands cause the player to decode the value and make it available to the application.
For example: 12[$int16]34[$ignore32] will expect "12" followed by 2 characters that will be converted to integer, then "34" and 4 characters that will be ignored.
In the Triggers tab, you can toggle basic or advanced mode:
- Basic mode – Presents a graphical user interface.
- Advanced mode – Can be useful if you want to copy and paste a complicated configuration into another without having to recreate it through the interface. See Advanced Mode.
The Triggers tab allows you to configure the player to receive and respond to triggers issued by RS232 devices such as barcode scanners or switches. To activate this functionality, you must first enable the trigger monitor in the Core tab, then configure your serial port similar to how serial ports are configured for devices.
Once done, you can add trigger actions. A trigger action can either match a specific ASCII or HEX string or match everything by clicking “Match All”. The duration of the trigger indicates for how long the triggered Ad Copies should play, if left 0, the triggered Ad Copies will play for their entire length. Lastly, you must choose the trigger category to issue to match the correct bundles.
For more information about triggers, see Frame Synchronization.
The Core tab has two sub-sections: Network Triggers and External Triggers.
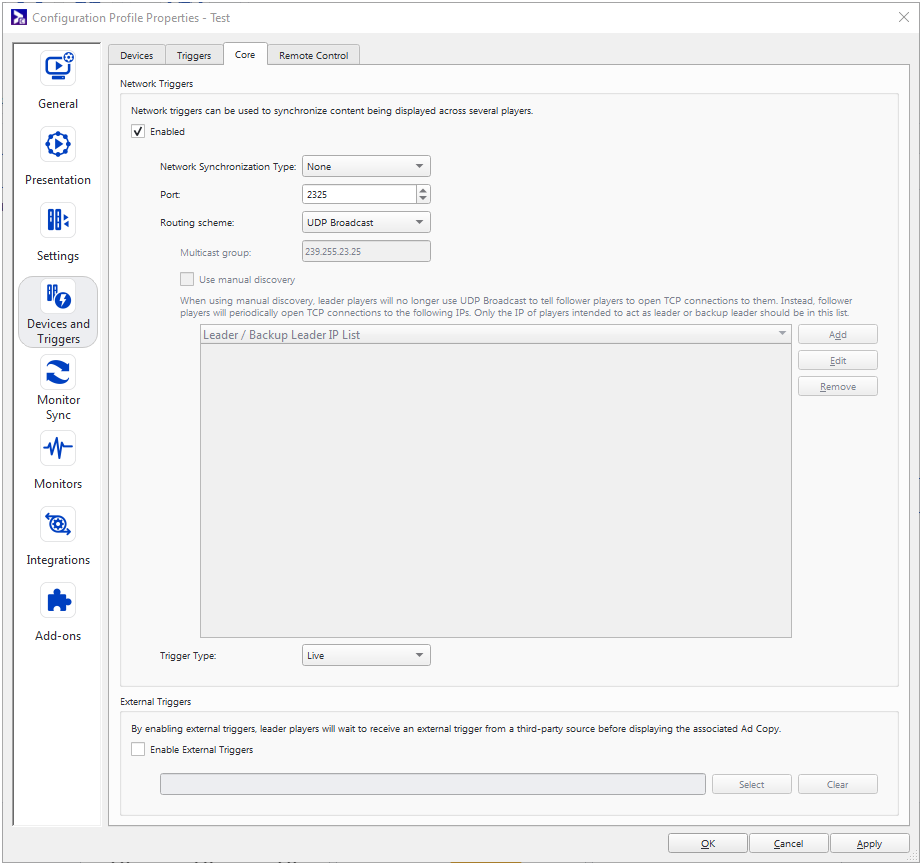
The Network Triggers section allows you to enable the trigger monitor and configure how it should behave about network triggers. Network triggers permit you to synchronize multiple players on the same network segment by defining one as the Leader and the others as Followers (see 3G Synchronization and Frame Synchronization).
- Network Synchronization Types – The following types are available:
- None – The player will not issue or respond to network triggers.
- Leader – The player will issue network triggers.
- Follower – The player will respond to network triggers.
- Leader-Follower – The player will both issue and respond to network triggers.
- Port – This is the port that the UDP or TCP packets will be sent and/or received on.
- Routing Scheme – The Routing Scheme decides how synchronization packets are propagated.
- UDP Broadcast – The Broadcast option is the simplest. In this case, UDP packets are sent on the IPV4 broadcast address (255.255.255.255). In order for a Follower to receive broadcast triggers issued by the Leader, they should be on the same network segment.
- UDP Multicast – Multicast is preferred for some networks to reduce network congestion. You must specify a multicast group address for both the Follower and Leader players to join using IGMP and be sure the correct routing equipment is in place.
- TCP – In networks with high packet error rates, such as Wi-Fi, TCP packets are preferred. This method is useful because the sender will retransmit if a TCP packet is lost. When the Leader is configured to use a TCP Routing Scheme, it will open a TCP socket server on the specified port and wait for client connections to be established. Whenever a trigger needs to be issued it is sent individually to each client connection.
- Broadsign Control Live – When network security policies prevent direct connection between players, this option allows for content synchronization across the bidirectional channel. In other words, you can both send and receive synchronization messages for synced players across the same channel. Broadsign uses outbound port 443 only on all players (see Required Firewall Rules). For more details, see Cloud Sync.
- Multicast group – Specifies the multicast group address for both Follower and Leader players in a UDP Multicast setup. This option only appears when you have selected UDP Multicast, above.
- Use manual discovery – When selected, all Follower players and backup Leaders will try to connect to all the IPs configured. This option only appears when you have selected TCP as your routing scheme. When selected, you can add the IP addresses of players that you intend to act as a Leader or a Backup Leader. See 3G Synchronization.
- Trigger Type
- Live – When selected, Follower players will play specified content when they receive their triggers.
- Time-based – When selected, Follower players will play specified content at the prescribed time. See 3G Synchronization.
Note: Time-based triggers cannot be used in conjunction with Campaign or Bundle Conditions.


Note: UDP triggers over wired Ethernet remain the most effective for synchronization.
Note: Effectiveness will slightly degrade once reaching 30 or more Follower players with TCP trigger.
Note: You can only access this feature if you have enabled Broadsign Control Live on your domain. For more information, contact your Sales representative or Broadsign Services.
When enabling external triggers, Leader players will wait to receive an external trigger from a third-party source before displaying the associated Ad Copy. See Use Leader Frame Triggers.
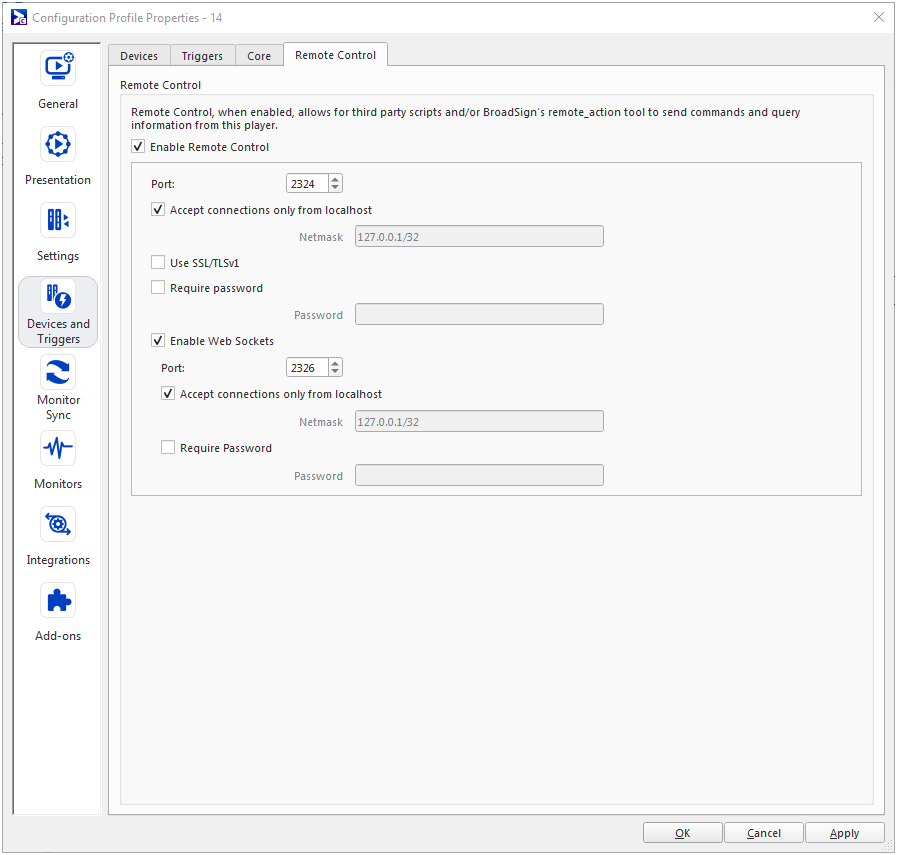
From this tab, it is possible to add security and encryption to Broadsign Control Player's remote control functions. You can access them via the remote_action command line tool, as well as JavaScript, ActionScript, and other programming languages.
- Enable Remote Control
- Port – For the remote_action tool, use Port 2324. For more information, see Broadsign Control Player API - Overview.
- Accept connections only from localhost – By default, it is unencrypted and we protect the service by allowing connections from localhost only.
- Use SSL/TLSv1 – When remote control functions are exposed via a public IP and port, it is possible to implement security and encryption with SSL/TLSv1.
- Require password – When remote control functions are exposed via a public IP and port, it is possible to implement security and encryption by requesting a password.
- Enable Web Sockets
- Port – When connecting to the WebSocket server, use Port 2326. For more information, see Broadsign Control Player API - Overview.
- Accept connections only from localhost – By default, it is unencrypted and we protect the service by allowing connections from localhost only.
- Require password – When remote control functions are exposed via a public IP and port, it is possible to implement security and encryption by requesting a password.
Notes:
- When an SSL connection is required, an SSL connection on the sending end needs to be implemented as non-encrypted connections will no longer be allowed.
- The certificate of the remote control service is self-signed using Broadsign's certificate authority. Any software used must be able to catch this warning and allow the connection to proceed.
- When a password is used, the client must send a password string matching the one specified.
- A client software sending its own XML documents must send the password as an extra XML attribute as shown in the following sample ActionScript 2.0:
- When using the remote_action command line tool, the following arguments should be used:
- -S [ --ssl ]: to use SSL/TLSv1
- -w [ --password ] arg: to use the password specified
// Start ActionScript 2.0
var theSocket:XMLSocket = new XMLSocket();
theSocket.onConnect = function(myStatus) {
    if (myStatus) {
        var myString:String = "<rc version=\"1\" id=\"1\" password=\”OCTOSHAPE” action=\"trigger\" trigger_category_id=\"xxxxxx\" duration=\"yyyyyy\"/>\r\n\r\n";
        theSocket.send(myString);
    }
};
theSocket.connect("localhost", 2324);


