- Configure the Loop Policy
- Configure the Display Unit
- Configure External Saturation
- Configure Audience Integration
- Add the Display Unit Folder to the Allow List
- Add the Criteria Folder to the Allow List
The following sections describe configuration to perform in Broadsign Direct:
Display Units, Frames, and Day Parts in Broadsign Control Administrator are translated into screens in Broadsign Direct. The screen name in Broadsign Direct is created as follows:
- If there is one Frame, or if there is more than one Frame but only one is sellable:
- Broadsign Direct Screen Name = Display Unit Name
- If there is more than one Frame in Broadsign Control Administrator:
- Broadsign Direct Screen Name = Display Unit Name _ Frame Name
For information on loop policy configuration in Broadsign Control Administrator, see Loop Policies.
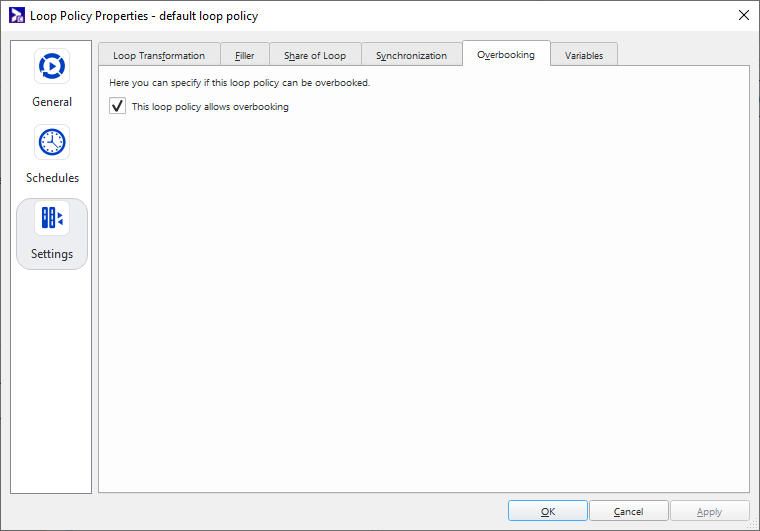
Overbooking is allowed.
To configure the Loop Policy (Broadsign Control Administrator):
- Open Broadsign Control Administrator.
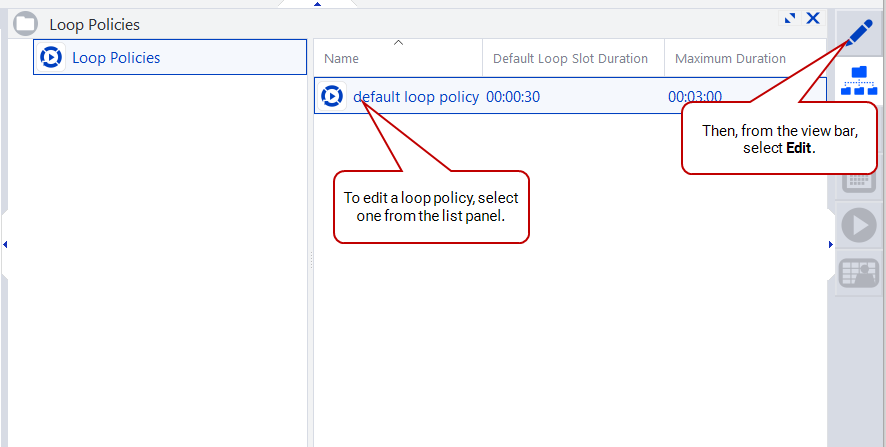
- Open the Loop Policies resources.
- From the list panel, select a loop policy. Then, from the view bar, select Edit.
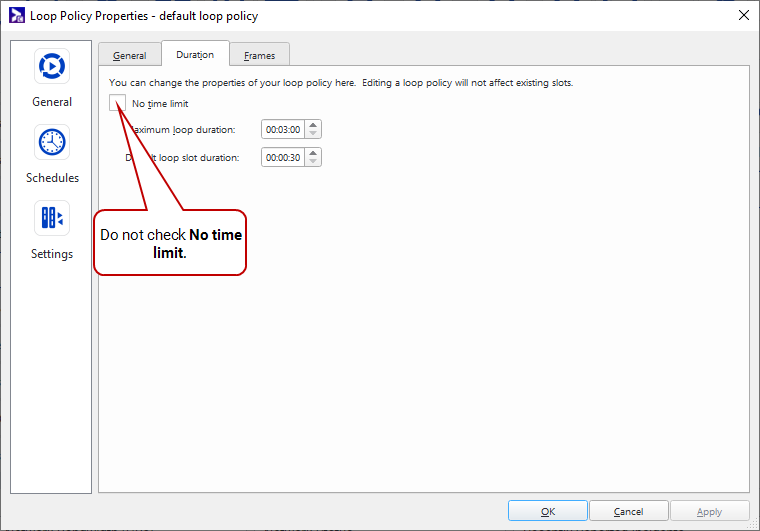
- In the Loop Policy Properties window, click the General section, and then the Duration tab.
- Uncheck the No time limit option.
- Click Apply.
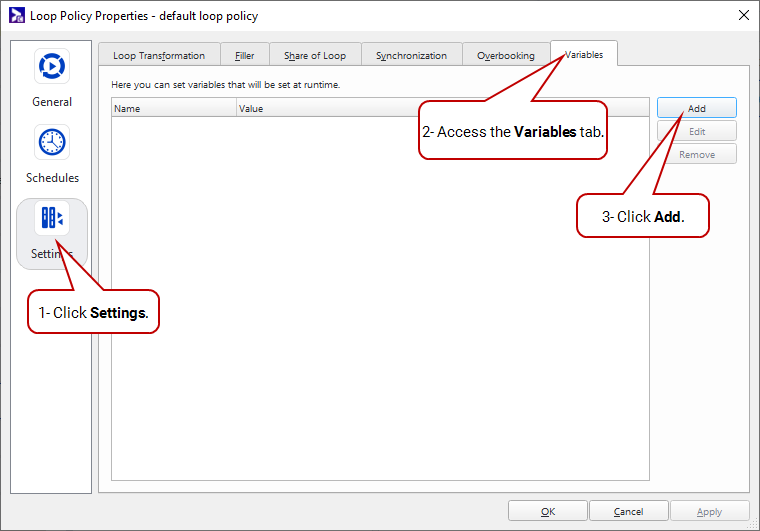
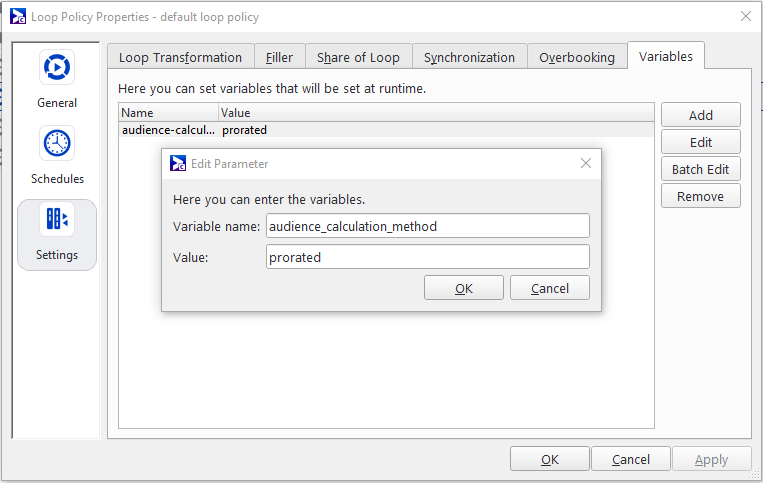
- Click the Settings section, and then the Variables tab.
- Click Add on the right to add a new variable.
- In the Edit_Parameter window, enter the following:
- Variable name: "audience_calculation_method"
- Value: "prorated" or "dwell", depending on your desired calculation method
- In the Overbooking tab, select This loop policy allows overbooking.
- Click OK or Apply.
For more details on which value to use, see Impressions Formulas in the Broadsign Control documentation.
Broadsign Direct requires to have one player connected to one display unit. If you have many players connected to the same display unit, then we suggest to clone the display unit, including the scheduling information, and assign each player to one display unit.
For information on Display Unit configuration in Broadsign Control Administrator, see Display Units.
To configure the Display Unit (Broadsign Control Administrator):
- Open Broadsign Control Administrator.
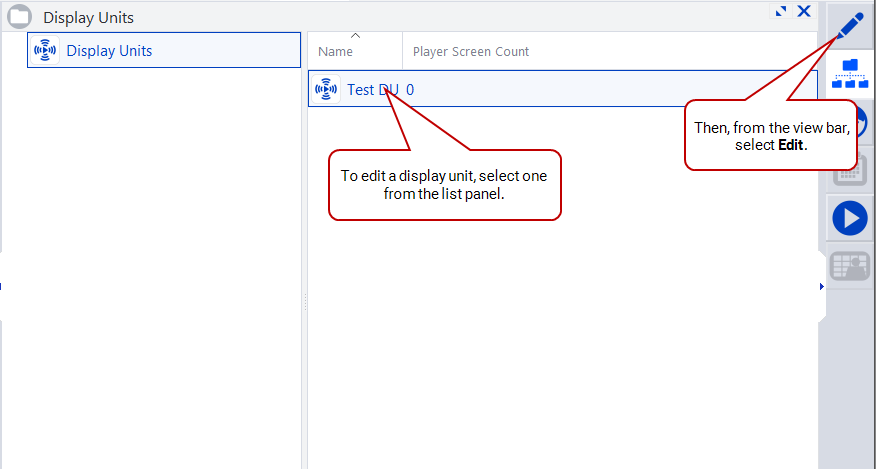
- Open the Display Unit resources.
- From the list panel, select a Display Unit. Then, from the view bar, select Edit.
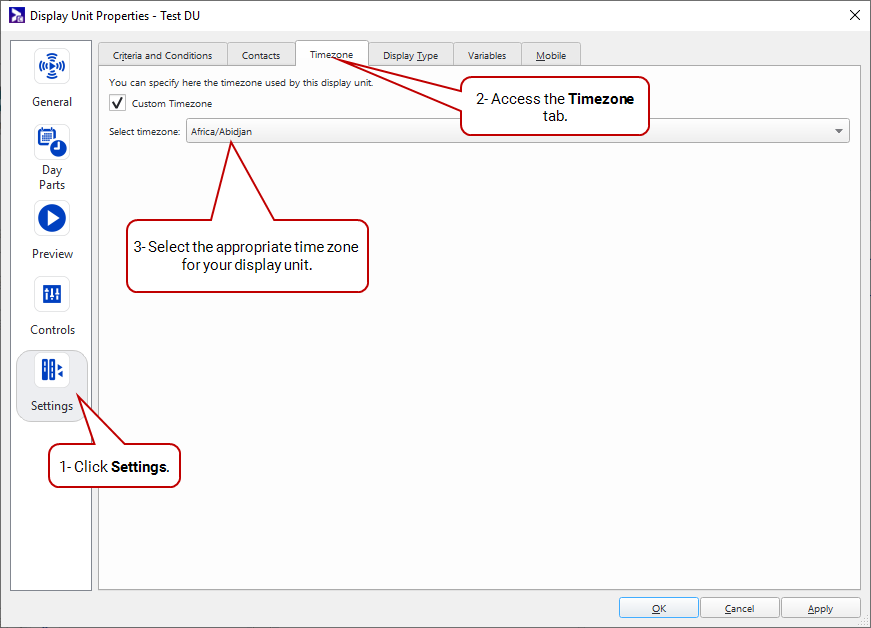
- In the Display Unit Properties window, click the Settings section, and then the Timezone tab.
- Click Custom Timezone, then select the appropriate time zone for your Display Unit in the drop-down menu.
- Click Apply.
- Click the Criteria and Conditions tab.
- If applicable, associate criteria and conditions with the Display Unit. For more information, see Criteria and Conditions in the Broadsign Control documentation.
- Click the Display Type tab.
- If applicable, associate a Display Type with the Display Unit. For more information, or if you need to create a Display Type, see Display Types in the Broadsign Control documentation.
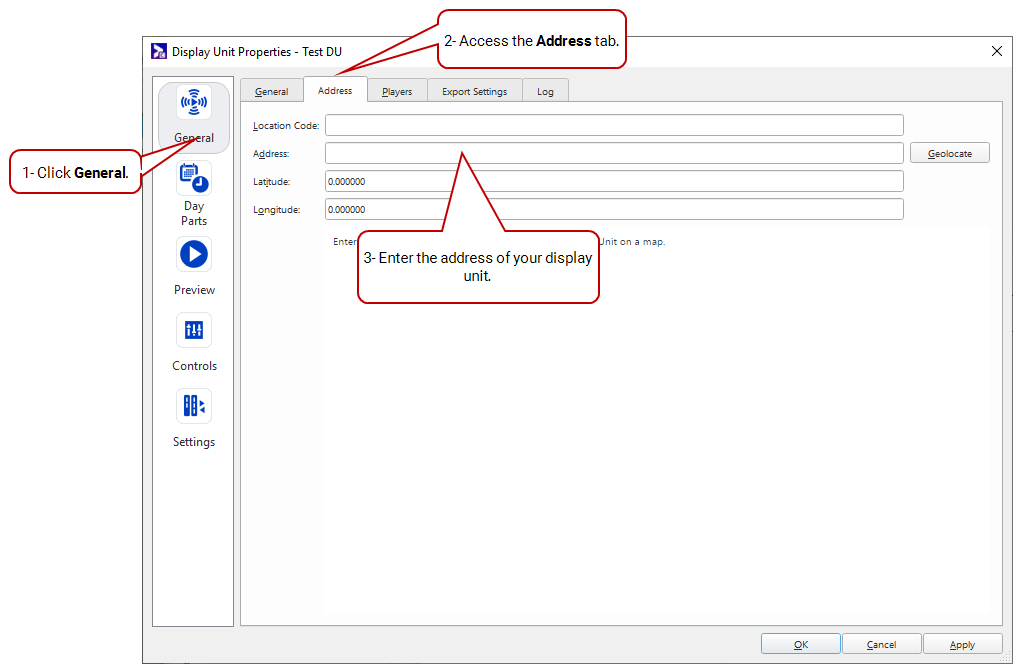
- Click the General section, and then the Address tab.
- Enter the address of the Display Unit.
- Click Apply.
- Click the Day Parts section, and then the Day Parts tab. Add day parts to your setting. You can add a Ticker with a loop policy unlimited to the deny list. For more information, see Day Parts.
- Click OK or Apply.
Warning: Changing the Display Type under Display Unit (see Display Unit Properties - Display Type Settings) in Broadsign Control Administrator creates a new screen in Broadsign Direct. The new screen will have no pressure on it as it is considered a brand new entity and any proposals targeting the old screen will not be targeting the new screen.
Warning: Changing the Geometry of the Frame (see Day Parts Properties - Frames) in Broadsign Control Administrator creates a new screen in Broadsign Direct with that geometry. The new screen will have no pressure on it as it is considered a brand new entity and any proposals targeting the old screen will not be targeting the new screen.
For information on external saturation configuration in Broadsign Control Administrator, see External Saturation Schedule.
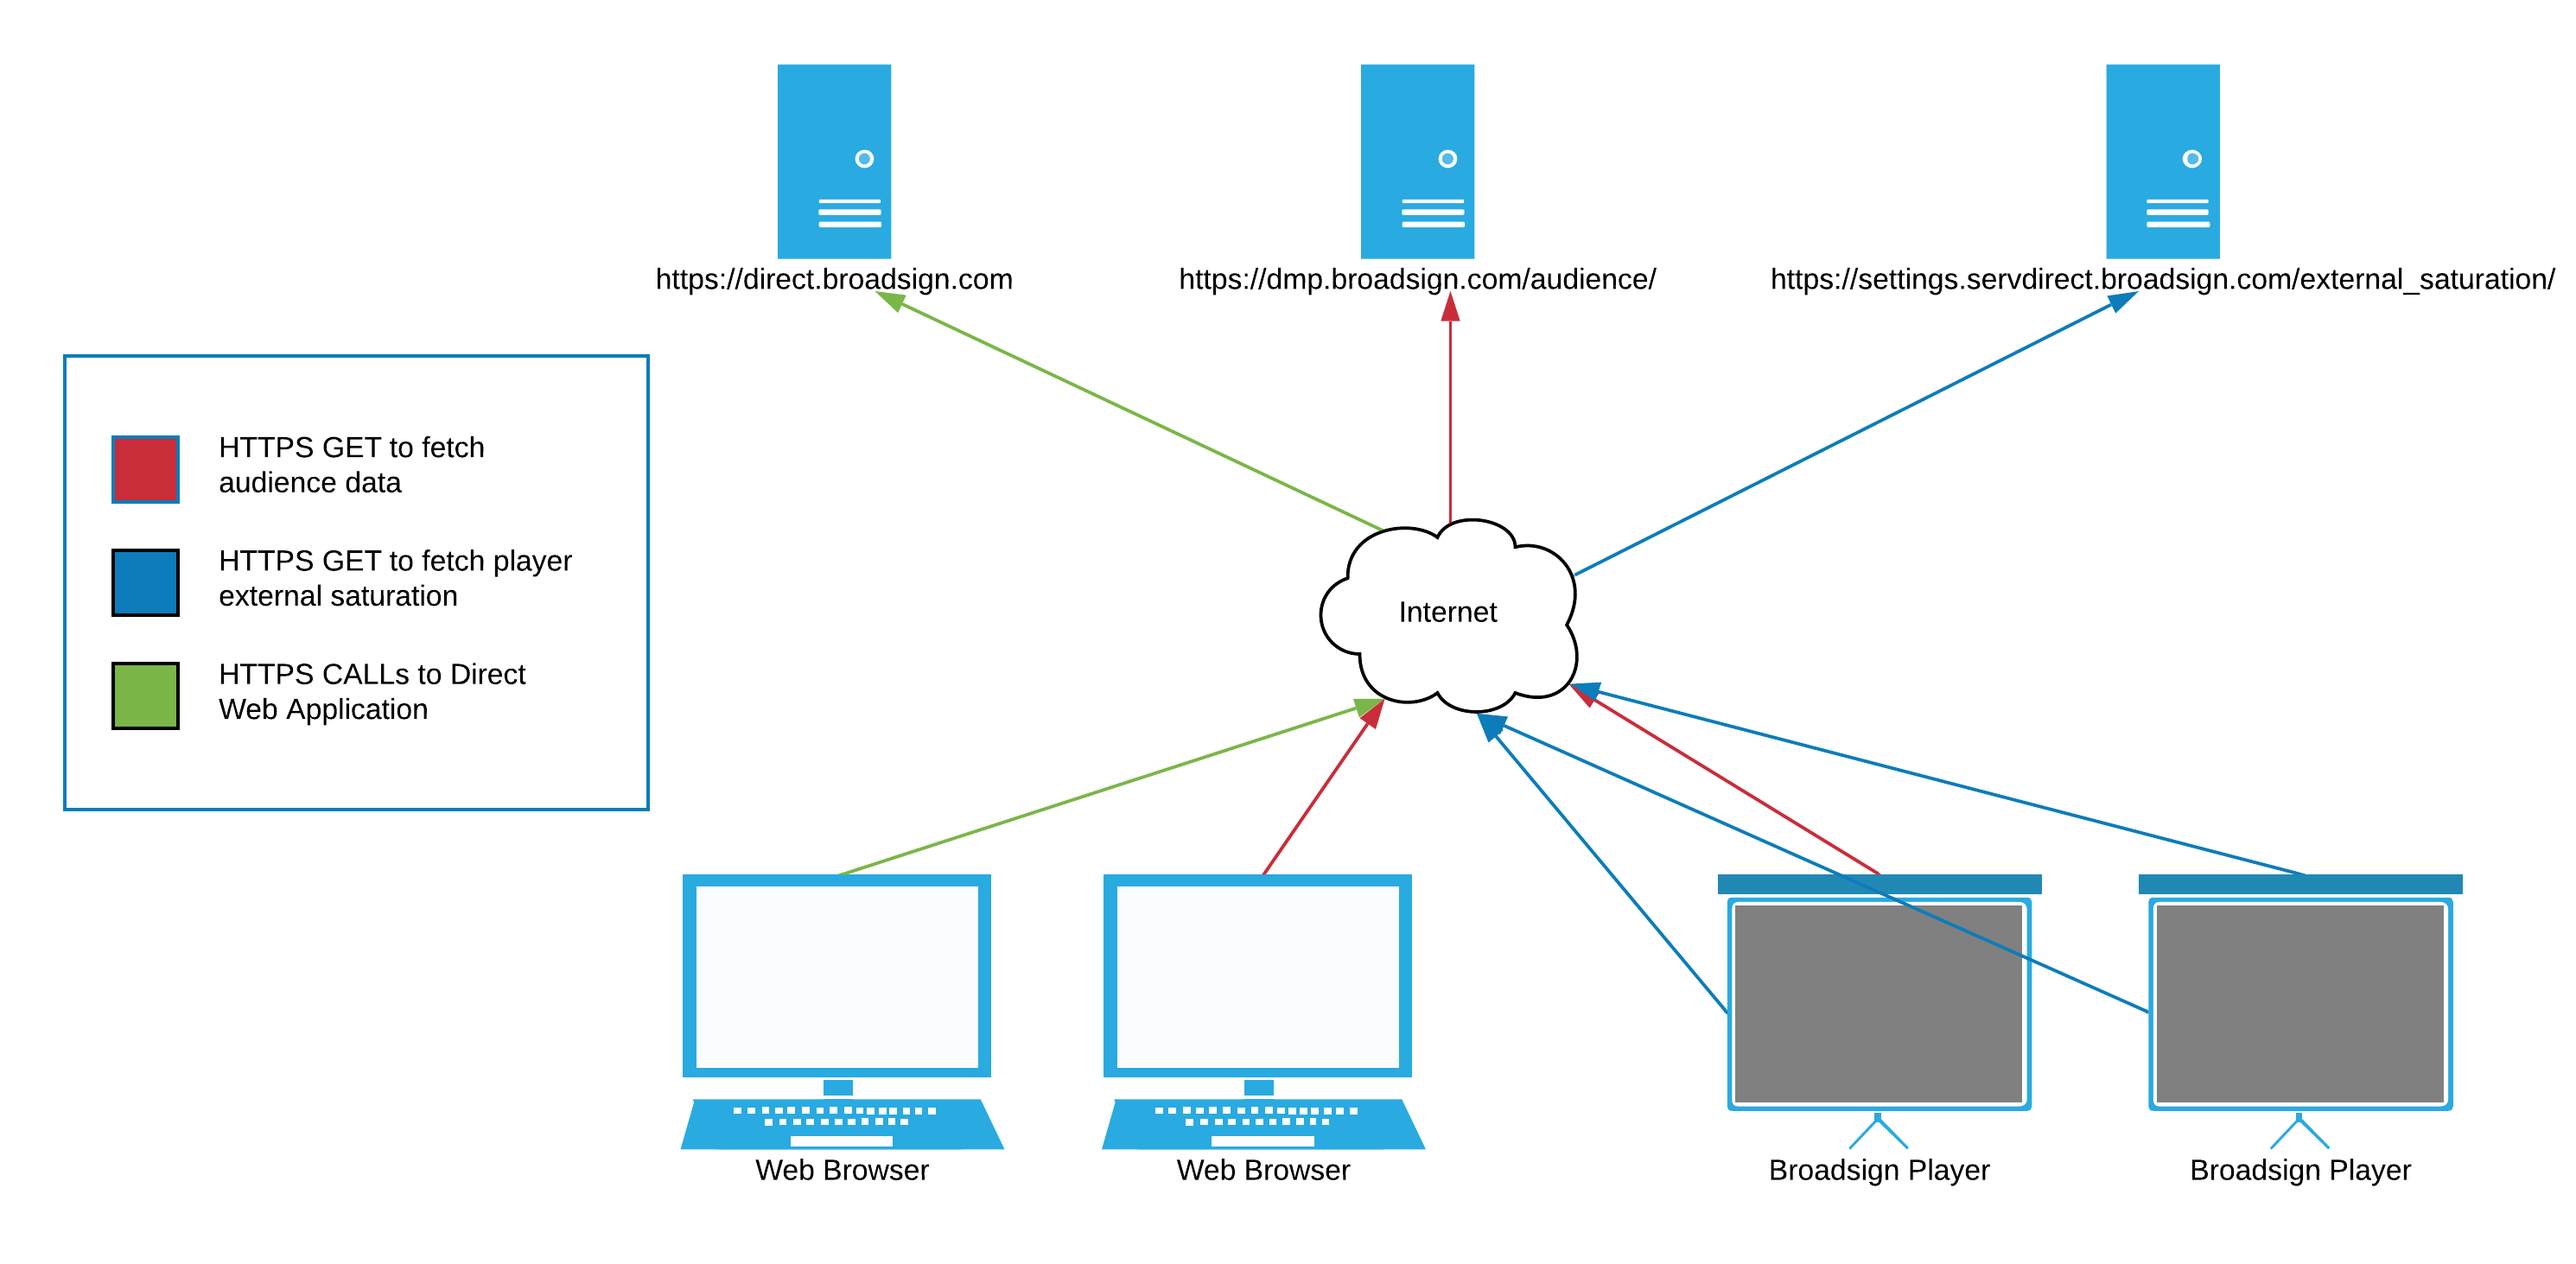
The external Saturation Control URL must be entered in the Broadsign Control Administrator Monitor Sync configuration.
Note: Domain settings are available only to users assigned the Admin role. For more information, see User Privileges by Role.
To find the Saturation Control URL:
- Access Broadsign Direct.
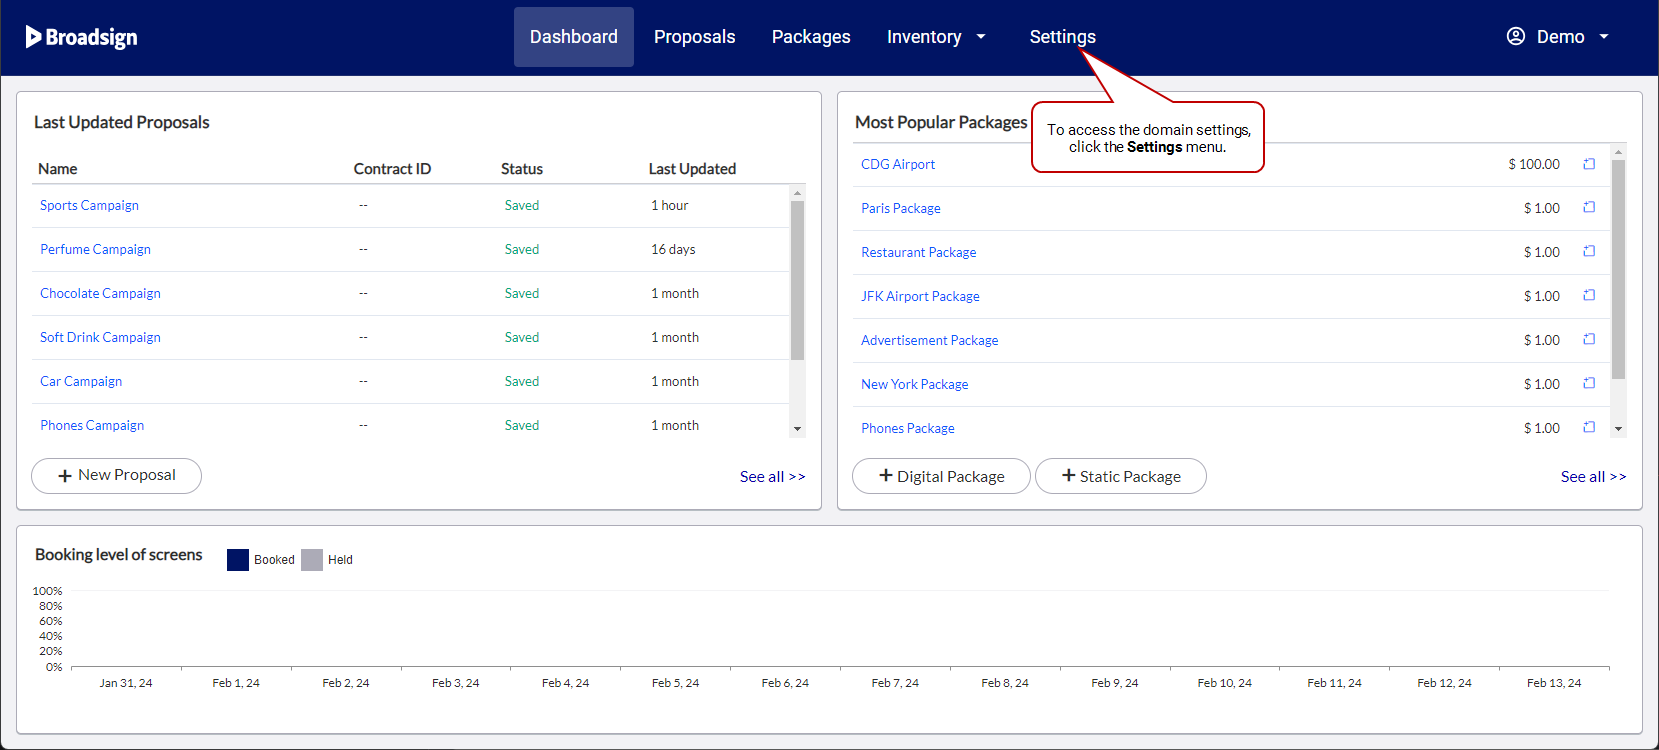
- Click the Settings menu item.
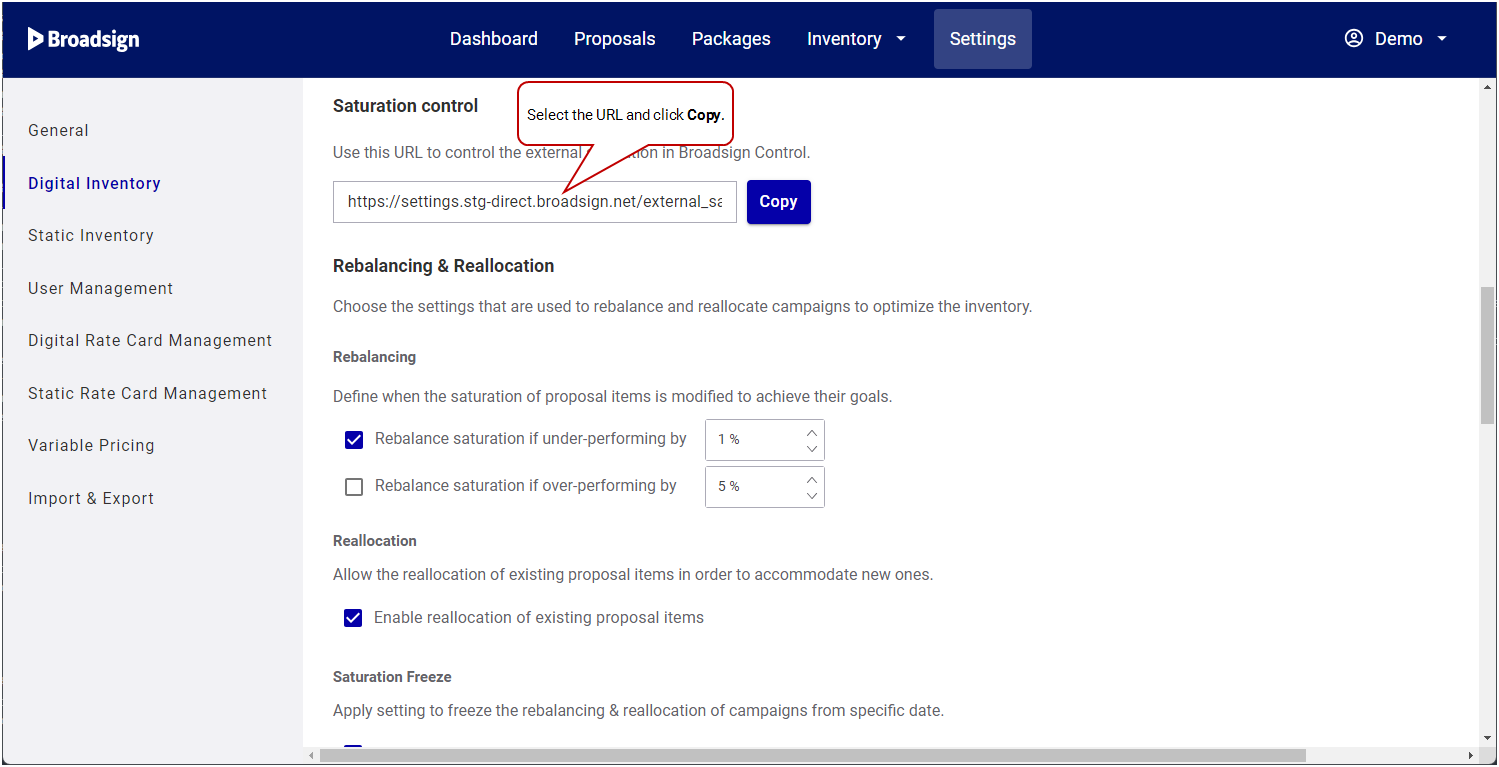
- In the Domain Settings section, click Digital Inventory.
- In the Saturation Control part, select the URL and click Copy.
For more details, see Saturation Control.
Note: Any configuration profile change will cause a player restart, so it is suggested to make these changes during low-traffic or off hours.
To enable external saturation API (Broadsign Control Administrator):
- Open Broadsign Control Administrator.
- Open the Configurations resources.
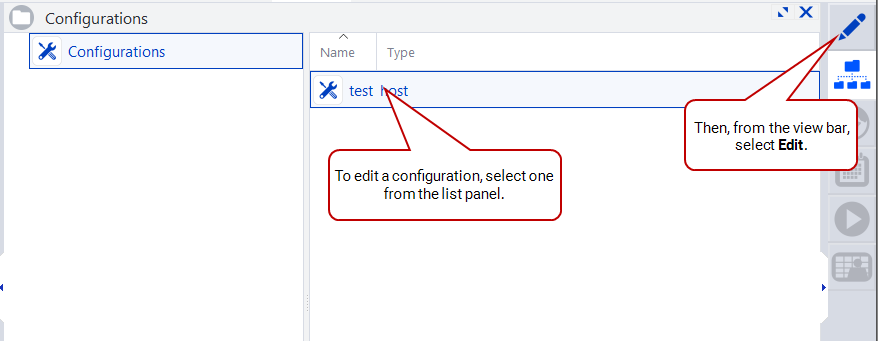
- From the list panel, select a configuration. Then, from the view bar, select Edit.
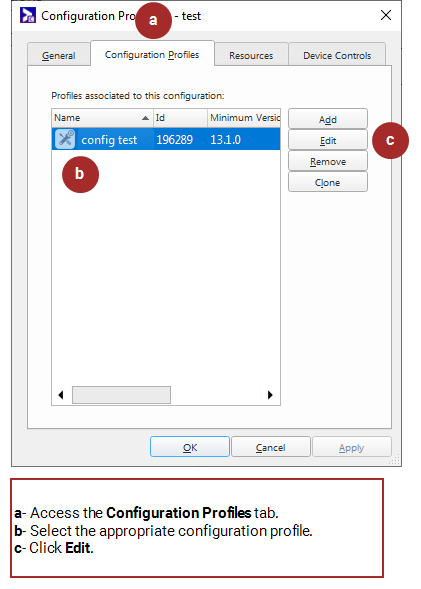
- In the Configuration Properties window, click the Configuration Profiles tab.
- Select a configuration, then click Edit.
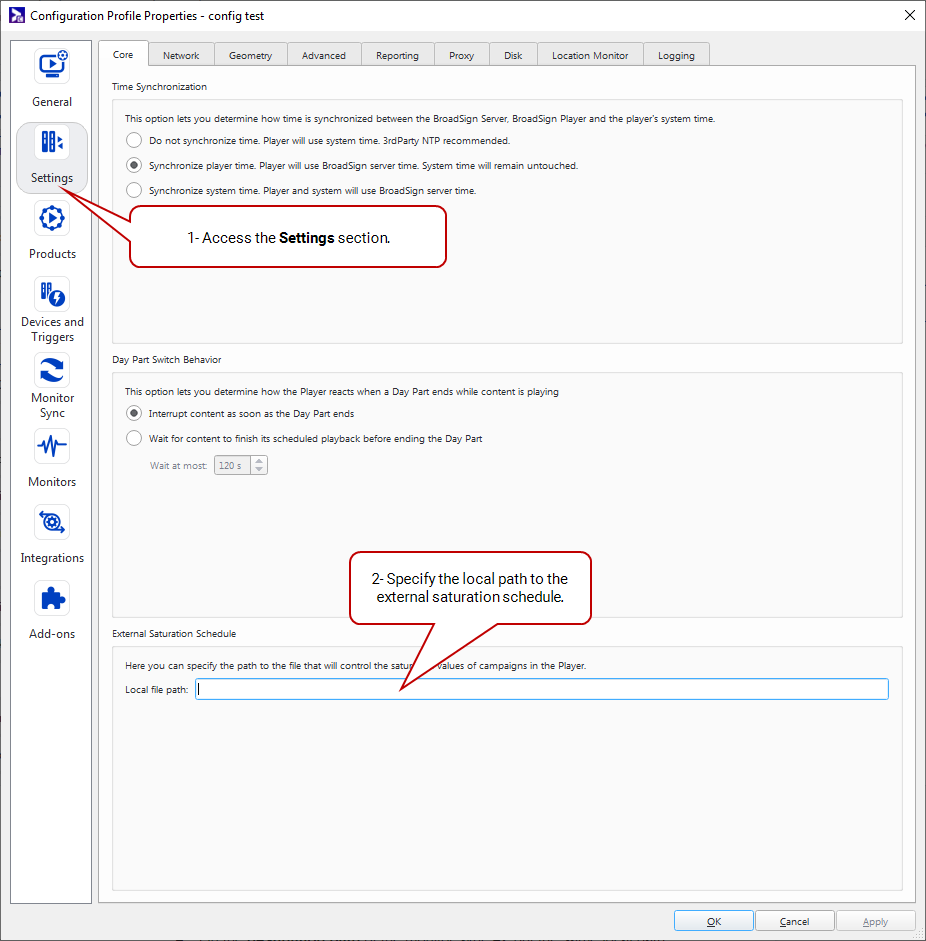
- Click Settings.
- Enable the external saturation API by specifying the local path to external saturation schedule in the Local file path field. This allows you to specify the path to the file that will control the saturation values of campaigns in the player.
- Click Apply.
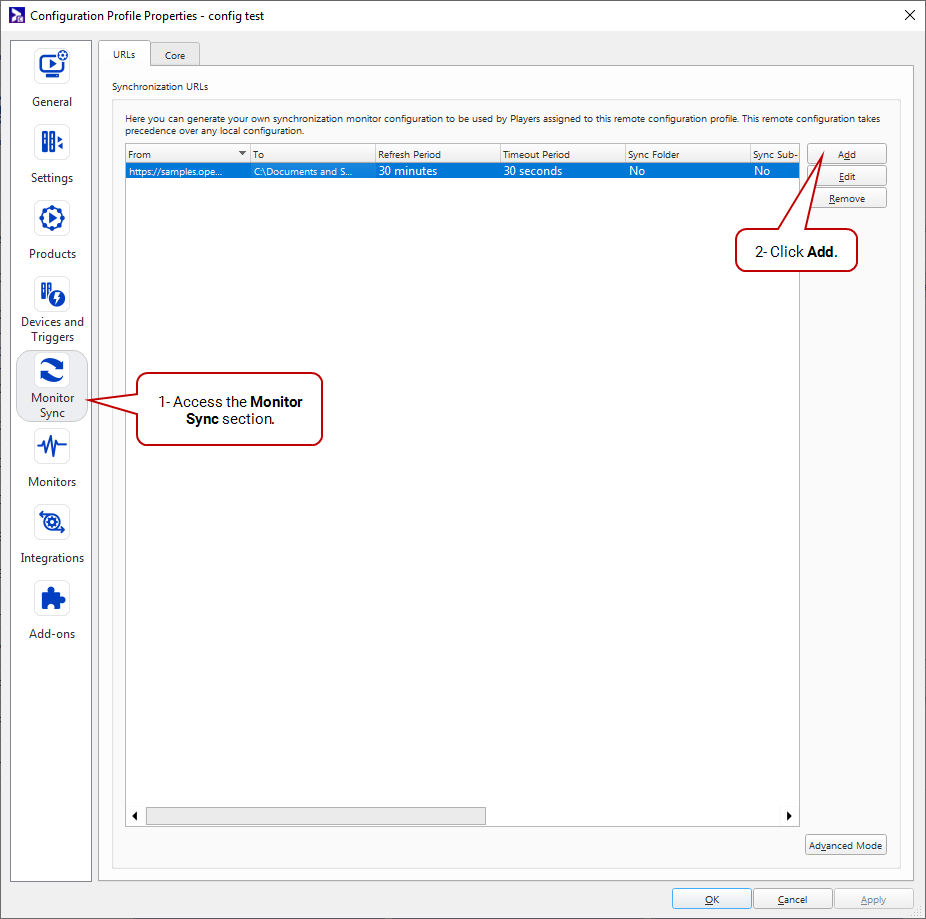
- Click the Monitor Sync section.
- Add a new synchronization URL by clicking Add.
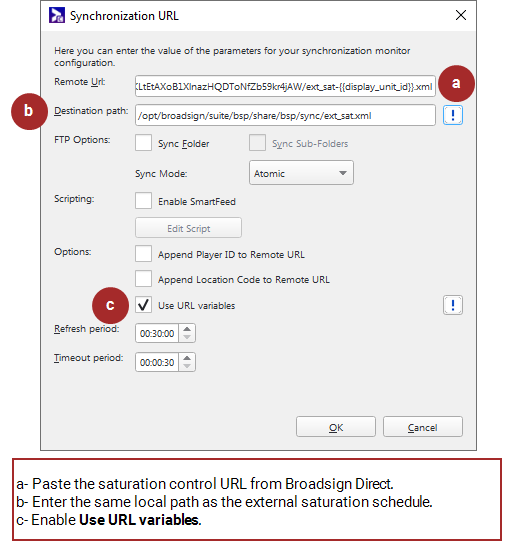
- In the Synchronization URL window that is displayed, do the following:
- In the Remote Url field, paste the URL that you have copied from the Domain Settings in Broadsign Direct. See Find the Broadsign Direct External Saturation Control URL for more details.
- In the Destination path field, enter the same local path as the external saturation schedule specified in Step 7.
- Check Use the URL variable.
- Click OK in all opened windows.
For information on audience configuration in Broadsign Control Administrator, see Integrations Section.
The Audience Integration URL must be entered in the Broadsign Control Administrator Monitor Sync configuration to sync audience data with Broadsign Control Administrator.
Note: Domain settings are available only to users assigned the Admin role. For more information, see User Privileges by Role.
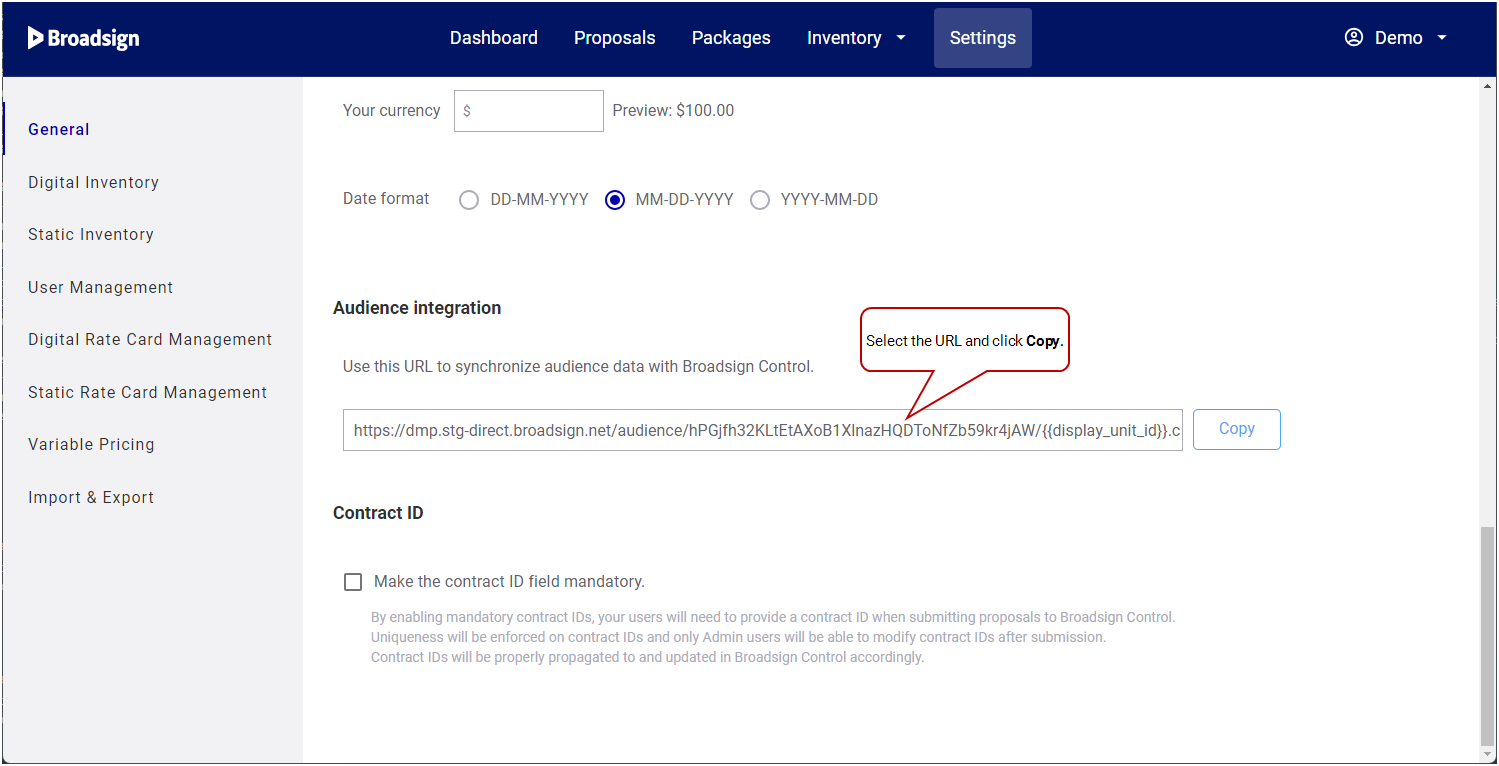
To find the Audience Integration URL:
- Access Broadsign Direct.
- Click the Settings menu item.
- In the Domain Settings section, click General.
- In the Audience Integration part, select the URL and click Copy.
For more details, see Audience integration.
Note: Any configuration profile change will cause a player restart, so it is suggested to make these changes during low-traffic or off hours.
To enable the Audience API (Broadsign Control Administrator):
- Open Broadsign Control Administrator.
- Open the Configurations resources.
- From the list panel, select a configuration. Then, from the view bar, select Edit.
- In the Configuration Properties window, click the Configuration Profiles tab.
- Select a configuration, then click Edit.
- Click Integrations.
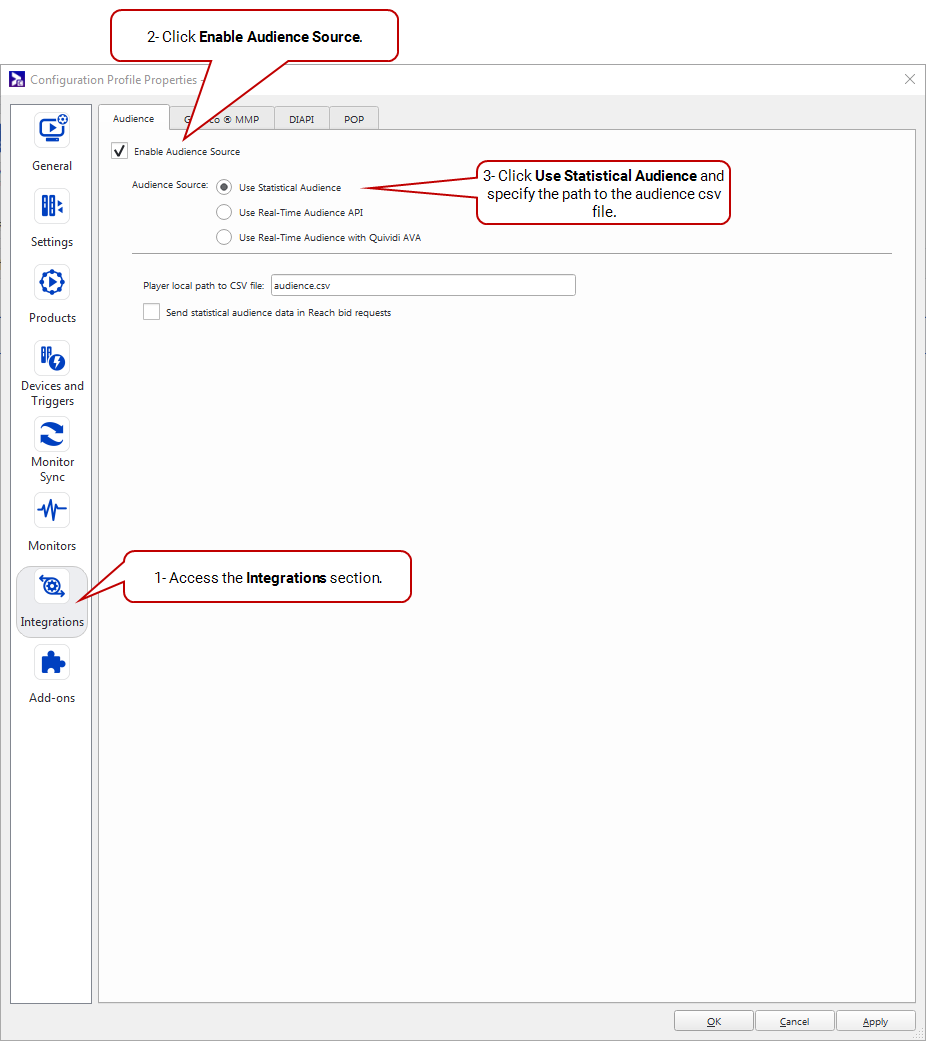
- If you are using Broadsign Control Administrator v13.2 and higher: Enable the Audience API as follows:
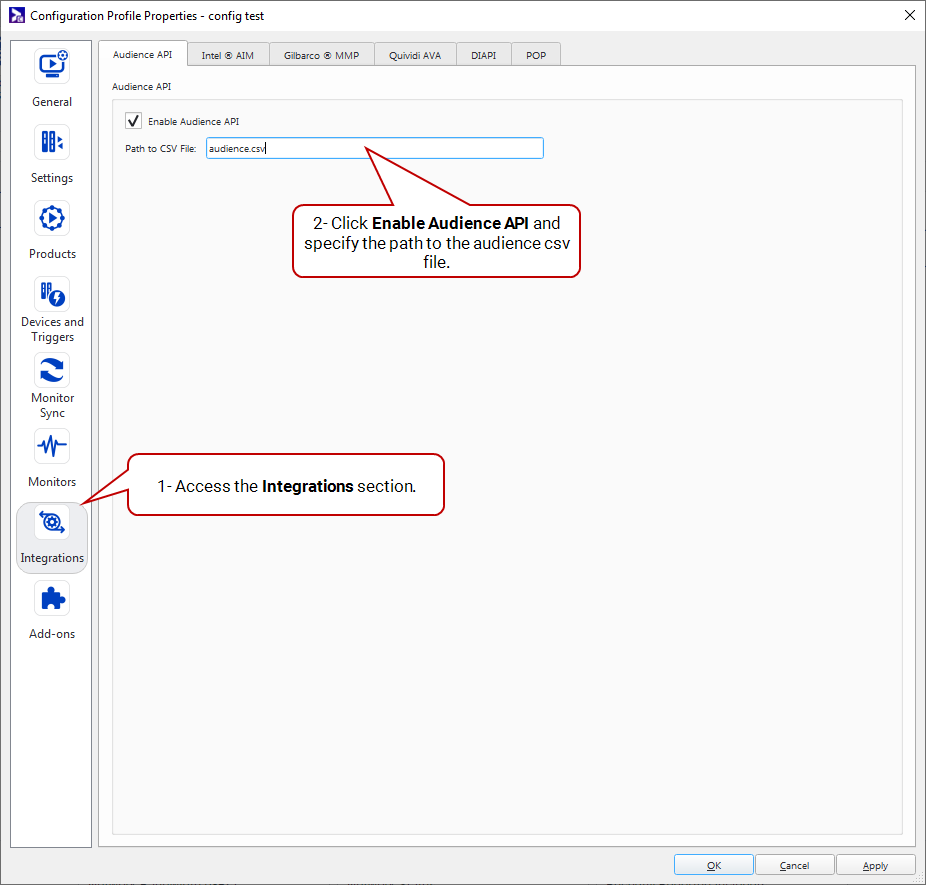
- If you are using Broadsign Control Administrator v13.1.x and lower: Enable the Audience API as follows:
- Click Apply.
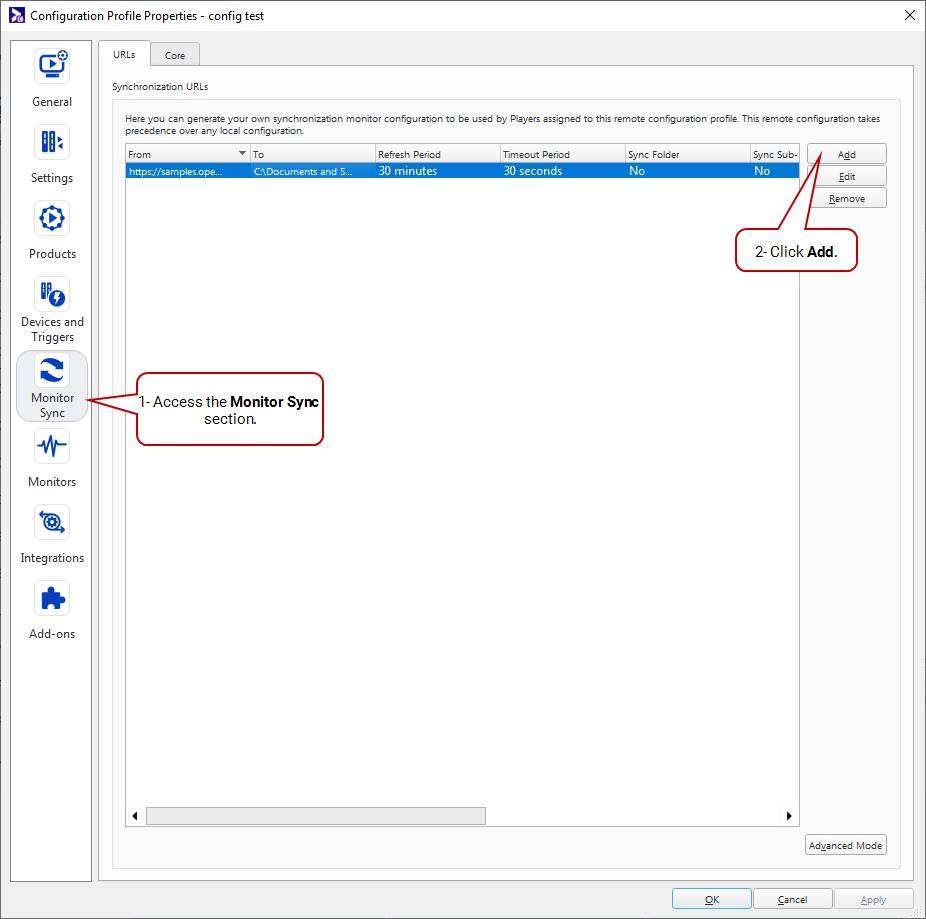
- Click the Monitor Sync section.
- Add a new sync with the audience by clicking Add.
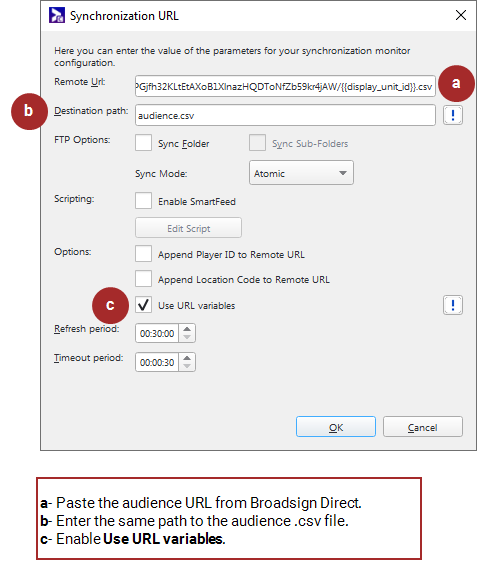
- In the Synchronization URL window that is displayed, do the following:
- In the Remote Url field, paste the URL that you have copied from the Domain Settings in Broadsign Direct. See Find the Broadsign Direct Audience Integration URL for more details.
- In the Destination path field, enter the same path as the audience .csv file specified in Step 7.
- Check Use the URL variable.
- Click OK in all opened windows.
Note: The following step differs depending on the version of Broadsign Control Administrator that you are using.
Add the Display Unit Folder to the Allow List
Once all configuration is finalized, contact Broadsign Services to add your Display Units folder to the allow list in Broadsign Control Administrator. We need to sync selected display units from your Broadsign Control Administrator domain with Broadsign Direct. Any resources (including sub-folders) that appear in this folder will sync with your domain on Broadsign Direct.
Warning: Be sure to only add folders to the allow list that contain display units that are in production. Refrain from including test resources in the folders added to the allow list.
Warning: Before adding the Display Unit folder to the allow list, ensure that the Display Type and Geometry of the Frame are all set. Changing these settings after adding the folder to the allow list creates a new screen in Broadsign Direct, and any proposals targeting the old screen will not be targeting the new screen. For more information, see Configure the Display Unit.
Add the Criteria Folder to the Allow List
Once all configuration is finalized, contact Broadsign Services to add your Criteria folder to the allow list in Broadsign Control Administrator. We need to sync selected criteria from your Broadsign Control Administrator domain with Broadsign Direct. Any resources (including sub-folders) that appear in this folder will sync with your domain on Broadsign Direct.
Warning: Be sure to only add folders to the allow list that contain criteria that are in production. Refrain from including test resources in the folders added to the allow list.
You must add audience data to your screen in Broadsign Direct. For more information, see Import Audience Data.
To properly calculate Impressions or Budget Goal in Broadsign Direct, you must add at least one digital rate card. For more information, see Add and Edit Rate Cards.

