The domain settings section provides the tools needed for an Admin user to configure your network on Broadsign Direct.
For a step-by-step tutorial, see Quick Setup.
Note: Domain settings are available only to users assigned the Admin role. For more information, see User Privileges by Role.
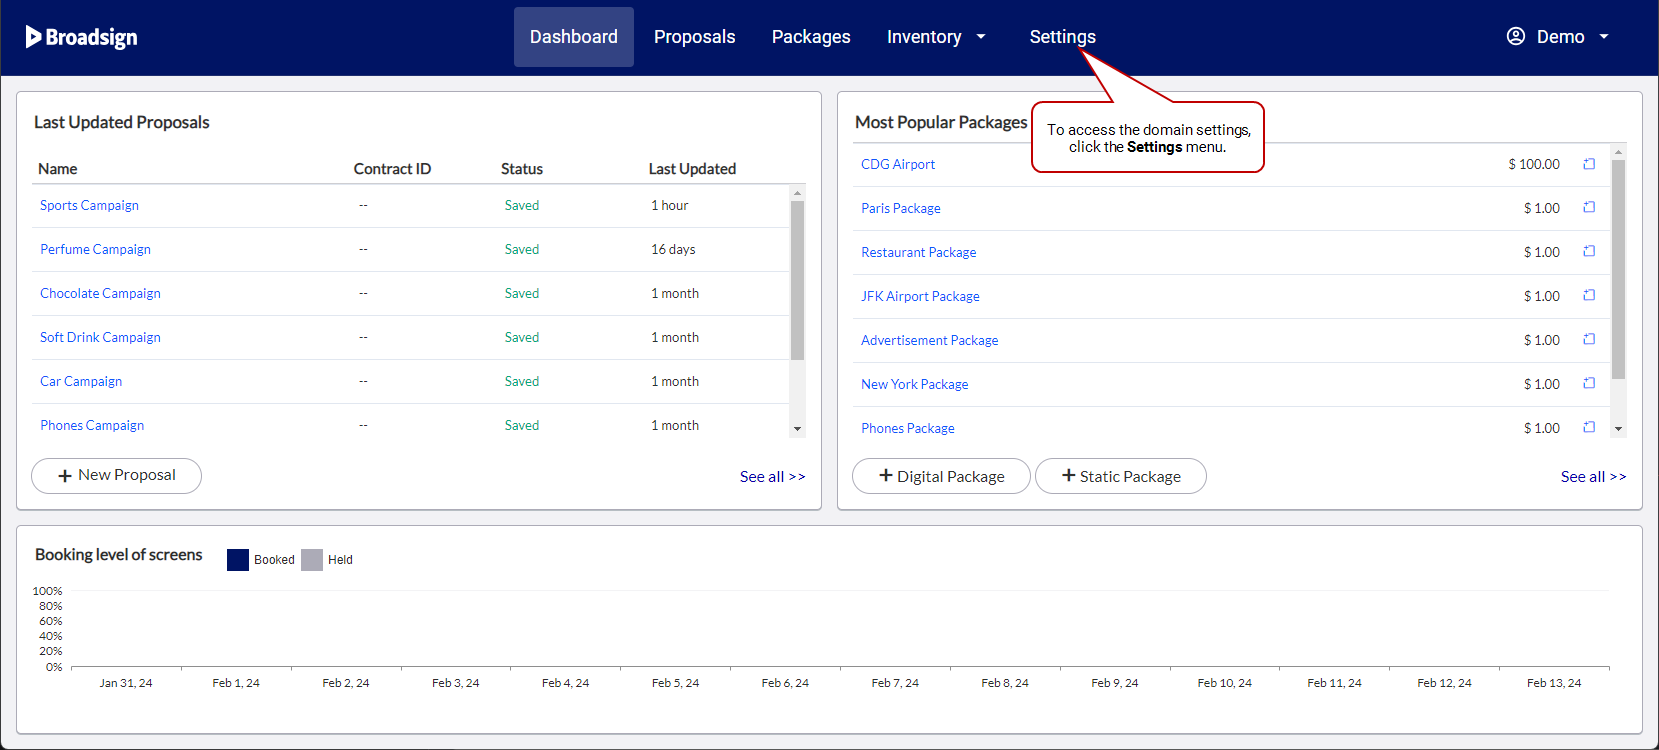
To access the domain settings page:
- Log in to Broadsign Direct as an Admin user (see User Privileges by Role).
- Click the Settings menu item.
In the General section, you can define the following parameters:
Set a proposal hold automatic expiry time in days or week days. See About Inventory Holds.
You can also set when the proposal expires on the expiry day:
- Time of Hold Submission: The expiry time is the same time as when the hold was placed, on the expiry day. This is the default value.
- Midnight: The expiry time is at midnight on the expiry day.
Set a customizable time, in days, to alert the owner with an email notification that their held proposal is about to expire. The default value is 1 weekday, and the minimum value is 1 weekday. See Proposal About to Expire.
Opt to receive email notifications when proposals are held. See Enable the Proposal Hold Approval Feature.
Optimize the booking process by controlling user permissions for proposal holds. See Enable the Proposal Hold Approval Feature.
Prevent Price Change
Once the Cost of a proposal item has been set, you can prevent it from being updated by changes in the Suggested price by checking this option. See Proposal Item Grid.
Define a custom renew hold duration for your held proposal. See Renew Hold Duration.
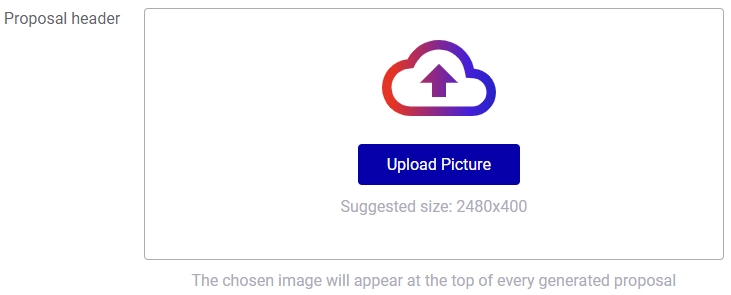
Upload the image that will appear as the header on your proposals. See Configure your Domain.
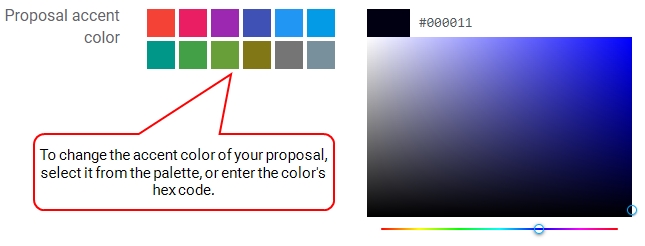
Set accent colors for your proposals. See Configure your Domain.
Set your domain's currency. See Configure your Domain.
Obtain a URL that allows you to synch audience data with Broadsign Control Administrator. See Configure Audience Integration.
The Contract ID field in the Proposal Builder can be configured as mandatory or optional.
-
Make the contract ID field mandatory – This setting determines whether users are required to provide a contract ID when submitting proposal to Broadsign Control.
-
Enforce contract ID for hold – This setting is available once the Make the contract ID field mandatory setting is enabled. It determines whether users are required to provide a contract ID when holding proposals.
Uniqueness will be enforced on contract IDs and only Admin users will be able to modify contract IDs after submission. Contracts IDs will be properly propagated to and updated in Broadsign Control accordingly. See Proposal Name and Client Info.
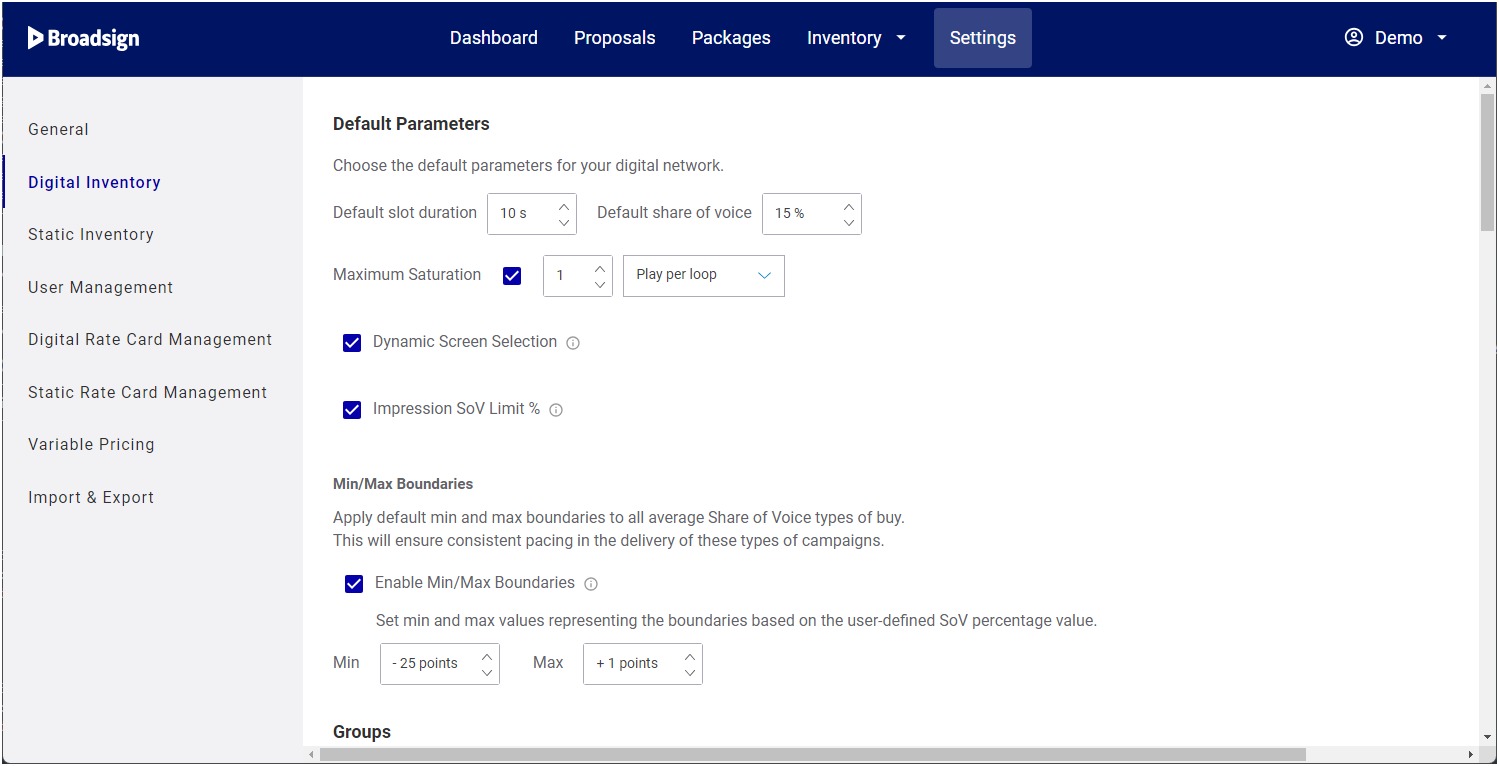
The Digital Inventory section allows you to configure some digital inventory parameters for your domain.
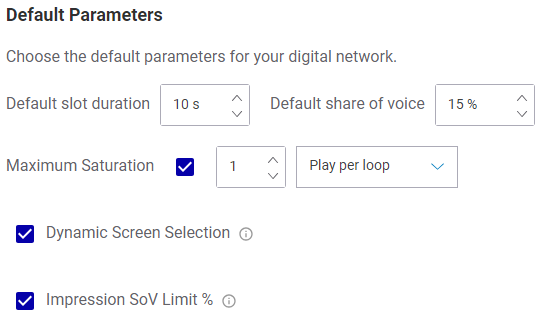
This section defines the default parameters for your digital network.
Note: You can override these default settings in individual screens in your inventory. See Digital Inventory Page.
| Parameter | Description |
|---|---|
| Default Slot Duration | Set the default duration, in seconds, of the ad duration. |
| Default Share of Voice | Set the default percentage of activities for one specific brand. |
| Maximum saturation |
Set the maximum saturation (that is, number of ad plays per loop or number of loops per play) allowed for the Impressions Goal, Budget Goal, Play Goal, and Average Share of Voice (SoV) types of buy. It allows you to spread impression, budget, play goals, or average SoV by applying a constraint. This could be used, for instance, in smaller domains with less screens to ensure that there are always slots available in your loop. The goal seek algorithm, availability check, and auto-rebalancing features also take into account the maximum saturation setting. The Maximum saturation setting is disabled by default and cannot be overridden in the Digital Inventory Page. |
| Dynamic Screen Selection | Allows you to enable automatic selection of the most optimally available screens. See Select Screens Dynamically. |
| Impression SoV Limit % |
Allows you to impose a limit on the amount of time a given impression proposal item can occupy in a loop. This can prevent over-saturation in certain conditions. See SoV Limit. |
When using Average Share of Voice types of buys, you set a percentage target to reach. You can apply a minimum and maximum boundary for all Average Share of Voice types of buy on your domain. These boundaries can be used to provide more pacing control in the delivery of these types of proposal items.
To activate the boundaries, check Enable Min/Max Boundaries and enter values in the Min and Max fields. The delivery of the proposal item will then respect these boundaries.
Note: The Maximum saturation setting at the domain level (defined in Default Parameters) will be the absolute max boundary. The Maximum saturation will override the Max boundary if the Maximum saturation is lower than the Max boundary.
For more information, see About Min/Max Boundaries.
A proposal item (campaign) created in Broadsign Control may have the Auto-synchronize bundle feature enabled. You can enable or disable that synchronization on proposal items that have screen groups.
- Enable Synchronization checked – The Auto-synchronize bundles feature in Broadsign Control is enabled. The screens and screen groups selected in the proposal will play content at the same time.
- Enable Synchronization not checked – The Auto-synchronize bundles feature in Broadsign Control is disabled.
For more information, see the Media Trigger information in the Broadsign Control documentation.
Enable shared goal, which allows multiple line items to contribute towards one goal. See Use Shared Goals.
Use the URL in this section to control the external saturation in Broadsign Control Administrator. See Configure Audience Integration.
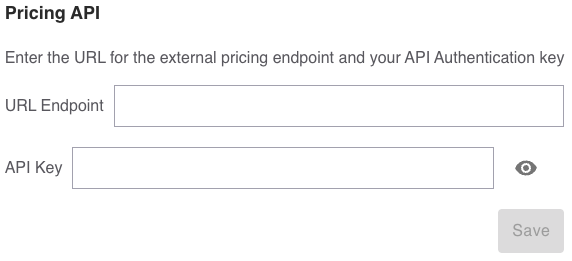
The Pricing API section allows you to define how to connect Broadsign Direct to an external pricing endpoint. See CPM Overwrite and Use the External Pricing API.
| Parameter | Description |
| URL Endpoint | URL of your external pricing API endpoint. |
| API Key | API Authentication key to access your external pricing API endpoint. |
Rebalancing is the daily task that modifies campaign playouts (distribution). This functionality will speed up or slow down campaign delivery to address under/over performing campaigns to ensure that you deliver any "repetitions" or "impressions" promised to your client. We like to call that a self-healing process.
The Rebalancing feature checks periodically the progress of Live proposal items (campaigns) and adjusts their external saturation to achieve the expected impressions or repetitions at the end.
The Reallocation feature (Optimization Engine) optimizes your network by shuffling the Held or Booked proposal items (campaigns) to accommodate new proposal items. The feature allows you to say yes! more often and create new opportunities to fit new proposal items that, without Reallocation, may not have appeared to be possible.
For more information, see Use the Rebalancing Feature and Use the Reallocation Feature.
Rebalancing & Reallocation
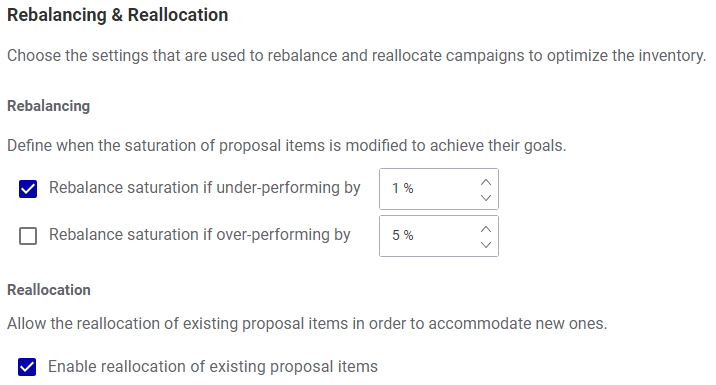
You can choose the settings that are used to rebalance and reallocate proposal items to optimize the inventory.
Rebalancing
The following rebalancing parameters allow you to define when to modify the saturation of proposal items to achieve their goals. You can enable none, one, or both of them.
- Rebalance saturation if under-performing by a set percentage threshold. The default value is 5%. You can use values from 1% to 100%.
- Rebalance saturation if over-performing by a set percentage threshold. The default value is 5%. You can use values from 1% to 1000000%.
For more information, see Enable Rebalancing Thresholds.
Reallocation
When enabled, Reallocation allows you to readjust the saturation of existing proposal items within the campaign parameters to maximize the space available. The following types of buys are supported:
- Budget Goal
- Impressions Goal
- Play Goal
- Average SoV
- Campaign Average SoV
- Daily Average SoV
- Daily Average SoV per Screen
For more information, see Use the Reallocation Feature.
Saturation Freeze
When enabled, Saturation Freeze will not allow rebalancing or reallocation of the proposal items from a specific date. For more information, see Use the Saturation Freeze Feature.
Rebalancing Types of Buys
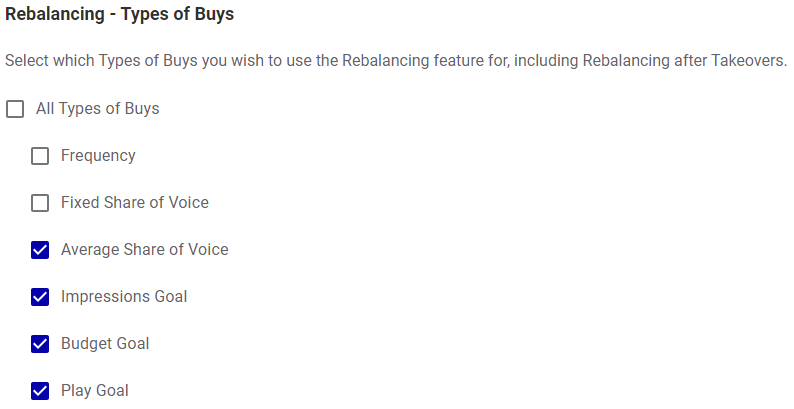
Select which types of buy will be rebalanced on your domain. You can enable all types or buys, or select individual ones. When rebalancing is enabled on the selected types of buy, it is triggered when proposal item performance is under the configured rebalancing threshold for the domain.
Tip: Broadsign recommends to enable Rebalancing for every type of buy.
For more information, see Select Types of Buys.
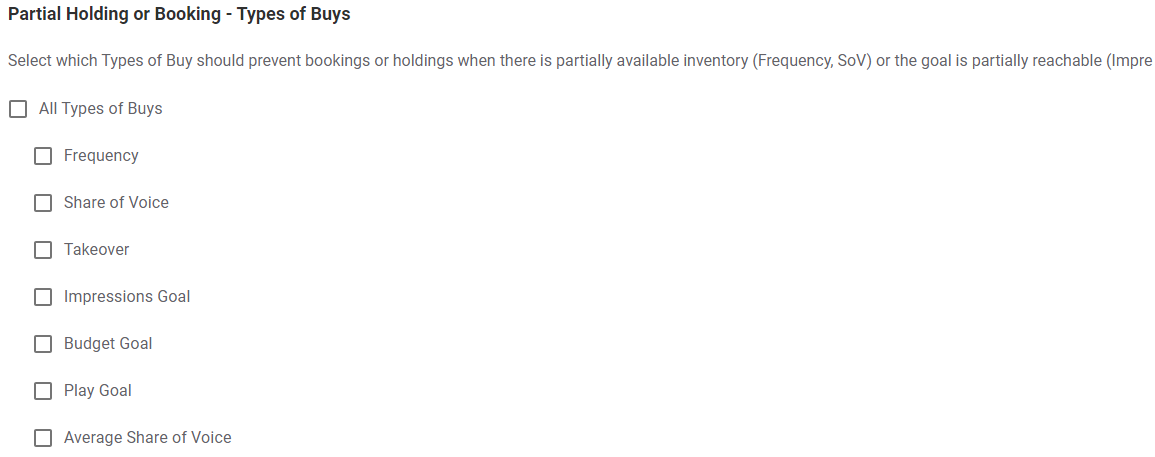
Partial Holding or Booking - Types of Buys
You may want to prevent your users from reserving inventory when the desired goal cannot be achieved due to partial availability.
You can specify which types of buys prevent users from reserving inventory when there is partial availability. You can define that types of buys cannot be booked or held in the following two scenarios:
- If proposals based on Frequency or Share of Voice types of buy have partially available inventory
- If proposals based on Impressions, Budget, or Play Goal types of buy have a goal that is partially reachable
You can select all types of buys, or only specific ones.
When a user clicks the Submit for booking or Hold button in the Proposal Builder, the Availability check window opens and the Submit or Hold button is not available. Also, if the user needs a hold request approval, the Request Hold button is not available. The user can check the blocking proposals and take action. See Availability Check Feature for more details.
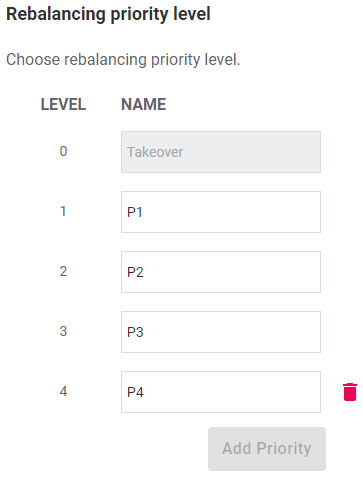
Rebalancing Priority Level
Create the priority levels that will be used on proposal items. For more information, see Create Priority Levels.
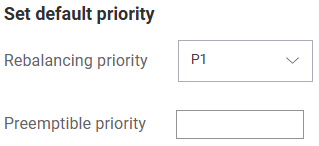
Set Default Priority
This section defines the following default priorities:
| Parameter | Description |
|---|---|
| Rebalancing priority | Set the default Rebalancing Priority Level used when creating a line item. |
| Preemptible priority | Set the default Priority used when creating Preemptible line items. |
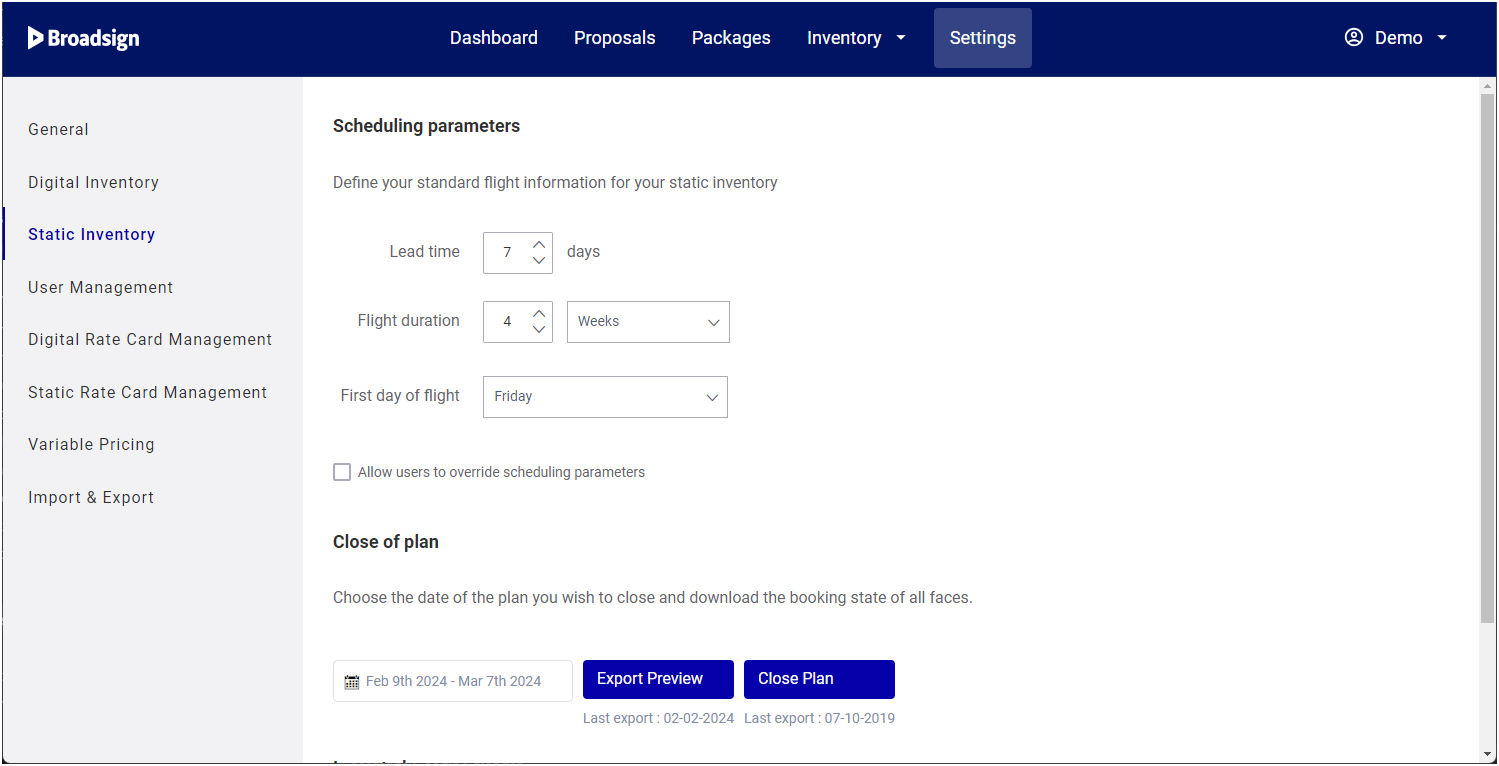
The Static Inventory section allows you to configure some static inventory parameters for your domain.
Note: We use the term "plan" to refer to the proposal items you have assigned to each face for a given period (week/flight/deployment).
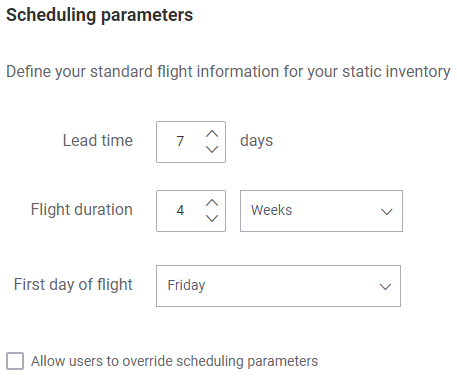
This section defines the standard flight information for your static inventory. You can also choose to allow users to override these settings.
| Parameter | Description |
|---|---|
| Lead Time | The number of days before the start date of a proposal for which users are not allowed to book static faces in a proposal. For example, if the lead time is two days, the current date is January 1st, and you try to book a proposal for January 2nd, you will not be able to do so. |
| Flight Duration | The default duration of an ad flight, in days or weeks. |
| First Day of Flight | The default first day of an ad flight. |
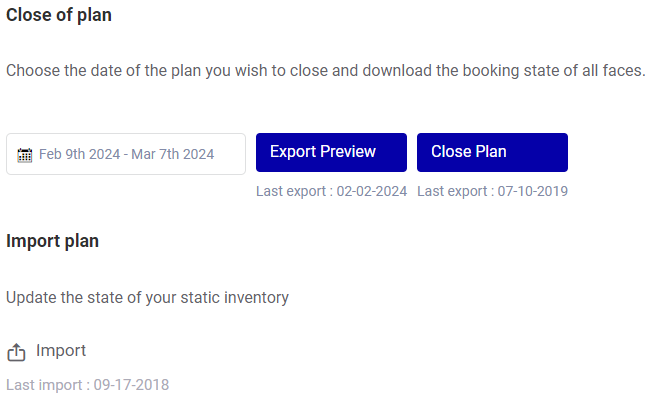
The Close of Plan feature allows you to change the status of your static proposals from Submitted or Processing to Booked. For more information, see Use the Close of Plan Feature.
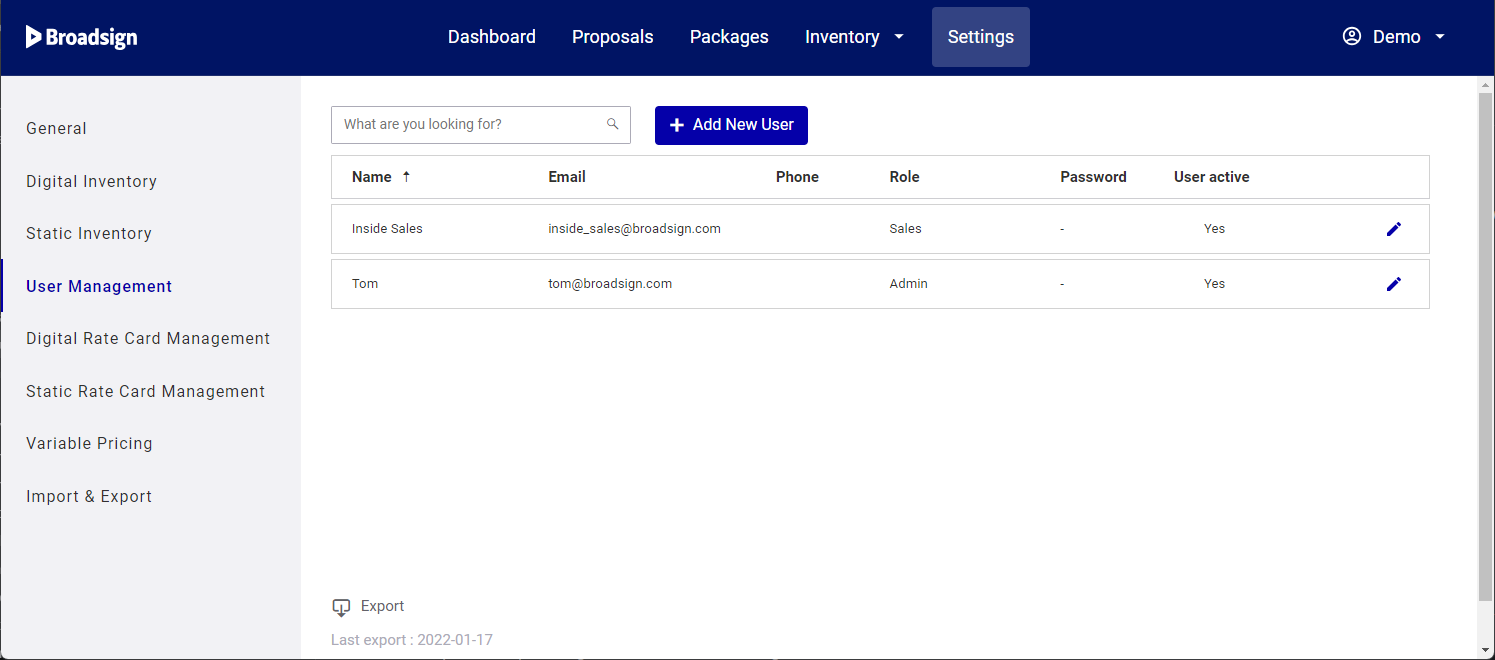
In the User Management section you can add users, create passwords and assign roles (Sales, Sales Coordinator, Manager or Admin). You can also export a list of users in your domain. For more information, see Add and Edit Users.
User List Components
| Component | Description |
|---|---|

|
Find users from within the user list panel. See Edit a User. |

|
Opens a new row in the user list panel so you can create a new user. See Add a User. |
User List Column Headings
| Column | Description |
|---|---|
| Name | The name of the user. Could be a given name or a position (for example, “Inside Sales”). Will appear next to the user icon (see User Icon and Help). |
| The user’s email address. Required for log in |
|
| Phone | The user’s phone number. Optional. |
| Role |
The user’s role, associated with specific privileges:
For more details about the privileges related to each role, see Add and Edit Users. |
| Password | When in edit mode, if you click on this field, you can change the user’s password (see Add and Edit Users). Remains hidden. |
| User Active | Indicates whether or not a user is active. For example, an employee may leave. You can set their user to “inactive” so that no one can use those credentials to log in. Their data remains on your network. For more information, see Add and Edit Users. |
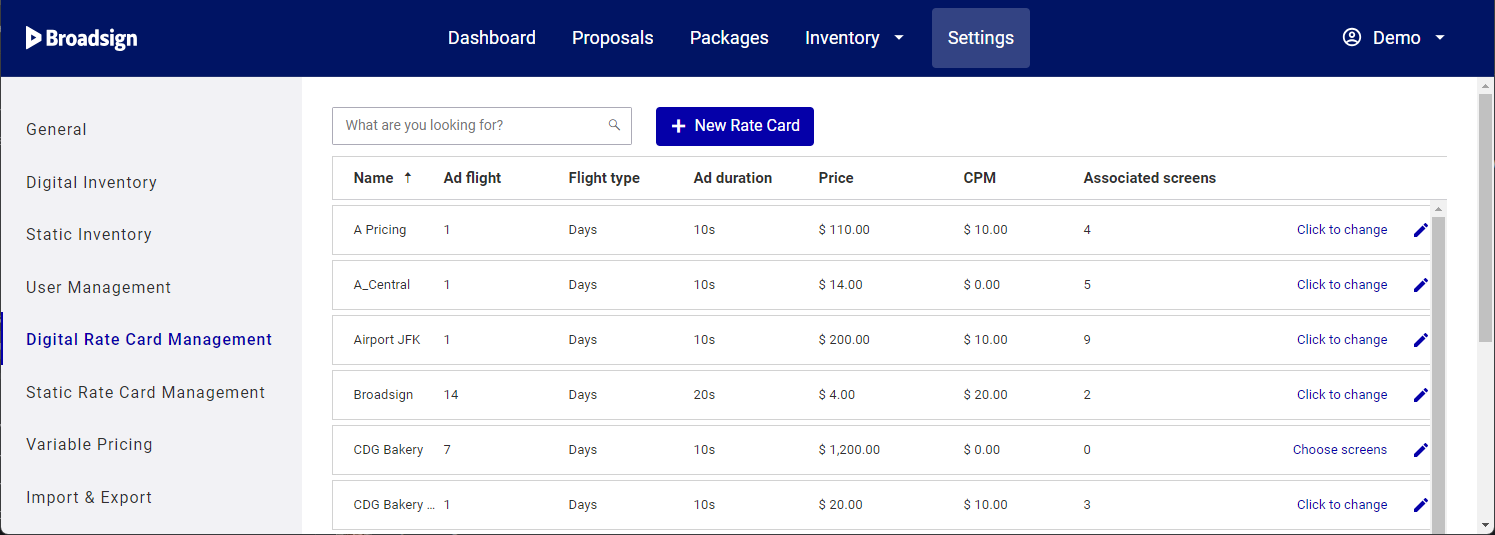
In the Digital Rate Card Management section, you can create rate cards and assign them to screens on your domain. The rate card data will appear in both the Package Builder and the Proposal Builder). Also, you can set the slot duration, flight duration, and price. For more information, see Add and Edit Rate Cards.
For more information about static rate card management, see Static Rate Card Management Section.
Digital Rate Card List Components
| Component | Description |
|---|---|

|
Find rate cards from within the rate card list panel. See Edit a Rate Card. |

|
Opens a new row in the rate card list panel so you can create a new rate card. See Add a Rate Card. |

|
Click to choose associated screens. Opens your screen inventory. Associate screens to this card, as needed. See Associate Screens with a Rate Card. |

|
Click to change associated screens. Opens a list of screens associated to this rate card. Add or remove screens, as needed. See Associate Screens with a Rate Card. |
|
Click |
Digital Rate Card List Column Headings
| Column | Description |
|---|---|
| Name | The name of the rate card. |
| Ad Flight | With the Flight Type, displays the duration of the rate card’s flight (for example, “2 days”, “4 weeks”, etc). |
| Flight Type |
The unit of the rate card’s flight length (for example, “2 days”, “4 weeks”, etc.):
|
| Ad Duration | The duration of the rate card’s ad flight (in seconds). |
| Price | The price of the rate card, using your domain’s currency. See Configure your Domain. |
| CPM | The cost per thousand impressions. |
| Associated Screens | The number of screens from your network that are associated with the rate card. See Add and Edit Rate Cards. |
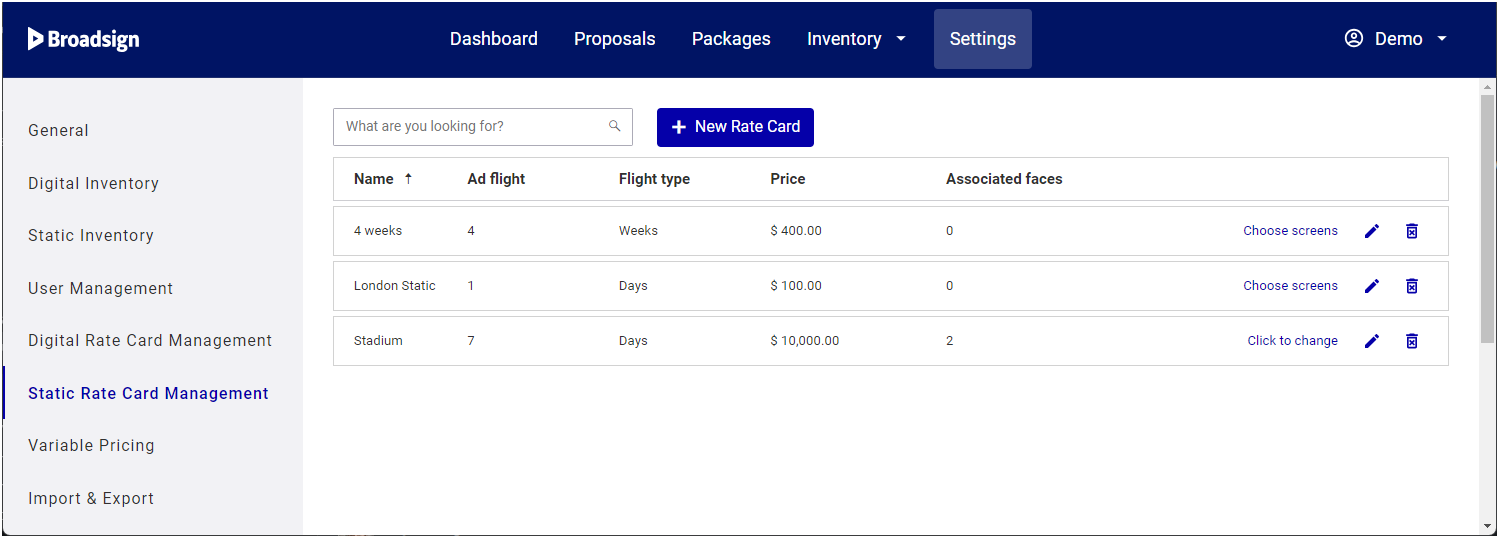
In the Static Rate Card Management section, you can create rate cards and assign them to faces on your domain. You can set the flight duration, flight type and price. For more information, see Add and Edit Rate Cards.
For more information about digital rate card management, see Digital Rate Card Management Section.
Static Rate Card List Components
| Component | Description |
|---|---|

|
Find rate cards from within the rate card list panel. See Edit a Rate Card. |

|
Opens a new row in the rate card list panel so you can create a new rate card. See Add a Rate Card. |

|
Click to choose associated screens. Opens your screen inventory. Associate screens to this card, as needed. See Associate Screens with a Rate Card. |

|
Click to change associated screens. Opens a list of screens associated to this rate card. Add or remove screens, as needed. See Associate Screens with a Rate Card. |

|
Click |
Static Rate Card List Column Headings
| Column | Description |
|---|---|
| Name | The name of the rate card. |
| Ad Flight | With the Flight Type, displays the duration of the rate card’s flight (for example, “2 days”, “4 weeks”, etc). |
| Flight Type |
The unit of the rate card’s flight length (for example, “2 days”, “4 weeks”, etc.):
|
| Price | The price of the rate card, using your domain’s currency. See Configure your Domain. |
| Associated Faces | The number of faces from your network that are associated with the rate card. See Add and Edit Rate Cards. |
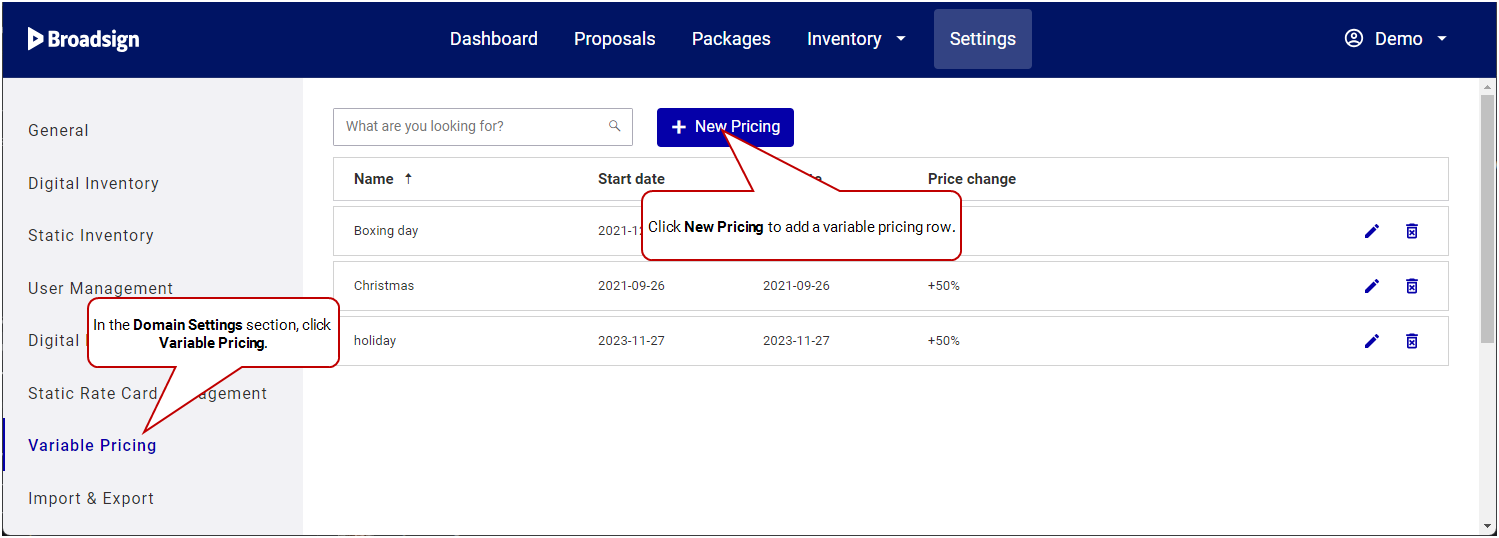
In the Variable Pricing section, you can create pricing discounts or increases. Then, when creating a package, you can enable variable pricing (see Description, Synchronized Screens, Ad Flight, and Price).
Note: If you do a proposal item manual selection, variable pricing is enabled by default. All discounts or increases that are active during the same date range will apply.
For a more detailed tutorial, see Set Up Variable Pricing.
Variable Pricing List Column Headings
| Column | Description |
|---|---|
| Name | The name of the individual variable price. Required. |
| Start Date | Set the start date of the individual variable price. Required. |
| End Date |
Set the end date of the individual variable price. Required. |
| Price Change |
Set the price change (that is, the discount or increase). Note: The value of the price change must be greater than -100%. Any two decimal values over -100 are accepted (for example, - 99.85, 2.12, 600000.01). |
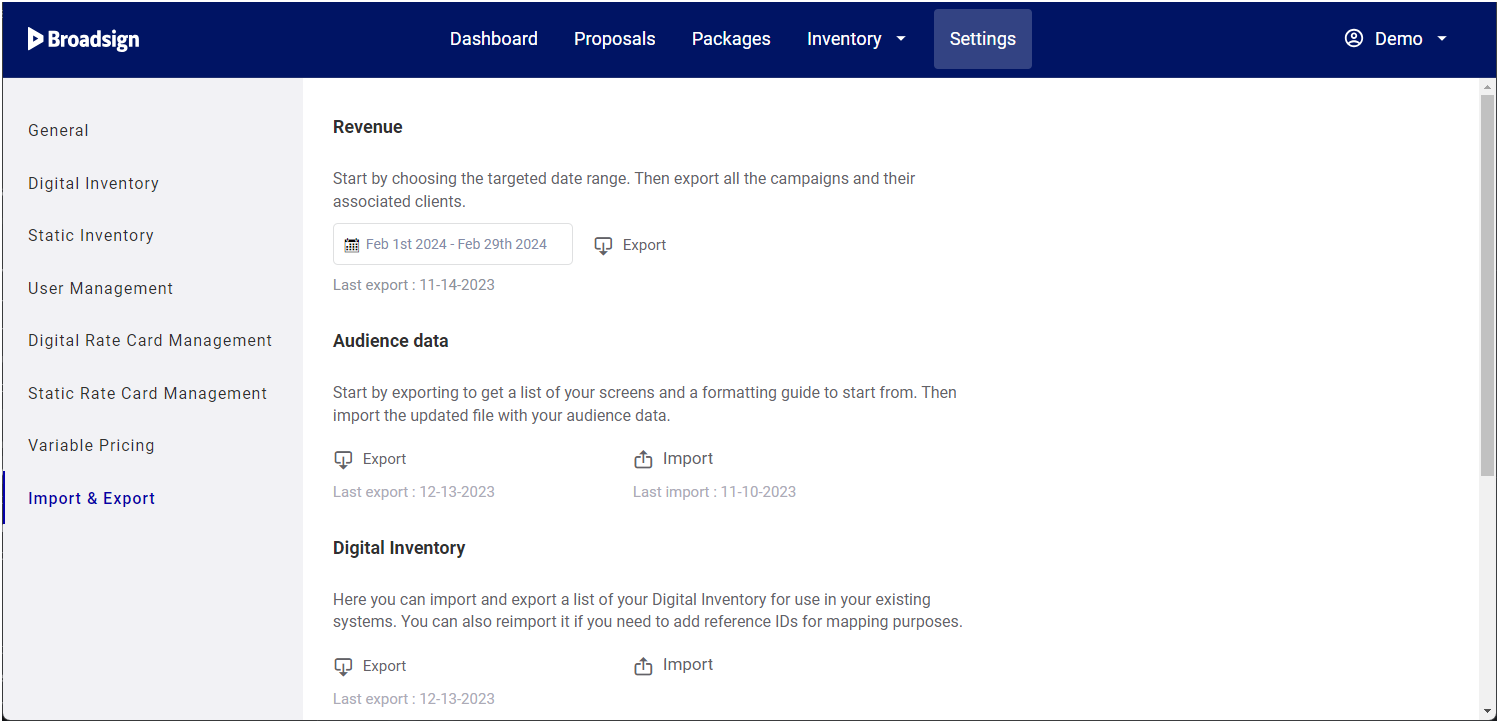
Import & Export
In the Import & Export section, you can carry out a few tasks:
- Export revenue data to easier manage your billing process (see Export Revenue Data).
- Configure the 1st party audience data that your sales team can target (see Import Audience Data).
- Import and Export a list of your Broadsign Direct screen inventory (see Set Up Digital Inventory).
- Import and Export a list of your static inventory (that is, your "faces") that your sales team can target (see Set Up Static Inventory).
- Import and Export a list of Category Exclusions that your sales team can apply to packages and proposals (see Set Up Category Exclusions).

