This section describes how to select screens dynamically in the Campaign Builder, which allows you to create guaranteed campaigns![]() A campaign represents the highest level and is set up between you and the advertiser. The Broadsign Platform allows you to create the following types of campaigns: Audience, Guaranteed, Programmatic, and Static. with one or more Line items
A campaign represents the highest level and is set up between you and the advertiser. The Broadsign Platform allows you to create the following types of campaigns: Audience, Guaranteed, Programmatic, and Static. with one or more Line items![]() In the Guaranteed Campaigns module, line items are within each campaign. These are the guidelines that you give the Guaranteed Campaigns module. You can have multiple line items per campaign. and creatives
In the Guaranteed Campaigns module, line items are within each campaign. These are the guidelines that you give the Guaranteed Campaigns module. You can have multiple line items per campaign. and creatives![]() Creatives are the visual aspect of the ad. You can have multiple creatives per line order or line item..
Creatives are the visual aspect of the ad. You can have multiple creatives per line order or line item..
Dynamic Screen Selection
Guaranteed Campaigns
As an option enabled by your admin in the domain settings, Dynamic screen selection selects available space from a targeted pool of screens while respecting the campaign criteria.
Dynamic screen selection offers the ability to automatically move campaigns between screens within a prescribed pool. This can help free up space allowing you to accept more campaigns that would previously have been blocked.
A pool of screens is created using one or more criteria (for example, airports). Each screen in the pool has the same qualitative characteristics. A screen goal is set such that the campaign will play out on that number of screens from the pool every day of the campaign. The Guaranteed Campaigns module selects the screens based on availability. However, because each of the screens in the pool is interchangeable, while the screen goal is maintained every day of the campaign, the selection of screens from the pool the campaign plays out on can vary each day. This allows the campaign to be automatically reallocated between screens when required helping free up space for other campaigns.
Tip: Broadsign recommends that screens in the pool have the same opening duration.
Dynamic screen selection offers the following benefits:
- It promotes inventory flexibility: Rather than blocking new campaigns by locking up screens or space, the system dynamically selects screens based on what’s available while adhering to the parameters established at the time of building the campaign.
- It reduces the need to manually reschedule: Another benefit is that you’ll no longer have to scour your inventory from A to Z to find another screen if one is at occupancy. Dynamic screen selection does this automatically for you—seamlessly, might we add.
- It allows media owners to say yes to more campaigns more regularly: This feature means campaigns can move between screens, freeing up space to make room for any new incoming activity.
Note: Dynamic screen selection cannot be used in conjunction with Shared Goal.
Note: Dynamic screen selection is available for the Frequency and Share of Voice types of buy.
Note: Dynamic Screen Selection line items cannot be amended.
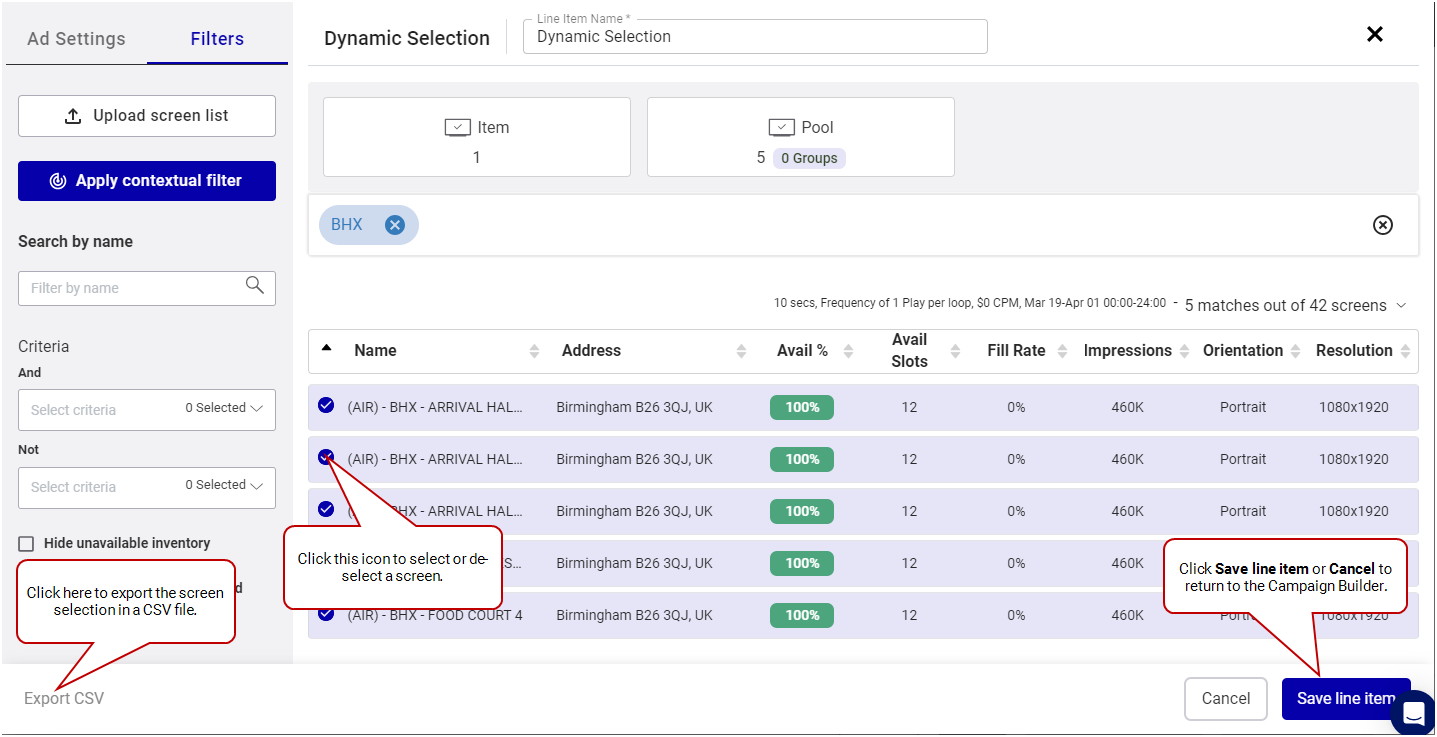
Clicking Select Screens Dynamically opens the Line Item window. For more information on the Line Item window, see Create a Digital Line Item.

For more information on the Line Item window, see Create a Digital Line Item.
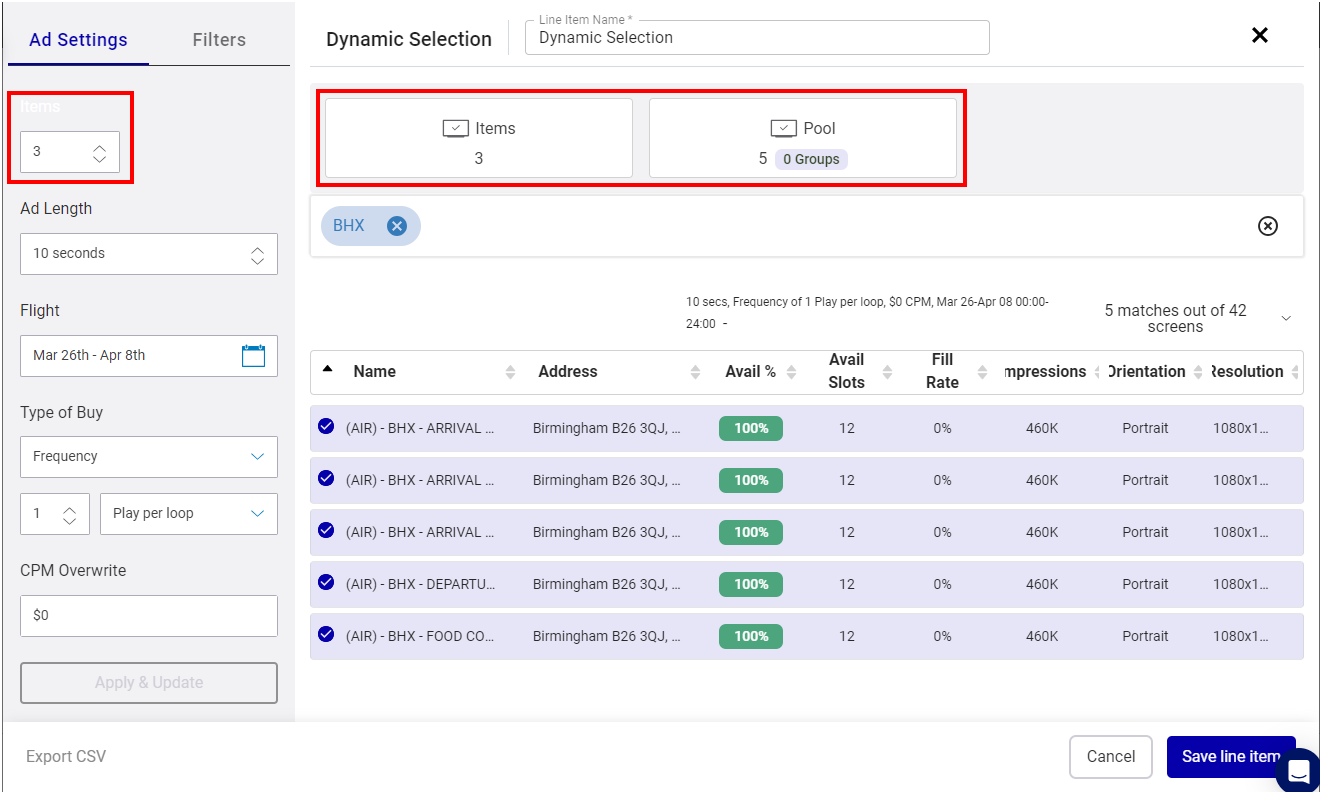
The Line Item window allows you to manage the screens and settings associated with your advertising campaigns. Here's what you can do:
- Specify Screen Count – Use the Screens drop-down menu to determine the number of screens to allocate from the available Pool.
- Define the Screen Pool – Select individual screens or screen groups to include in the Pool of potential screens for automatic allocation. This involves using filter criteria and manual selection.
- Name the Line Item – Provide a clear and descriptive name for your line item.
- Configure Parameters – Adjust the settings of the line item to meet your campaign requirements.
- Save the Line Item – Save the selected screen pool and screen goal as a new line item.
- Export screen selection – Download a CSV file of your screen selection. The Export as CSV button becomes available after saving the line item at least once.
Once these steps are complete, the selected screens appear in a list format within the Campaign Builder, with each row representing a line item.
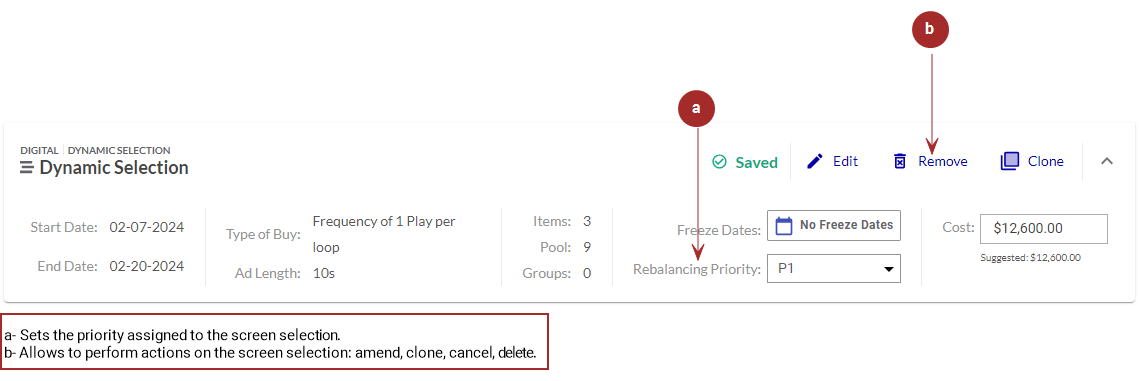
Once you have created a line item, you can perform the following tasks in the Campaign Builder:
Edit a Digital Line Item
Click on a digital line item in the list to open the Digital Line Item window, where you can add or remove screens or screen groups from the selection. For more details, see Edit Line Items.
Set the Priority of Digital Line Items
Assign a priority to an existing digital line item in the Rebalancing Priority field. This determines the order in which digital line items are served. For more information, see Use the Rebalancing Feature.
Preemptible line items cannot be prioritized.
Remove Line Items
To remove a line item that has been saved but not yet submitted, click the  button.
An item with the Held status cannot be removed.
Cancel Line Items
Cancel a line item that is either Submitted, Booked, or Live by clicking the  button. See Cancel a Line Item.
Clone a Line Item
Create a copy of an existing line item by clicking the  button. See Clone a Line Item.
Amend a Line Item
Amend a line item by clicking the  button. This will open the Digital Line Item window. For more details, see Amend Line Items.


