By following the steps in this tutorial, you will complete the initial setup of a digital signage network.
We have created a video playlist for our Network Setup Tutorial. It covers the same material as our online documentation, along with some advanced features.
These are the videos in the Network Setup playlist:
- 1 of 5: Loop Policies
- 2 of 5: Criteria
- 3 of 5: Display Types
- 4 of 5: Registering a Player
- 5 of 5: Display Units
A loop policy is a collection of rules that allows the player to create its own playlist.
For more details about loop policies, see Loop Policies.
To create a loop policy:
-
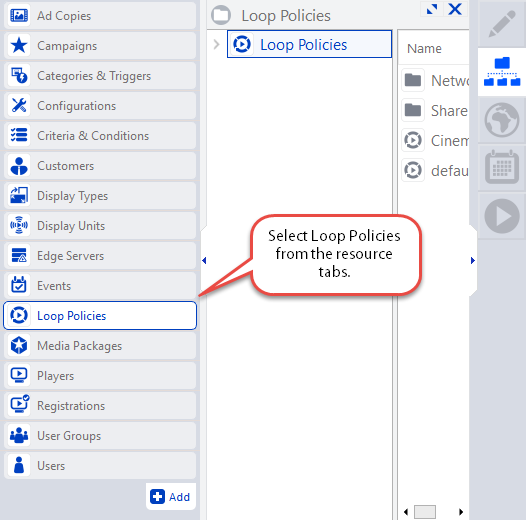
From among the resource tabs on the left, select Loop Policies.
- Select the Network Setup ribbon.
- Click the Folder icon.
- Give the folder a name (for example, "Network 1").
- Click Finish.
-
In the Network Setup ribbon, click the Loop icon.
- In the Select a folder dialogue box, select a folder. In this example, we will use the "Network 1" folder.
- Click OK. The Add Loop Policy Wizard opens.
-
On the Welcome page, give the loop policy a descriptive name.
Note: We recommend giving the loop policy a name that combines the frame in which it belongs, the length of the loop, and the duration of each slot. In this example, we will call the loop policy "Main - 5 min - 30 sec".
- Click Next.
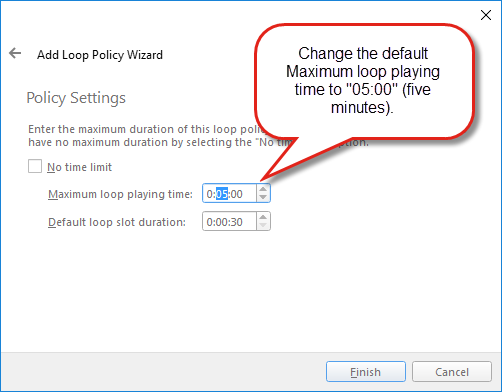
- On the Policy Settings page, make the following changes:
- Set the Maximum loop playing time to five minutes.
Set the Default loop slot duration to 30 seconds.
- Click Finish.
We have created a loop policy. Next, we will add some criteria to our network.
Criteria
Criteria are key words that you can use to create flexible and scalable targeting for your network. You can assign multiple criteria to each display unit or frame for efficient, error-free scheduling.
For more details about criteria and conditions, see Criteria and Conditions.
To add criteria:
- From among the resource tabs on the left, select Criteria & Conditions.
- In the Network Setup ribbon, click the Folder icon.
- Give the folder a name (for example, "Geographical").
-
Repeat steps 2 and 3, naming the folders "Frame" and "Network Chain".
Note: In both the folder panel and list panel, you should have three folders: "Frame", "Geographical" and "Network Chain".
-
Click the Criteria or Condition icon.
- In the Select a folder dialogue box, select "Geographical".
- Click OK. The Add Criteria Wizard opens.
- On the Welcome page, give the criteria a descriptive name. In our example, we will use "New York" (but any geographical location will work).
- Click Next.
- On the Criteria Type page, select All.
- Click Finish.
- Repeat steps 5-11, creating criteria called "Paris" and "London".
- Click the Criteria icon.
- In the Select a folder dialogue box, select "Frame".
- Add four criteria to the "Frame" folder, and name them "Main", "Side", "Ticker" and "Background".
- In the "Network Chain" folder, add two criteria and name them "Retail" and "Restaurants".
Now that we have a loop policy and some criteria, we will add a few display types.
Display types profile the display characteristics of the screen hardware in use on the network. When you create a display unit, you must assign a display type to it. The display type indicates the maximum display resolution allowed by the hardware, as well as its orientation.
For more details about display types, see Display Types.
To add display types:
- From among the resource tabs on the left, select Display Types.
- In the Network Setup ribbon, click the Display Type icon.
- In the Select a folder dialogue box, select "Display Types".
-
Click OK. The Add Display Type Wizard opens.
Note: We recommend giving the display type a name that describes its dimensions. In this example, we will call the display type "1280 × 720".
- Click Next.
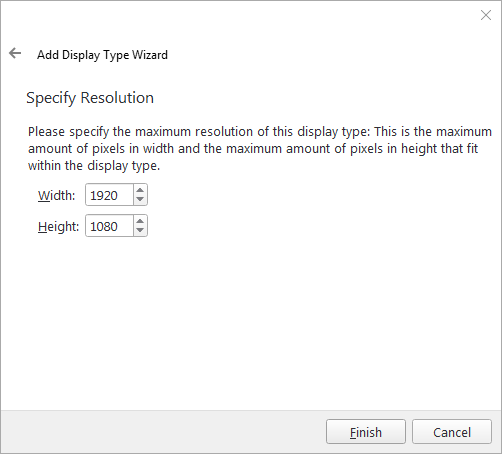
- On the Specify Resolution page, enter the following information:
- Width – 1280
- Height – 720
- Click Finish.
- Repeat steps 2-7, creating a display type called "1920 × 1080".
Now that we have a loop policy, some criteria and a few display types, we will register a player.
Player resources in Broadsign Control Administrator represent PCs running Broadsign Control Player. They communicate with Broadsign Server to receive their scheduling information and display proper content.
Note: When a player registration replaces an existing player, the system retires the replaced player upon completion of the registration wizard, not during the new player's registration process. For more information, see Replace a Player.
Note: Every Evaluation Agreement has three players with which you can evaluate Broadsign Control Administrator.
To register a player:
- Ensure that you have a PC-player for your demo-network.
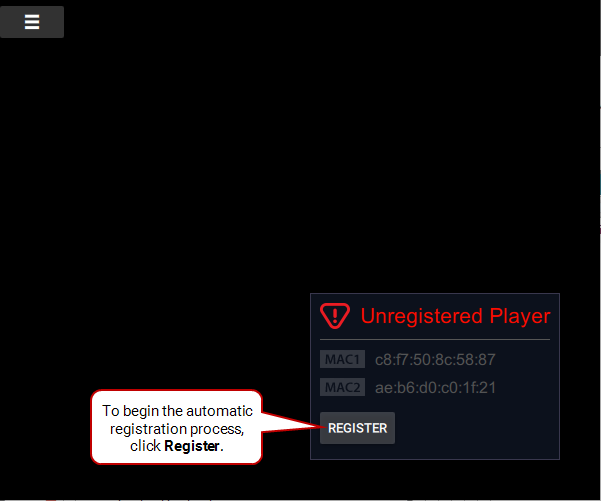
- Open Broadsign Control Player.
-
Click Register.
- Follow the steps on the screen for a player registration. For this demonstration, you will skip through most of the pages of the registration, except the following:
- On the Display Settings page, select the display unit that you created in Add a Display Unit.
- On the Registration Name page, name the player (e.g., "Player 1").
Once registered, the new player will appear in Broadsign Control Administrator under the Players resource tab. The player polls/connects with Broadsign Server, allowing your display unit/player to download your content.
The final step in our Network Setup tutorial is to add a display unit, combining all of the resources we have created so far.
Broadsign uses the term "display unit" to refer to an individual screen on your network. Display units bring together several settings required for each screen.
Note: In this part of the Network Setup tutorial, we will cover the creation of a single display unit. For features like opening hours and frame layouts, see the Display Unit training video.
For more general information about display units, see Display Units. For information about advanced features like device control and network control, see Edit Display Unit Properties.
To add a display unit:
- From among the resource tabs on the left, select Display Units.
- In the Network Setup ribbon, click the Folder icon.
- Give the folder a name. In this example, we will call it "Network 1".
- Click Finish.
- In the Network Setup ribbon, click the Display Unit icon.
- The Select a folder dialogue box opens. Select your new folder.
- Click OK. The Add Display Unit Wizard opens.
- On the Welcome page, give the display unit a descriptive name. In our example, we will use "Location 1".
- Click Next. The Display Unit Type page opens.
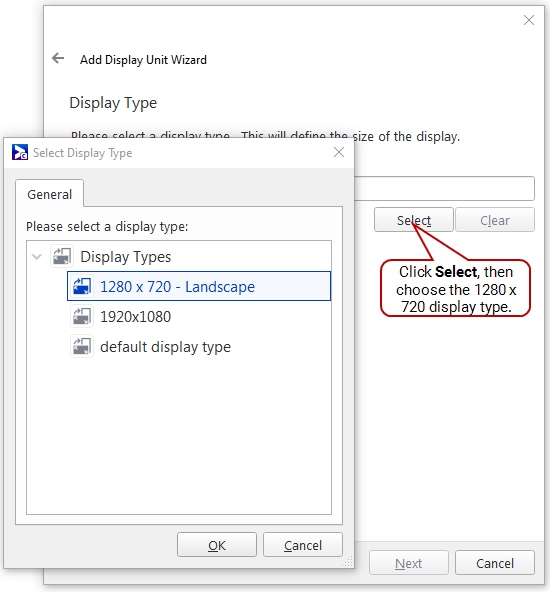
- Click Select. The Select Display Unit Type dialogue box opens.
- For this example, select "1280 × 720 - Landscape" (which we created in Add Display Types).
- Click OK.
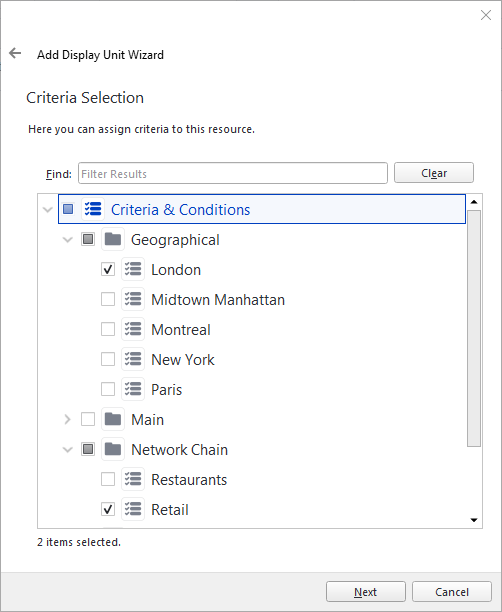
- Click Next. The Criteria Selection page opens.
- Expand the criteria folders labeled "Geographical" and "Network Chain". As this screen is in London in a retail network, we will select "London" and "Retail".
- Click Next. The Loop Policy page appears.
- Click Select. The Select Loop Policy dialogue box appears.
- Expand the loop policy folder labeled "Network 1".
- Select the loop policy "Main - 5 minutes - 30 seconds".
- Click OK.
- Click Finish. The Campaign Retargeting pop-up appears.
Note: The use of criteria is very important as it allows us to target large networks efficiently. By profiling each display unit location when we add it, we can use this information to target content to the screen in different ways.
Note: The Campaign Retargeting pop-up appears as a default setting. It is a precaution that can prevent unwanted network-wide changes. You can configure this setting in the options menu. For more details, see The Campaigns and Events Tab.
As we are just setting up our network, it is safe to click Yes.
We now have our first display unit which, by default, will run 24/7, year-round and in a full screen layout.
After you have completed the network setup tutorial, you can then move on to:
If you want to use multiple frames in a screen or multiple screens, we suggest that you check the following advanced topics:

