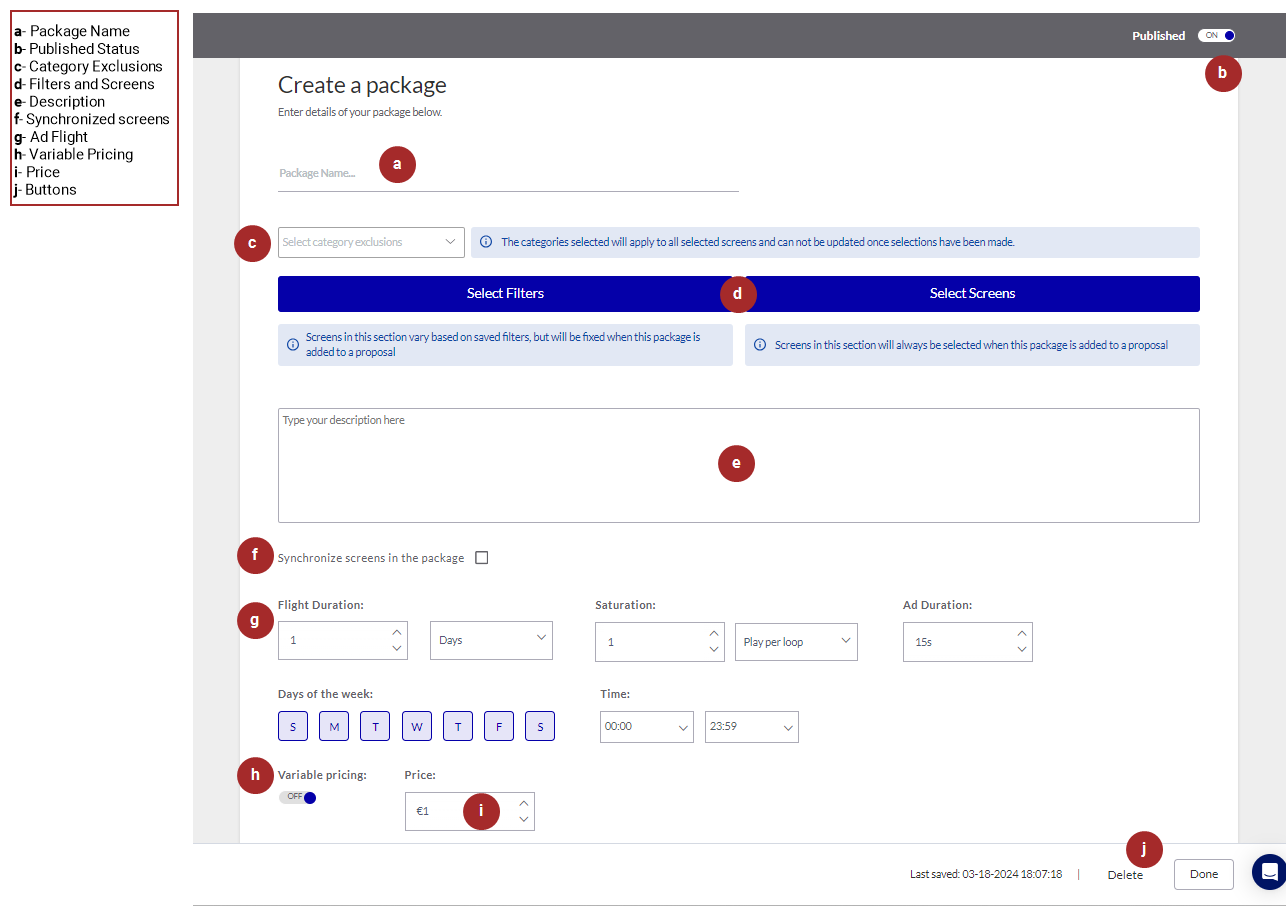
You can create either digital or static packages using the Package Builder. This page describes the parts of each.
For more information about packages, see Packages List.
Note: Only users with the Admin or Direct Sales Admin role can add or edit packages.
To create a package:
Guaranteed Campaigns
Creating a package involves the following steps:
- Step 1 – Start the Package Creation Process
- Step 2 – Select Category Exclusions (Optional)
- Step 3 – Add Content to Your Package
- Step 4 – Add a Description (Optional)
- Step 5 – Enable Screen Synchronization (Optional)
- Step 6 – Configure the Ad Flight and Saturation
- Step 7 – Enter a Price
- Step 8 – Enable Variable Pricing
- Step 9 – Finish the Package Creation Process
Packages are created in the Package Builder.
To start the package creation process:
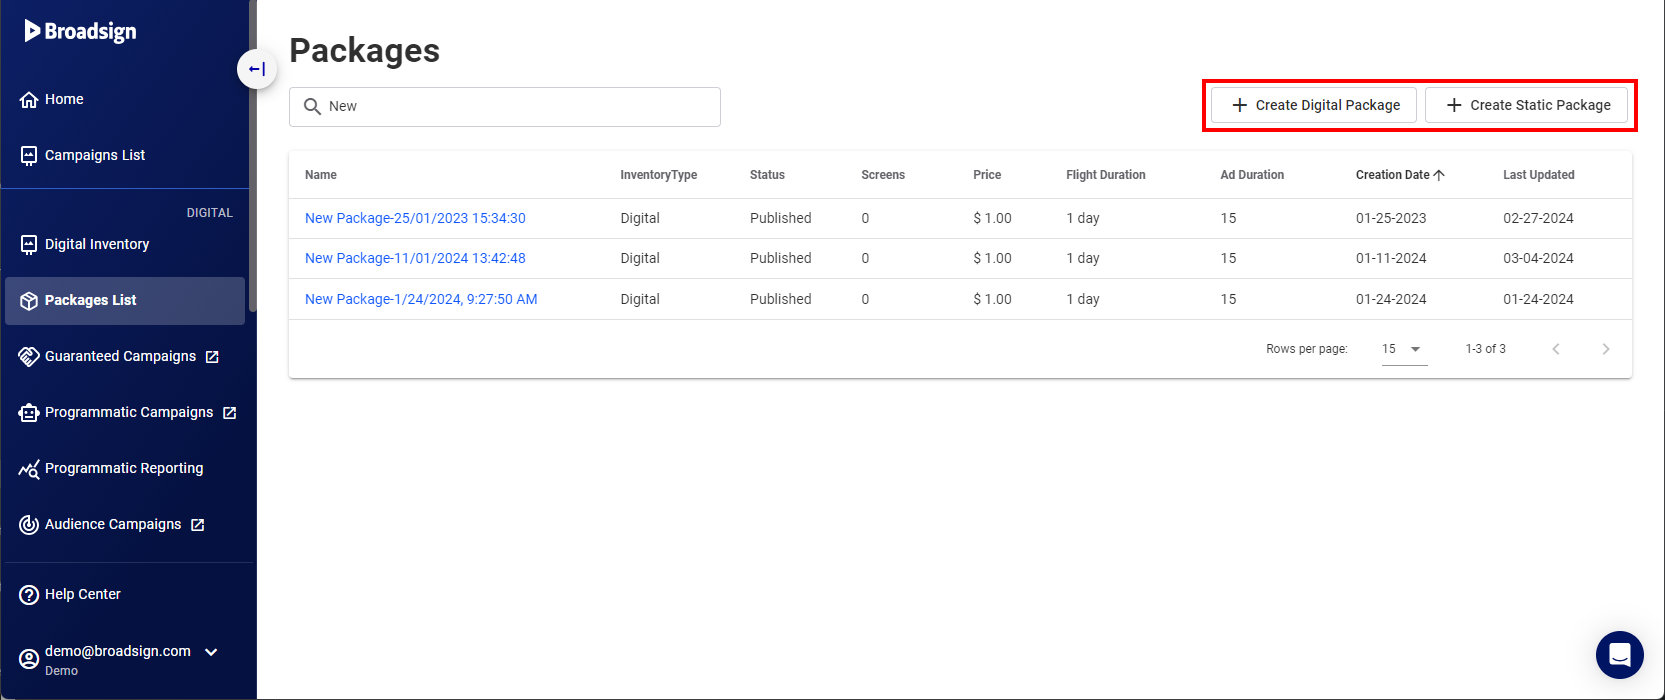
Packages
- Access the Packages page.
- Click the Create Digital Package or Create Static Package button at the top right corner of the Packages page.
- Enter a name for the package (required before you can save it).
- Set the publication status of the package.
- If you select On and save the package, it will be available for use on your network.
- If you select Off and save the package, it will be unavailable for use on your network.
This creates a blank package.
The remaining information is optional.
Tip: You must at a minimum enter a name before you can save the package.


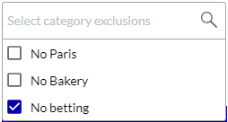
This section of the Package Builder allows you to refine package availability by associating one or more category exclusions. These exclusions, applied at the package level, provide granular control over which campaigns can utilize the package.
- Selected category exclusions apply to all screens within the package.
- The use of category exclusions is optional, providing flexibility in package design.
-
Your administrator defines the list of available category exclusions in the Guaranteed Campaigns settings, under the Import & Export section. For detailed instructions on setting up and managing category exclusions, refer to Set Up Category Exclusions.
Note: Once a Category Exclusion has been assigned to a saved campaign or package, it cannot be modified. Careful consideration is necessary before applying exclusions.
Category exclusions function as filters, preventing packages from being included in campaigns with mismatched exclusions. This mechanism ensures that only campaigns with the exact same category exclusions can utilize the package.
For example:
- A package named "Package A" is created with a category exclusion labeled "Category A."
- A campaign is configured with the "Category A" exclusion.
- When selecting packages for this campaign, the Guaranteed Campaigns module will only display packages with the "Category A" exclusion. "Package A" will be available, while other packages without this specific exclusion will be hidden.
To select category exclusions:
Guaranteed Campaigns - Packages
- If applicable, select exclusions in the Category Exclusions section.
You are now ready to add content to your package. The method for selecting content depends on whether you have clicked the Create Digital Package or Create Static Package button in Step 1 – Start the Package Creation Process.
There are two methods of selecting content for a package:
- Dynamic Selection
- Ideal for flexible packages where the screen and face composition can vary based on predefined criteria.
- Employs saved filters to determine the screens and faces included in the package.
- The selection is fixed once the package is added to a campaign, ensuring consistency (see Select Packages).
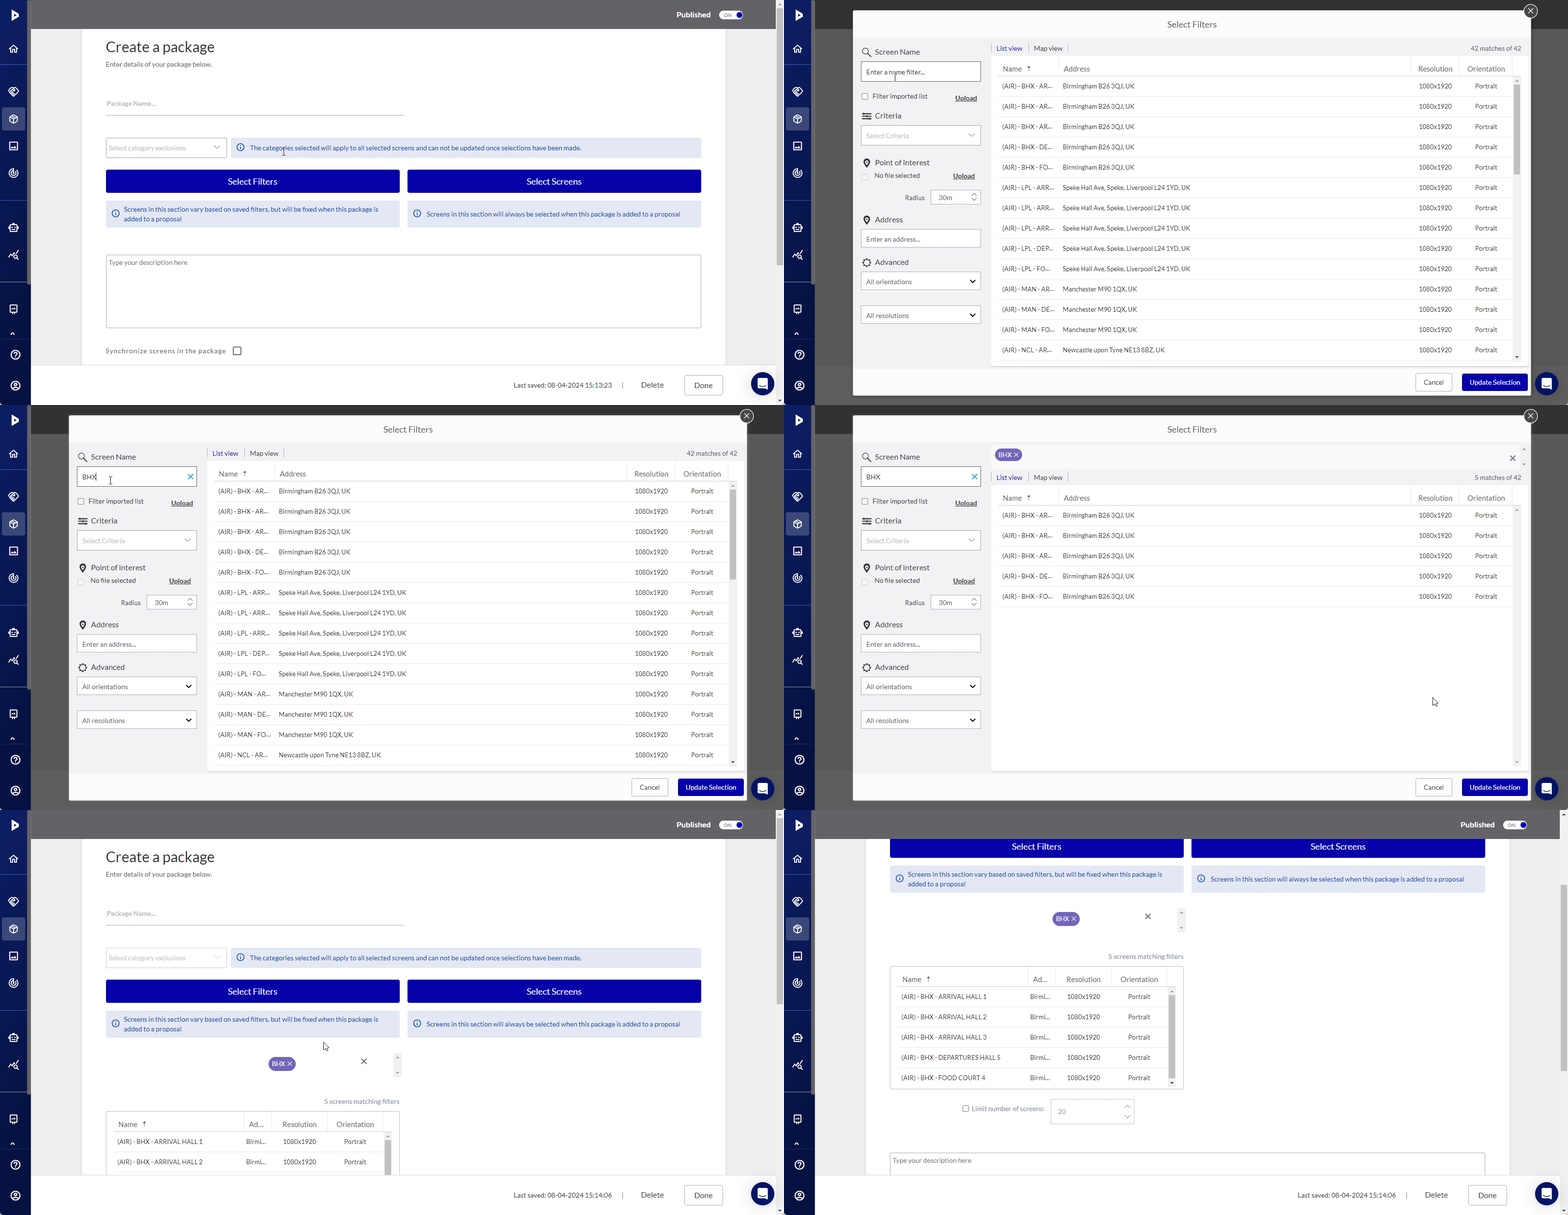
- To add content dynamically, click Select Filters and proceed to Step 3A – Select Filters for detailed instructions.
- Fixed Selection
- Offers greater control over package composition by allowing you to hand-pick individual screens or faces.
- The selected screens or faces are permanently included in the package, guaranteeing their presence in any campaign utilizing the package.
- To add fixed content, choose one of the following options:
- Click Select Screens and proceed to Step 3B – Select Digital Screens.
- Click Select Faces and proceed to Step 3C – Select Static Faces.
For packages requiring flexibility, the Select Filters option allows you to define content dynamically. This method utilizes your existing screen or face inventory and applies filters to determine which items are included in the package.
Key Features:
- Filter-Based Selection – Instead of hand-picking individual screens or faces, you apply filters to dynamically populate the package.
- No Individual Selection – While you can apply filters to narrow down the options, you cannot manually select specific screens or faces within this interface.
- Category Exclusion Compatibility – If category exclusion criteria are applied to the package in the previous step (Step 2 – Select Category Exclusions (Optional)), the corresponding filters will be excluded from the available options, preventing those screens or faces from being included in the package.
- Filter Visualization – Applied filters and the resulting narrowed list of screens are displayed within the Package Builder, providing a clear overview of the package's dynamic content.
- Screen Limit – You can impose a limit on the number of screens included in the package, even with dynamic selection.

For a comprehensive guide to navigating and utilizing the screen inventory interface, refer to Create a Digital Line Item.
For precise control over package content, the Select Screens option enables you to hand-pick individual screens for inclusion. This method opens the digital Line Item window, where you can browse and select screens while retaining the ability to apply filters for easier navigation.
Key Features:
- Individual Screen Selection – This method grants you the freedom to choose specific screens for the package, ensuring their inclusion in any campaign utilizing the package.
- Filter Integration – Filters can be applied within the digital Line Item window to streamline the screen selection process.
- Visual Representation – Selected screens are displayed in a list format within the Package Builder, providing a clear overview of the package's fixed content.
This approach offers maximum control over package composition, allowing you to curate the screen selection based on specific campaign requirements or client preferences.
For precise control over package content, the Select Faces option enables you to hand-pick individual faces for inclusion. This method opens the static Line Item window, where you can browse and select faces while retaining the ability to apply filters for easier navigation.
Key Features:
- Individual Face Selection – This method grants you the freedom to choose specific faces for the package, ensuring their inclusion in any campaign utilizing the package.
- Filter Integration – Filters can be applied within the static Line Item window to streamline the face selection process.
- Visual Representation – Selected faces are displayed in a list format within the Package Builder, providing a clear overview of the package's fixed content.
This approach offers maximum control over package composition, allowing you to curate the face selection based on specific campaign requirements or client preferences.
If applicable, define whether the system must synchronize the digital screens in the package. For more information, refer to Synchronize Screens in a Package.
This applies to digital packages.
Set the ad flight and saturation information of the package.
To set the ad flight and duration of digital packages:
- Flight Duration – Set the number and units (days, weeks or months) of the package’s ad flight.
- Ad Duration – Set the duration, in seconds, of the digital package’s ad slot.
- Saturation – Set the saturation of your digital package’s ad flight, that is, number of ad plays per loop or number of loops per play.
- Days of the week – Select the days of the week for which you want to calculate screen availability.
- Time – Select the daily start and end time for which you want to calculate screen availability.


For example, you can set an ad to play twice per loop or once every two loops.


The default is “00:00 – 23:59” (that is, 24 hours a day).
To set the ad flight of static packages:
- Flight Duration – Set the number and units (days, weeks or months) of the package’s ad flight.
- Slots – Set the number of slots required for the selected flight duration.


Enter a price for the package. This price will appear as the Suggested Price in the Campaign Builder. The currency will be the set up in the Guaranteed Campaigns Settings. For more information, see Configure your Domain.

Turn on or off variable pricing for all line items. By default, variable pricing is off. For more information, see Variable Pricing Section.

When everything is ready, you can save your changes to the package.
- Delete – Cancels all changes to your package, as of your last explicit save.
- Done – Saves your changes to the package.
