 minute read
This page provides a step-by-step guide for publishers to manage placements one at a time in the Portal.
To manage placements in bulk, see Bulk Placement Management in the Portal.
For an overview of placements in Place Exchange, see Placements.
To create a placement:
Place Exchange
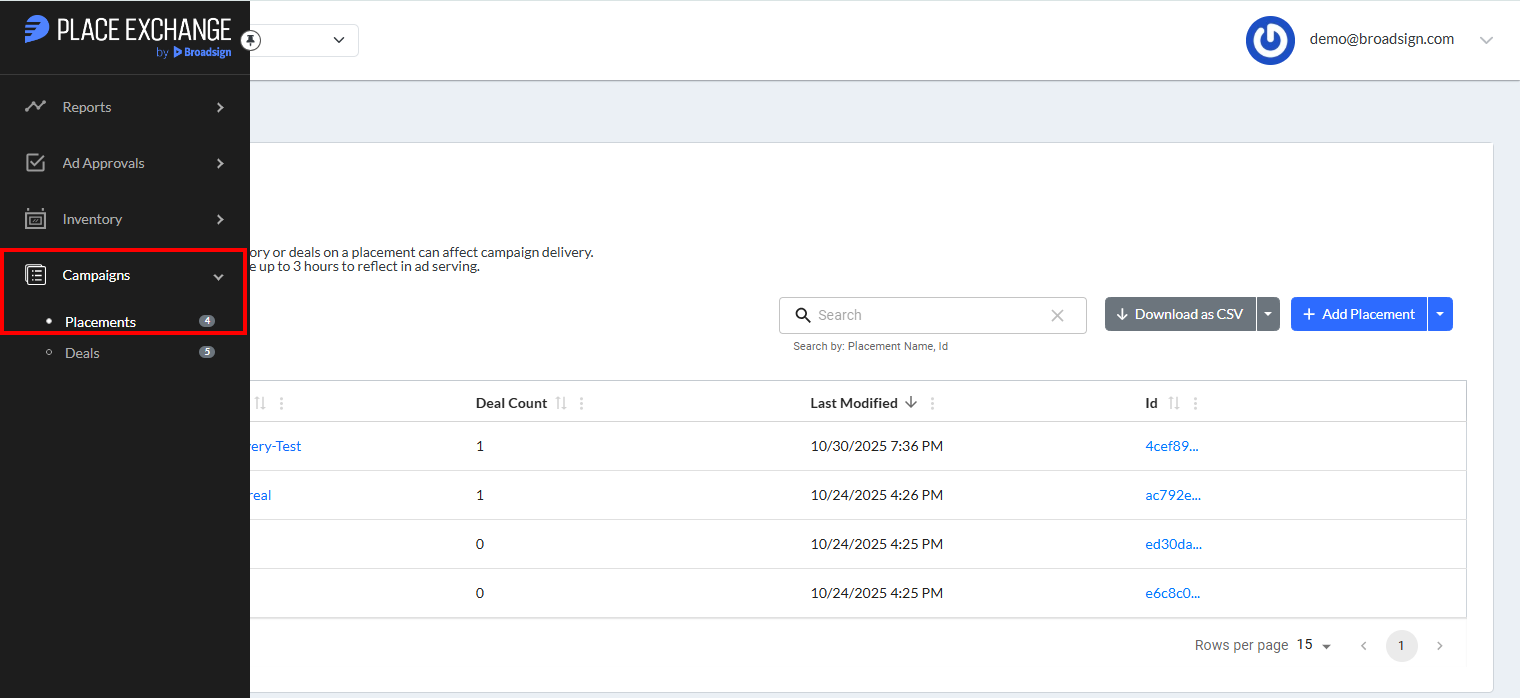
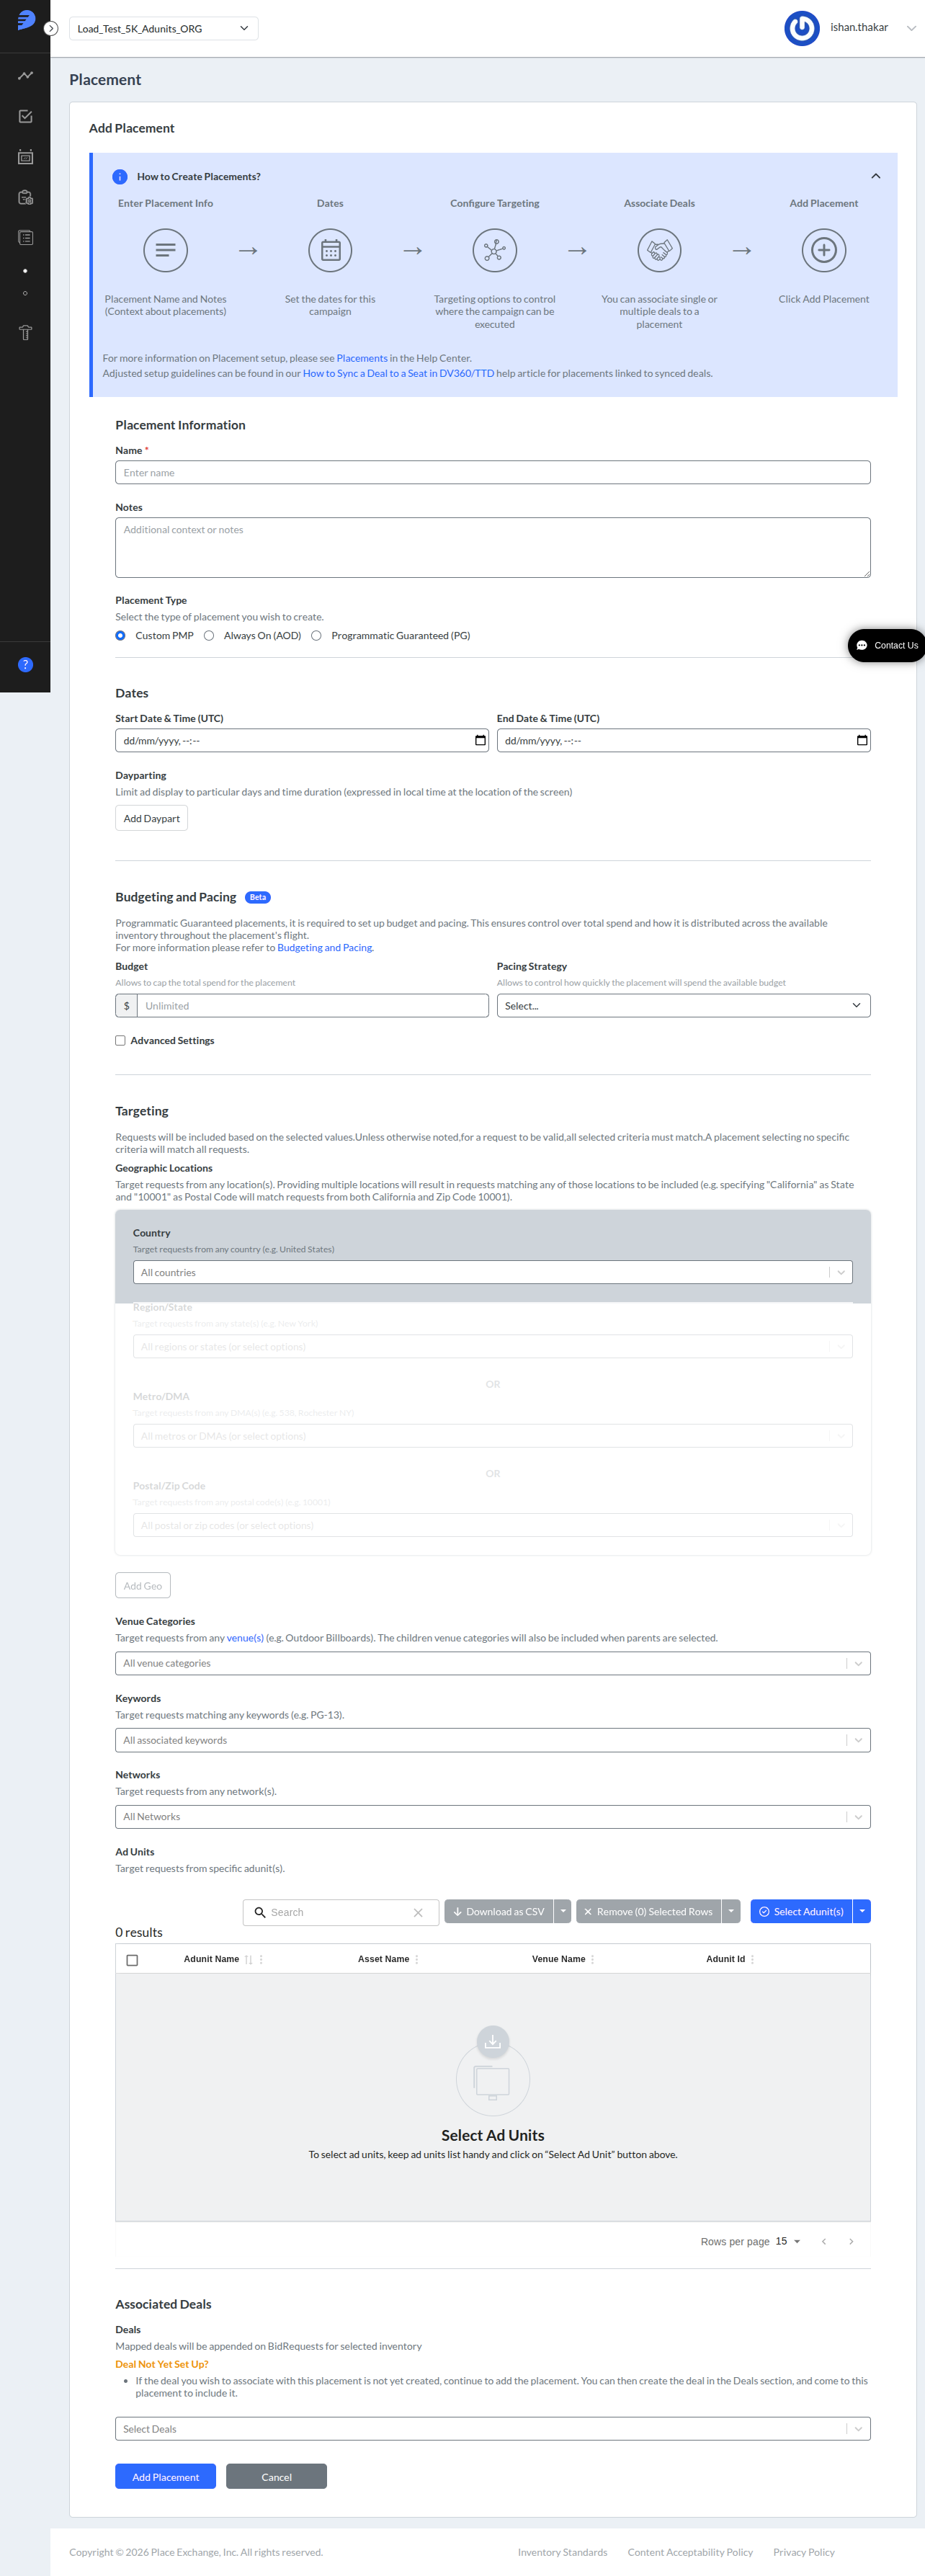
- Access the Place Exchange Publisher Portal and select Placements under the Campaigns menu on the left.
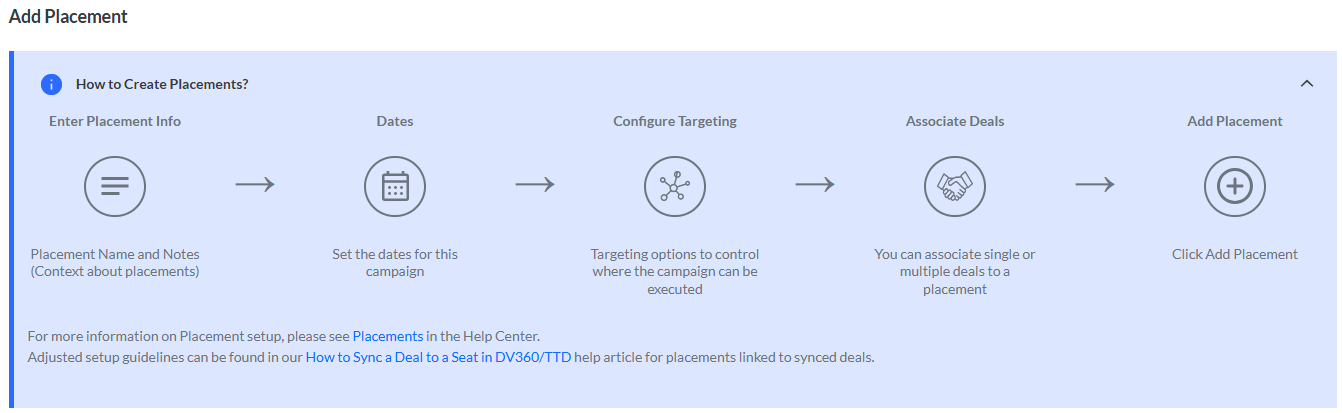
- Click the Add Placement button to open the Add Placement page.
- Enter Placement Information.
- Set the Dates when the placement should be active.
- If you are creating a Programmatic Guaranteed placement, set up the Budgeting and Pacing.
- Use Placement Targetingto select relevant inventory by setting targeting criteria.
- Select Associated Deals with the selected inventory.
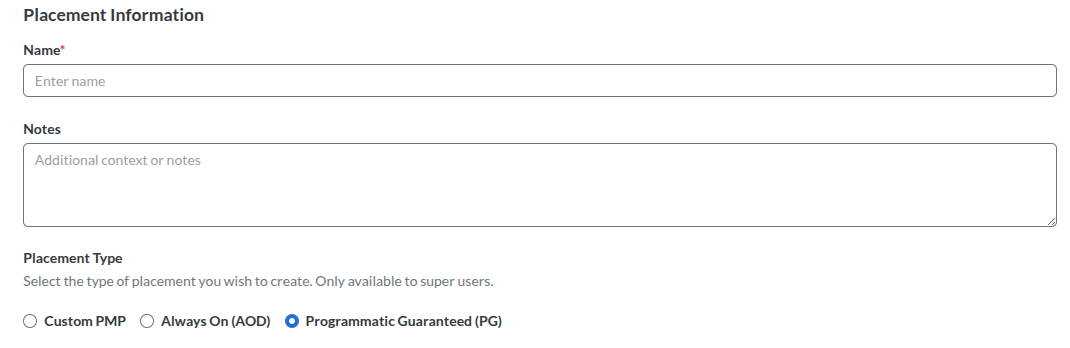
Provide the following details to identify your inventory group:
- Name – Enter a unique moniker to identify the targeted inventory group. This is mandatory.
- Notes – Add specific information related to the placement.
- Placement Type – Select from the following types:
- Custom PMP (default)
- Always On (AOD)
- Programmatic Guaranteed (PG)
Placement Type Rules
Custom PMP or Always On (AOD)
- The Budgeting and Pacing fields are optional.
- The system defaults these fields to the following:
- Budget: Unlimited
- Pacing Strategy: Not selected
- Cap Type: Not selected
- Daily Cap: Unlimited
- You may override these defaults manually.
Programmatic Guaranteed (PG)
- The Budgeting and Pacing fields are mandatory.
- The following fields are required:
- Start Date
- End Date
- Budget
- Pacing Strategy (defaults to EVEN)
- Cap Type (defaults to Budget)
- PG placements only allow one associated deal, which must also be a PG type.
- You cannot submit the form until you complete all required fields.
Note: Bulk upload: Placement Type is not supported and always defaults to Custom PMP.
Flight Dates

Set start and end dates on a placement, along with times of day when a placement must be active. These settings apply to all inventory selected within the placement and impact all associated deal.
When configuring dates and times, you must adhere to the following logic:
- The system processes start and end dates in UTC. However, day parts follow the local timezone of each individual ad unit or network within the placement.
- The system supports start dates no earlier than January 01, 2000.
- To prevent the Year 2038 technical limitation, you must set all end dates to occur before 18 January 2038 23:59 UTC.
Note: If you create a Placement without a Start Date and End Date, but configure all targeting, the Placement becomes active immediately and runs indefinitely.
Some common usage scenarios:
- Publishers often create placements for "always-on" deals before the actual launch date. If you associate a placement with deals like
agency-fixed-allandagency-first-allthat do not begin bidding until November 1, 2021, you should set the placement start date to 11/1/2021. Setting an end date far in the future (e.g., 12/21/2022) ensures the placement remains active for long-term bidding. - Publishers are in the process of renegotiating AODs with a few different buyers and want to stop sending requests until those negotiations are complete. To stop sending requests immediately, update the existing placement with a future start date (such as tomorrow). Once you complete negotiations, simply update the start date again to resume the flow of requests.
Dayparting
Dayparting restricts ad displays to specific days and time durations based on the local time at the screen's location. While buyers typically set dayparting within their Demand Side Platform (DSP), publishers can use the portal to manage scheduling when DSP controls are unavailable.
If a buyer cannot set a specific schedule for a Programmatic Guaranteed (PG) deal, such as a campaign targeting live football games, the publisher manages this via the placement settings. For instance, the publisher can configure the placement to activate only during game windows on Sundays, Mondays, and Thursdays, ensuring the campaign runs precisely when intended.
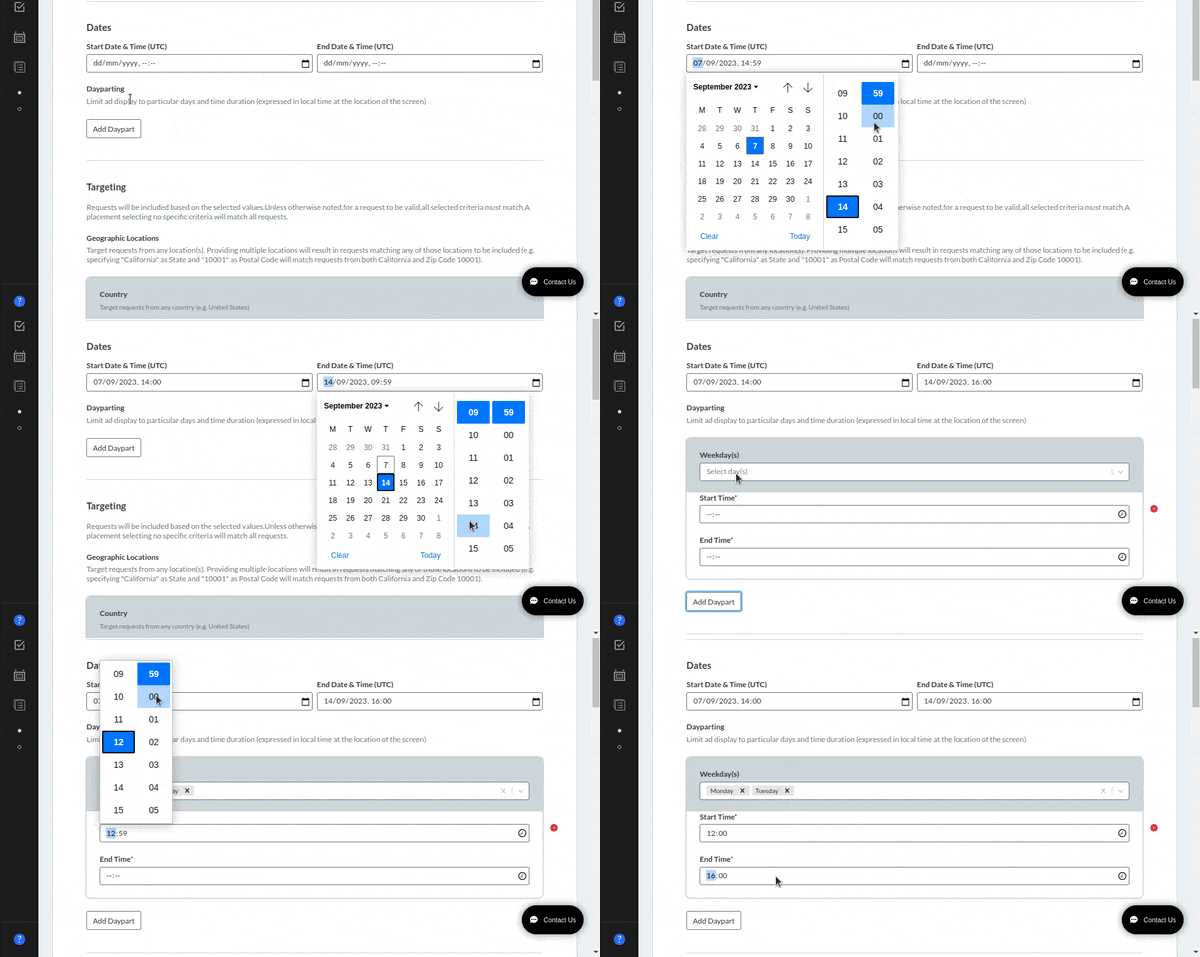
To reference how to set dates (start date and end date) and dayparting for a placement, refer to the screenshot below.
- The example in the screenshot has a start date of 09-07-2023 2 PM (UTC) and end date of 09-14-2023 4 PM (UTC). The placement is active only between those dates. Only adrequests received from
test_adunit1after 2 PM on the 7th or before 4 PM on the 14th will include the dealtest_deal. - Dayparting is expressed as a combination of the "Day of the Week" and "Hour of the Day". When setting dayparting, only the adrequests received during the set time window will include the deals associated in the placement. In the example below, this placement will be activated only between 12-4 PM local timezone on Mondays and Tuesdays.
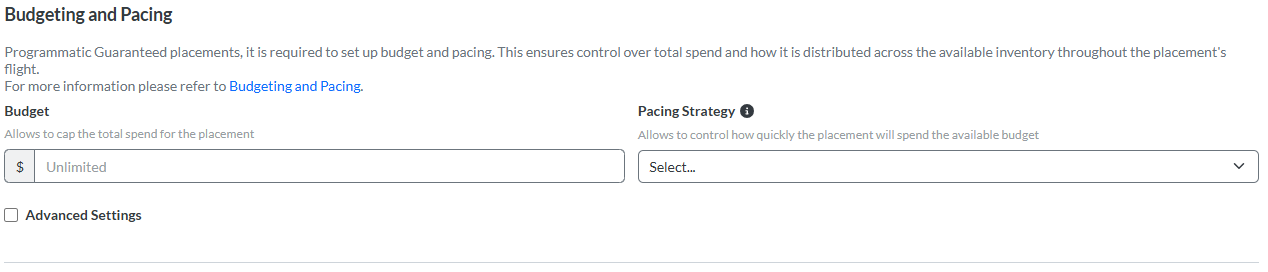
Publishers can set budget caps and pacing on their placements. These settings limit spend or impressions and pace all deals associated with a specific placement.
Note: Place Exchange recommends to apply Budgeting and Pacing settings primarily to Programmatic Guaranteed (PG) deals. Budgeting and Pacing can impact anticipated delivery when setting caps.
If you want to enable Budgeting and Pacing for your organization, contact your partnership manager.
For detailed information about how to manage spend and its distribution within placements, see Budgeting and Pacing.
Budget
Budget allows you to control the total spend for a specific placement (for example, spend up to $50,000 for this placement). By default, the system applies an Unlimited cap to every new placement. Under this setting, the system does not restrict spend.
Pacing Strategy
Pacing Strategy allows you to determine how quickly a placement will spend its allocated budget. You must define a total budget for a placement before the system allows you to select a pacing strategy.
Selecting a Pacing Strategy is disabled when a budget is not set.
| Pacing Strategy | System Behavior |
|---|---|
| ASAP |
Place Exchange spends the allocated budget as quickly as possible. Select this strategy in the following circumstances:
|
| EVEN | Place Exchange limits spend to distribute the remaining budget evenly across the remaining duration of the campaign. When delivery deviates from target, the system recalculates the daily spend target to absorb over- or under-delivery gradually across future days, without pausing spend. This results in smoother, continuous delivery adjustments. |
| EVEN_ASAP_CATCHUP |
(DEFAULT) Place Exchange targets a constant daily spend by distributing the total budget equally across the entire campaign duration.
|
Advanced Settings
Place Exchange offers a range of settings to fine-tune behavior for various situations.

Daily Caps
(Defaults to unlimited) The Daily Cap setting restricts the amount a placement can spend within a single 24-hour window.
In most scenarios, you should set the daily cap significantly higher than your expected daily spend. This overhead allows the placement to "catch up" and recover lost volume if it previously under-delivered. The system calculates daily caps based on a unique cycle: 12:00 PM (Noon) to 11:59 AM UTC.
The Budget and Daily Cap figures represent targets and can overspend depending on how high play latency is.
For example, if play latency is 5 minutes, and spend is $10 a minute, then the placement can overspend by $50.
Cap Type
(Defaults to BUDGET) When configuring a placement, you must choose one primary metric for your delivery limits: Budget (Spend) or Impressions. The system enforces all caps against the specific metric you select.
| Cap Type | System Behavior |
|---|---|
| BUDGET | (DEFAULT) Enforce caps on total and daily delivery for a placement by spend (in USD). |
| IMPRESSIONS | Enforce caps on total and daily delivery for a placement based on delivered impressions. |
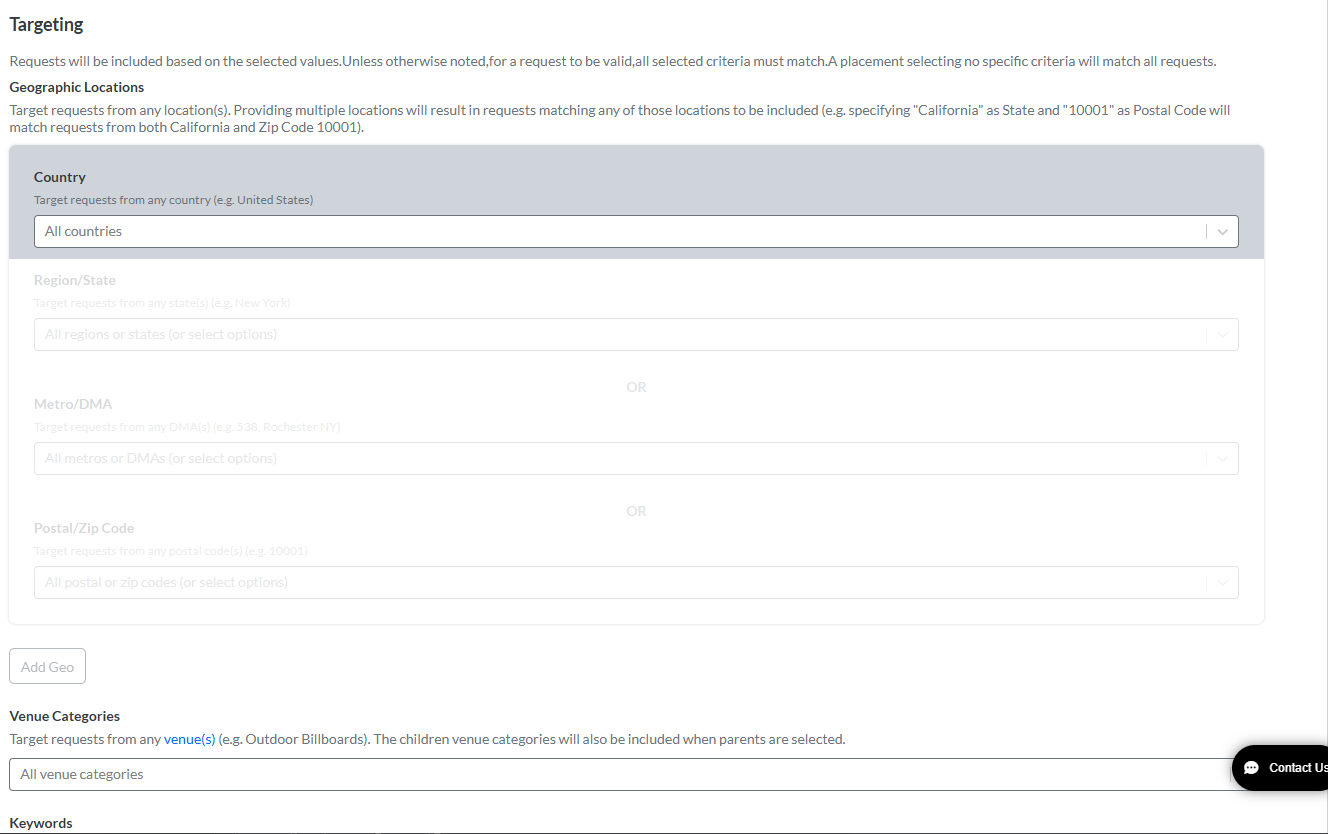
Publishers select inventory for a placement by setting specific targeting criteria. Ad units that match these parameters automatically join the placement. This automation eliminates the manual effort required to update placements whenever the network integrates new inventory.
Publishers benefit from targeting criteria rather than manual selection in several standard scenarios:
- Curate media packages for popular markets, such as all screens within the New York DMA.
- Curate media packages based on venue categories, such as grouping all retail locations.
- Create custom inventory slices for brand tie-ups or to avoid channel conflicts, such as identifying all screens eligible for Pepsi advertisements.
- Reduce the operational work of updating placements as the network grows, such as automatically including new screens rolling out in the Los Angeles market over the coming months.
The following targeting criteria are available:
- Targeting by Geographic Locations
- Targeting by Venue
- Targeting by Keywords
- Targeting by Networks
- Targeting by Ad Units
Targeting by Geographic Locations
Select inventory based on the geographic location (lat/lon) that the campaign targets. Available geo attributes include:
| Geo Attribute | Description |
|---|---|
| Country | The system targets all countries by default. You may narrow this scope by selecting specific countries. Click Add Geo to include a new country for targeting. |
| Region/State | The system includes all states and regions within the selected country by default. You may select specific values from the drop-down menu or copy-paste multiple values directly from a spreadsheet. |
| Metro/DMA code | The system includes all metros and DMAs within the selected country by default. You may select specific values from the drop-down menu or copy-paste multiple values directly from a spreadsheet. |
| Postal/Zip Code | The system includes all postal or zip codes within the selected country by default. You may select specific values from the drop-down menu or copy-paste multiple values directly from a spreadsheet. |
For example, to target ad units in specific regions, such as the “IN (Indiana)“ state, the "Los Angeles, CA" DMA, or the "74820" zip code, select the corresponding values in each field.
Manage multiple geographic targets using the following controls:
- Add additional geographic targeting layers by clicking the Add Geo button.
- Remove geographic blocks by clicking the
 icon.
icon.

Targeting by Venue
Venue categories describe the environment or scene where a display resides. This attribute indicates the activities or events likely to occur in that area, which suggests the audience profile of the people present.
Publishers target audiences based on OpenOOH venue categories. The system targets all categories by default. To narrow your reach, select specific categories from the drop-down menu or copy-paste a list directly from a spreadsheet.
Manage multiple venue targets using the following controls:
- To target all ad units categorized as either Education OR Outdoor, select both values in the targeting field.
- Selecting a parent category automatically includes all associated child and grandchild categories in your targeting.

Targeting by Keywords
Keyword targeting provides a flexible method for building sales packages and identifying high-demand inventory patterns. For example, you can group "cannabis-eligible" ad units into a single placement to streamline demand for that category.
Keywords act as user-defined metadata associated with entities like ad units. You can target ad units based on these associated keywords using the following methods:
- To target "keyword_1" OR "keyword_2", select the values from the drop-down menu.
- Type a new name into the field and click Create <keyword name> to create a new keyword.
- Copy and paste a list of keywords from a spreadsheet to select existing values or create multiple new keywords simultaneously.

For more information on keywords, see Using Keywords in Place Exchange.
Targeting by Networks

Publishers can target entire networks within a placement.
- If you select no specific network, the system targets all networks within the organization by default. In this state, the system automatically adds any future networks to the placement.
- All ad units within the selected networks are included in the placement. Any additions or removals of ad units at the network level automatically update the placement.
- You can enable the Select All Networks toggle to target every network currently available in the organization.
Note: Selecting all the networks does not mean enabling it for future new networks. The system will not automatically include new networks created under the organization in the future.
Targeting by Ad Units
Manually select the specific ad units you want the placement to target. You can search for and associate an ad unit using any of the following identifiers:
- Ad Unit ID
- Ad Unit Name
- Venue Name
- Asset Name
To associate Adunits :
- Navigate to the Select Adunit(s) drop-down menu.
- Click Select Adunit(s) to associate by Adunit Name or choose the relevant option from the drop-down for another type of association :
- Select by Adunit ID
- Select by Asset Name
- Select by Venue Name
- Add the relevant required data to complete the Adunit association with the placement.

Note: The system applies an AND condition when combining manual ad unit selection with rule-based targeting (such as Geo or Venue targeting). Specifically, the rule-based criteria filter the set of manually selected ad units. If an ad unit’s Geo attribute or OpenOOH category does not match the rules defined on the placement, the system excludes that placement and its associated deals from the ad request and ad response.
You can create a placement even if the deal name is not currently available. Click Add Placement to save your progress and edit the placement later with the necessary deal information. If you save without deal information, the placement targets no deals until you complete that step.
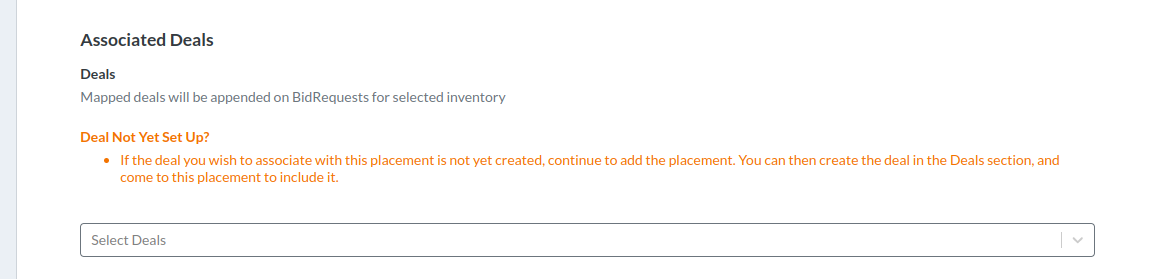
Associate deals with your selected inventory using one of the following methods:
- Select specific deals from the drop-down menu.
- Paste a line-separated list of deal names directly into the selection field.
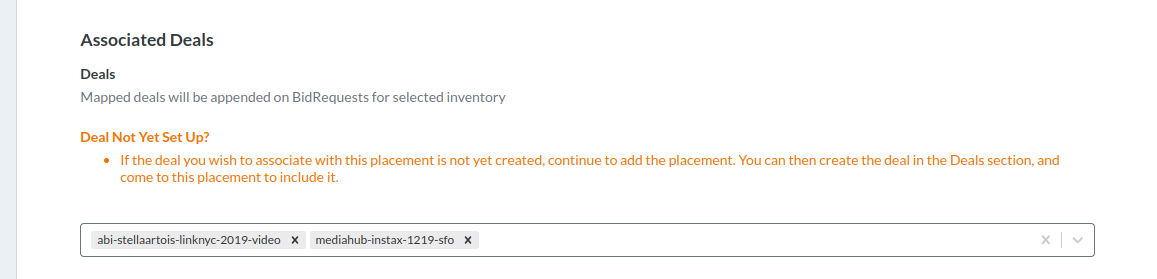
The drop-down menu displays all deals belonging to the organization. To ensure data integrity, the system validates every entry and rejects the following:
- Archived deals
- Deal names belonging to a different organization
- Deals that do not yet exist in the system
If you enter an invalid value, the system displays a warning message directly below the drop-down menu.

Once you enter the required information, click Add Placement to create the placement.
Manage changes to targeted inventory or deal statuses by editing the placement. To enter edit mode, click the placement name within the Summary View. This allows you to update the placement whenever inventory shifts, you add new deals, or existing deals conclude.
You can update the following information:
- Placement information
- Dates
- Targeting
- Deals
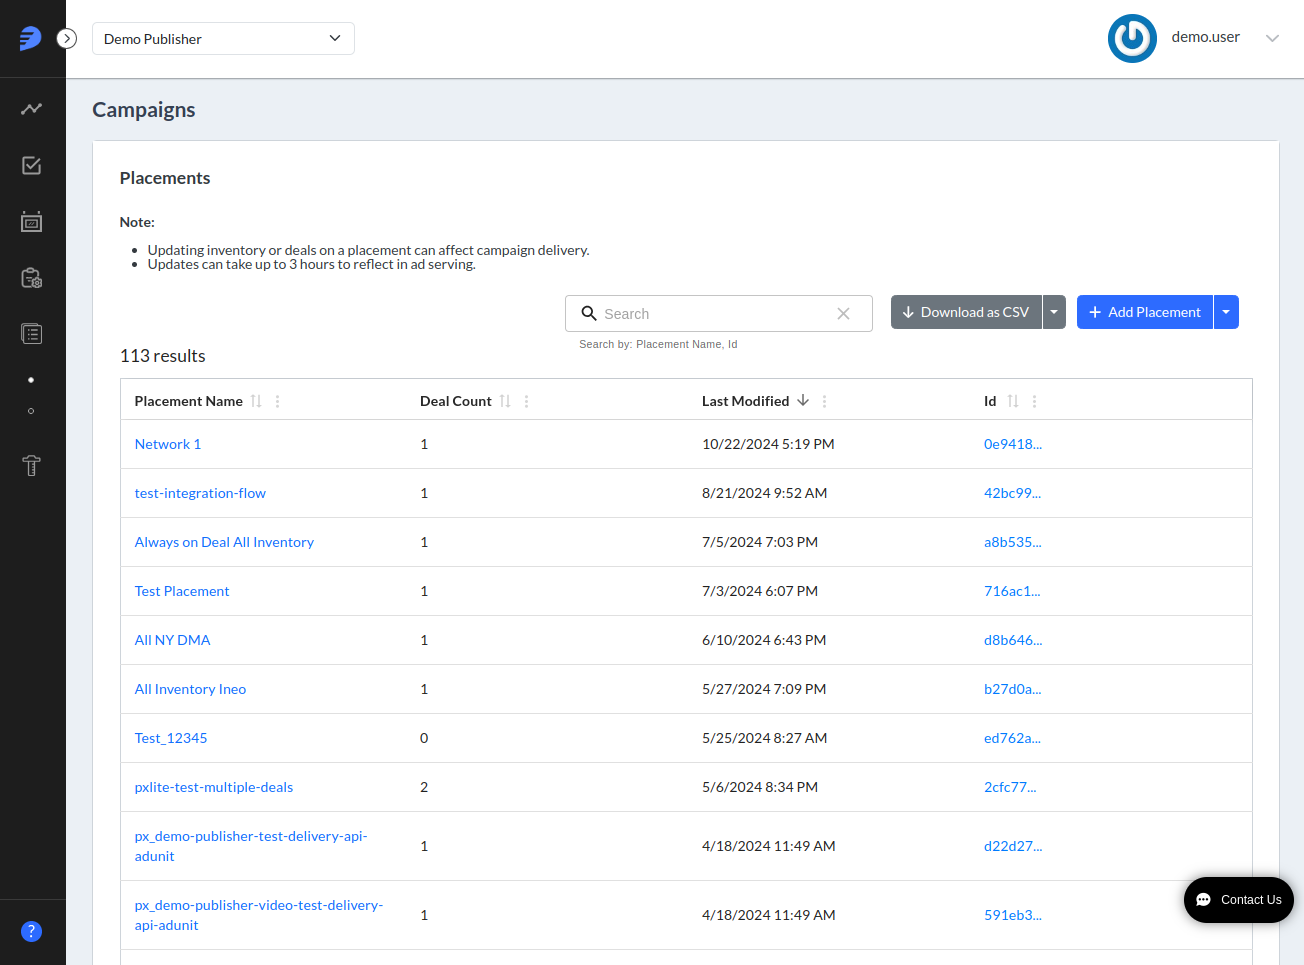
You can select the placement to update from the Summary view. After clicking on that placement, you are redirected to the Edit page, where you can update the placement information. Once finished, click the Update Placement button.
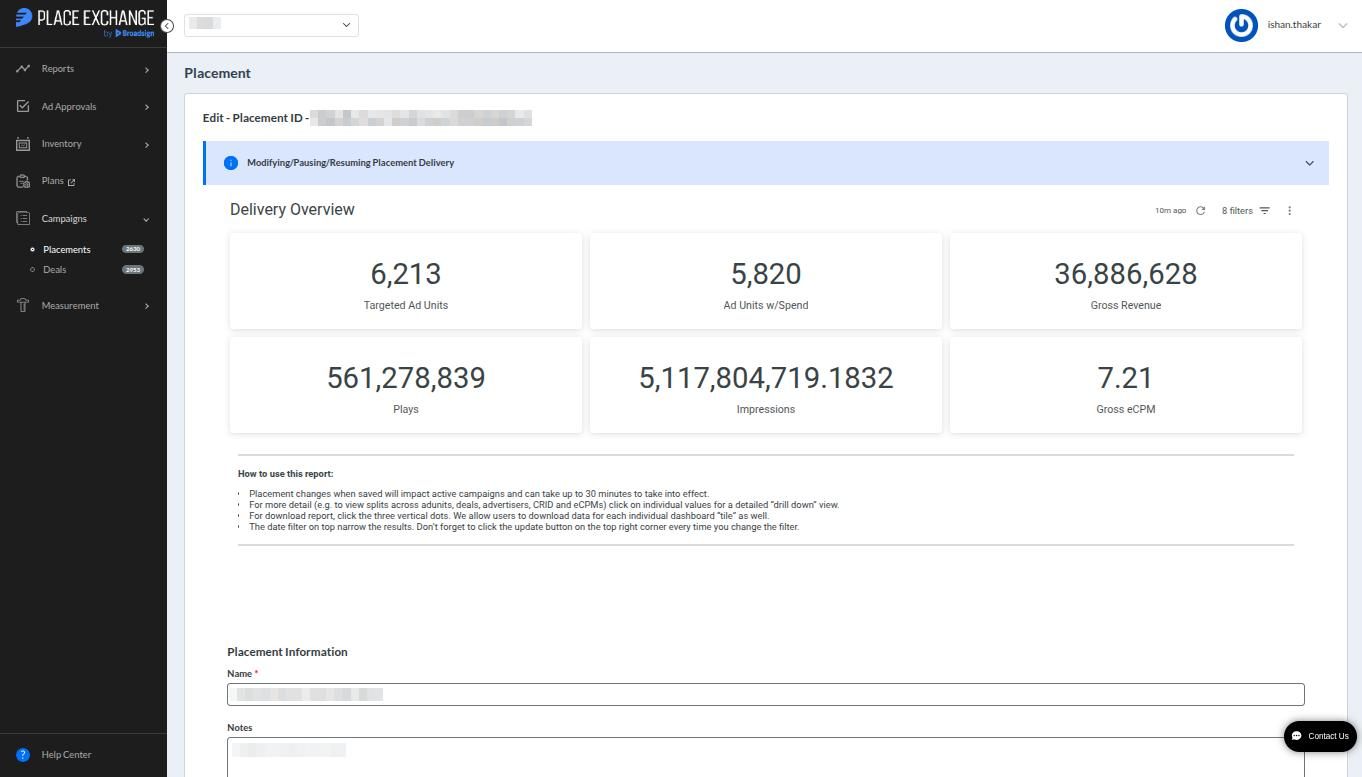
The Edit Placement page features the Delivery Overview dashboard. This dashboard tracks how a placement performs against its specific goals.
Metrics
The following metrics are available:
| Metric | Description |
|---|---|
|
|
Tracks the total count of Ad Units the placement targets. Note: The Targeted Ad Units metric excludes specifically selected Ad Units. Instead, the dashboard aggregates data based on all other active filters. |
|
|
Identifies targeted Ad Units that register active spending. |
|
|
Totals the revenue generated during the selected date range. |
|
|
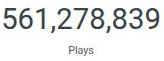
Counts all plays reported within the selected date range. |
|
|
Calculates delivered impressions by applying the impression multiplier to the total play count for the selected date range. |

|
Measures the gross effective cost per thousand impressions for the selected data. |



Drill Downs
The Portal offers different options to drill down into the specific values driving that statistic:
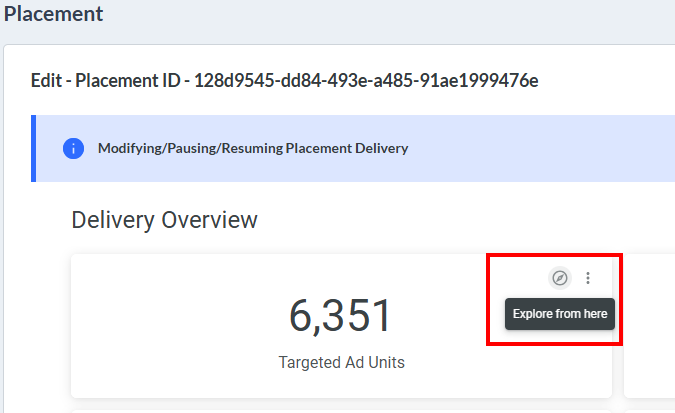
- Select an individual tile to drill down into the specific values driving that statistic. For example, clicking the Targeted Ad Units tile displays a list of the first 500 units. To access the entire drill downs data, download the complete file.
- Click the Explore from Here icon of the tile. This brings you to the Explore view, where you can get detailed custom insights into the values. For more information, see Creating and Managing Custom Reports with Explore.
- To download the report the entire drill downs data, click the three vertical dots and select Download data.
- Narrow your results using the Date Filter located in the top right corner. Select the Update button after every filter change to refresh the dashboard data. For more details, see Single Placement Management in the Portal.


Remove deals from a placement using one of the following methods:
- Remove individual deals by clicking the X next to the deal name in the selection field.
- Clear all selected options directly within the drop-down menu to remove all deals simultaneously.
Note: These changes take effect when clicking the Update Placement button.

Note: Saving placement changes affects active campaigns immediately. The system requires up to 30 minutes for these updates to take effect across the network.
Manage associated ad units directly from the Edit Placement form.
Upon entering the screen, the system displays all ad unit names in the Ad Units Table immediately. While you interact with the form, the system loads supplementary data, such as Asset Name, Venue Name, and Ad Unit IDs, in the background.
To ensure an uninterrupted experience, the system provides the following functionality during the data fetch:
- You can sort the list by Ad Unit Name as soon as the page opens.
- A loading indicator appears while the system retrieves the remaining ad unit data.
- The system enables sorting for all remaining columns once the background load completes.

You can download the ad units as a CSV or Excel file from the placement form. The downloaded file includes columns such as Adunit Name, Asset Name, Venue Name, and Adunit ID. It contains the same data that is displayed in the table.
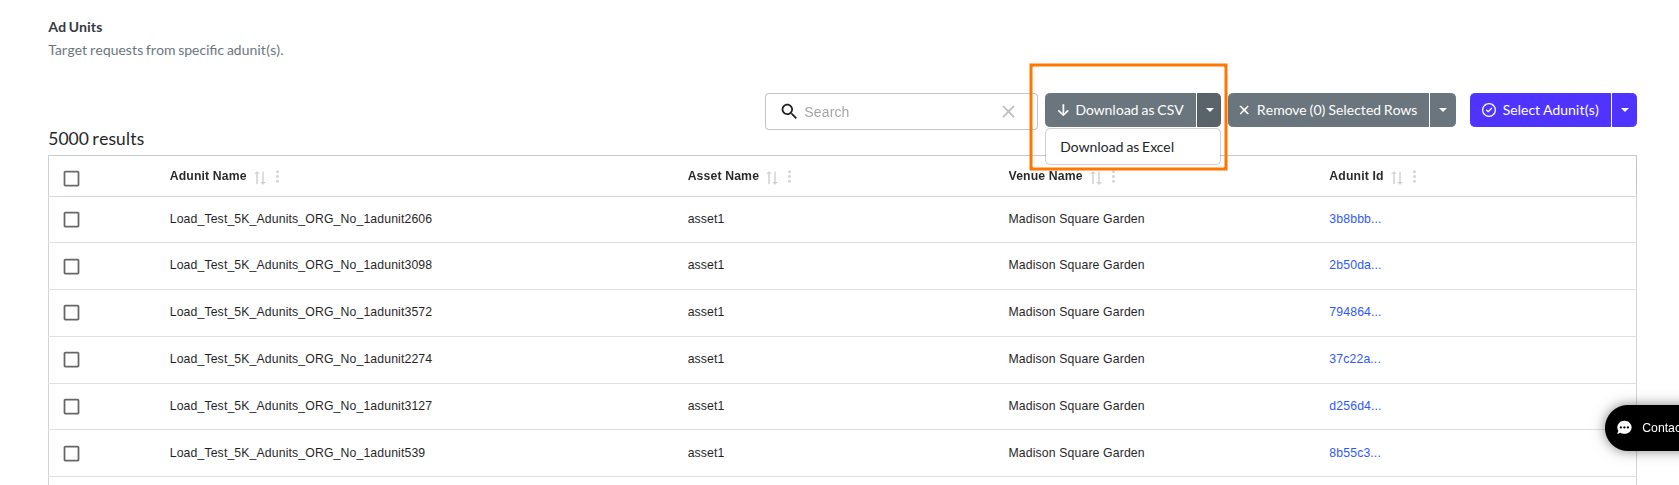
You can select ad units from the table and click the Remove Selected Rows button to remove the ad units based on your selection.
To remove all ad units, click the drop-down toggle and click the Remove All Rows button.

The Delivery Dashboard provides an overview of how a placement is delivering against its goals. See Delivery Overview for more details.
To follow steps for troubleshooting, see Troubleshooting Campaign.
