The Network Operations tutorial provides a network operator with the tools to monitor and maintain a digital signage network.
We have created a video playlist for our Network Operations Tutorial. It covers the same material as our online documentation, along with some advanced features.
These are the videos in the Network Operations playlist:
- 1 of 5: Users and User Groups
- 2 of 5: Contacts
- 3 of 5: Scoping
- 4 of 5: Monitoring
- 5 of 5: Reporting
In Broadsign Control Administrator, you can create multiple users with varying levels of access. Then, you can place users into groups to manage them.
User groups serve two purposes:
- assign privileges to each of the resources in the software
- provide access to specific folders in the domain
Note: We recommend that you add privileges to a group, instead of an individual user. Then, add users to the groups with the relevant privileges. Each user can be a member of multiple groups.
We will configure a group that will give members the ability to generate the network status report. See Network Status Report.
To add a user group:
- From among the resources on the left, select User Groups.
- Select the Operations ribbon.
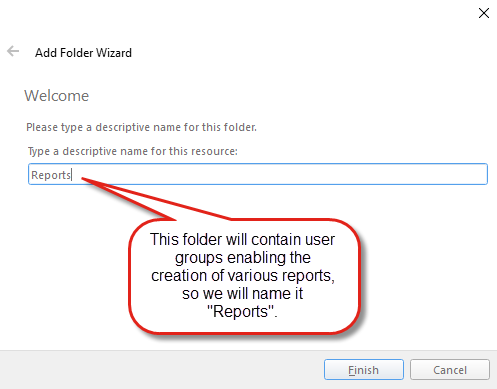
- Click the Folder icon.
- Click Finish.
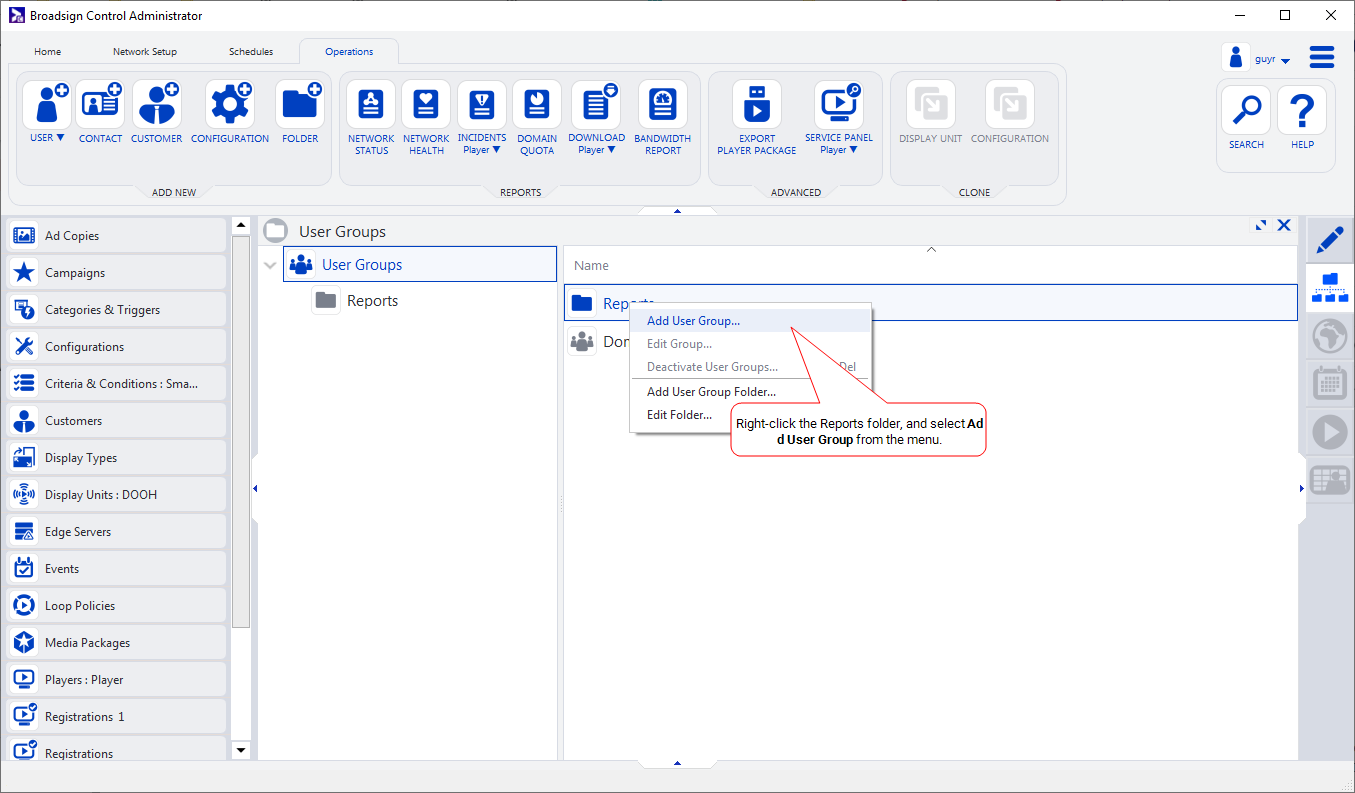
- Once you have created the group, while in the tree panel view, right-click on the Reports folder, and then select Add User Group.
- In the Add Group Wizard, on the Welcome page, give the group a descriptive name, for example, "Network Status Report".
- Click Finish.
-
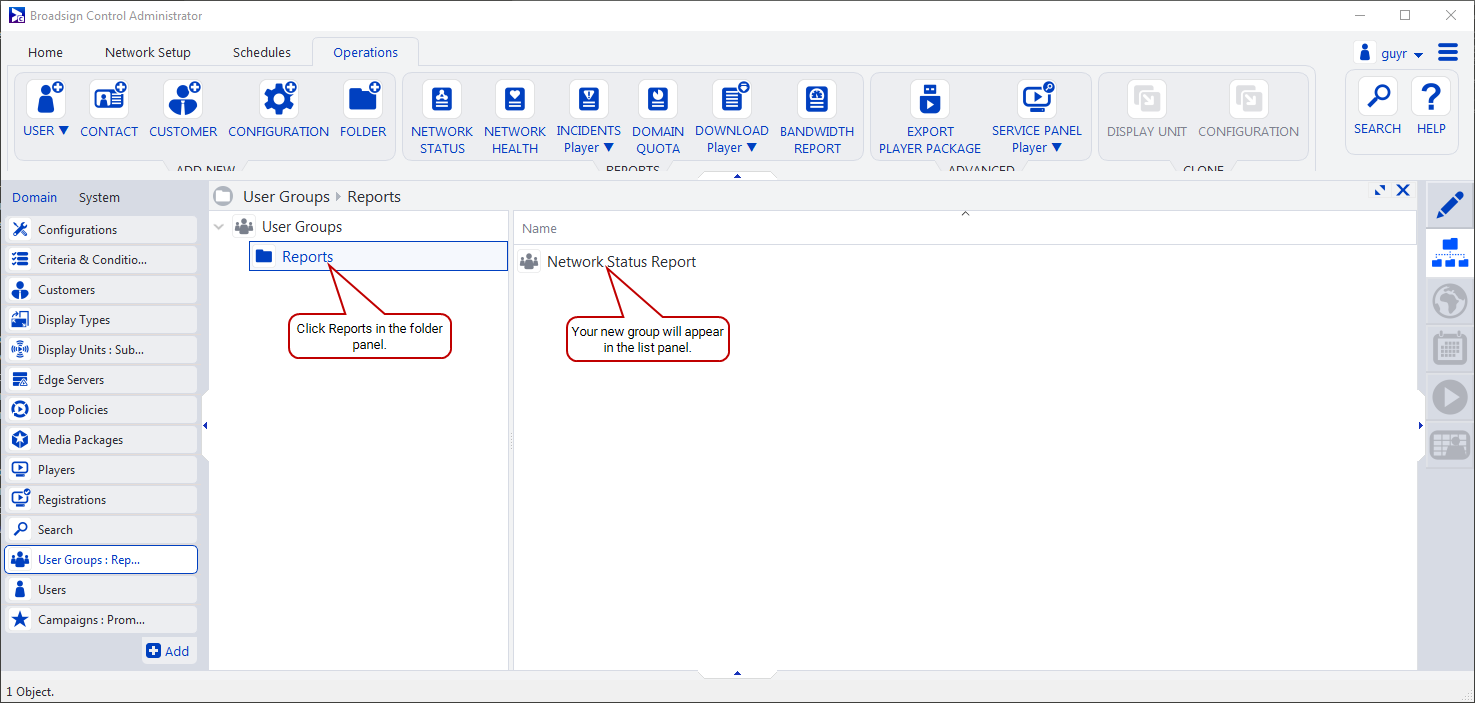
To verify the creation of the user group, click on Reports in the folder panel. You will see the group in the list panel, on the right.
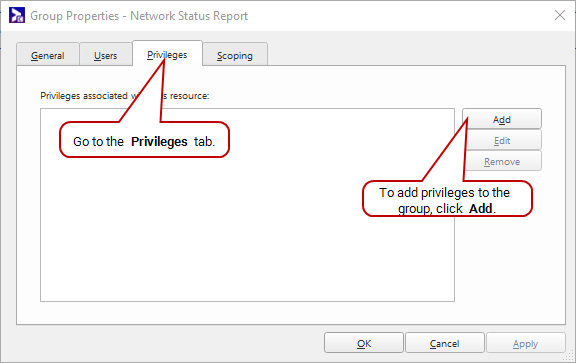
- To add privileges to the Network Status Report folder, double-click on it in the list panel. The Group Properties dialogue box opens.
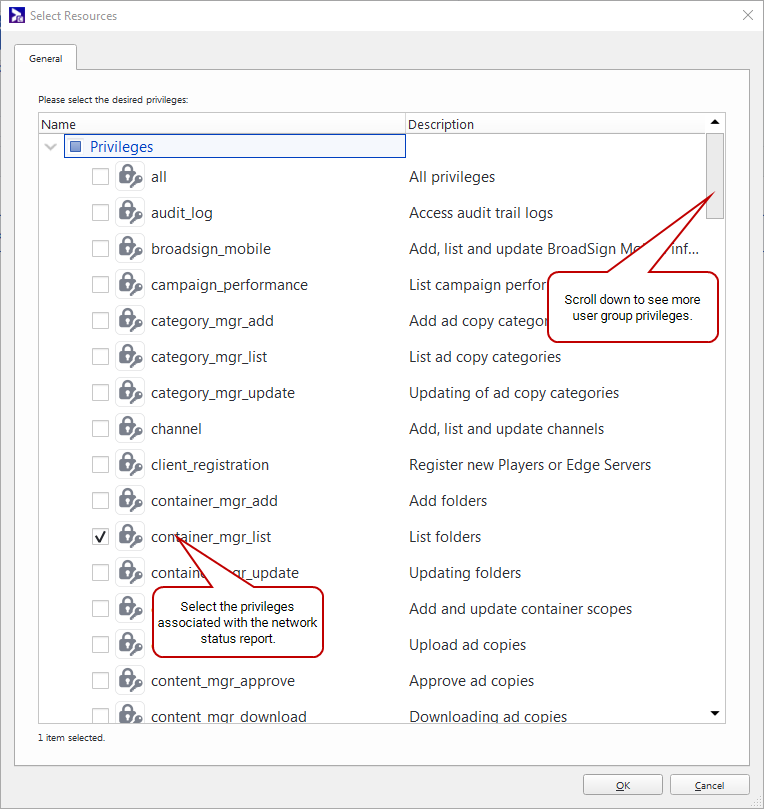
- Click the Privileges tab, and then click Add.
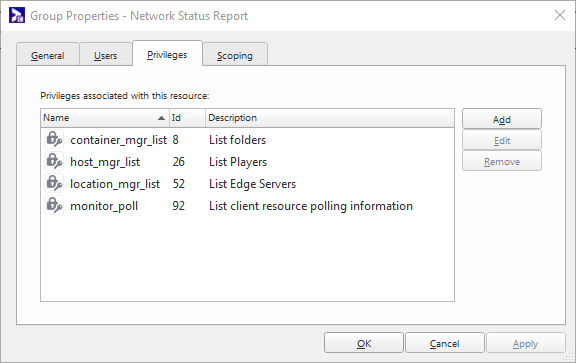
- To provide the privileges needed for the network status report, add the following privileges:
- container_mgr_list
- host_mgr_list
- location_mgr_list
-
monitor_poll
- Click OK. The privileges for this user group will appear in the Privileges tab.
- Click OK.
To add a user:
- Select Users from among the resources on the left.
- In the Operations ribbon, click on the User icon.
- In the Select a folder dialogue box, select Users.
- Click OK.
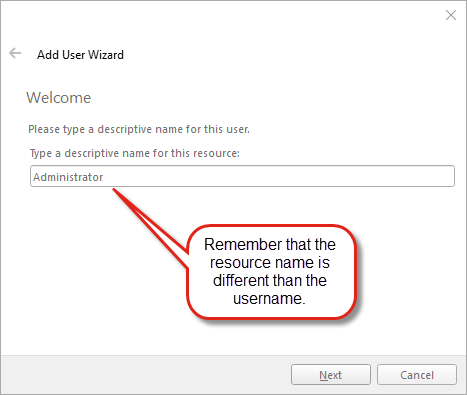
- On the Welcome page, give the user a name.
- We recommend naming the user after the individual employee (for example, Odie Cleghorn) or the job position (for example, Administrator).
- The resource name, provided on this page, is different than the username, which you will add on another page.
- Click Next. The Password Setup page appears.
- Create a password. It must:
- be a minimum of eight characters in length; and,
- contain a minimum of one non-alphabetic character.
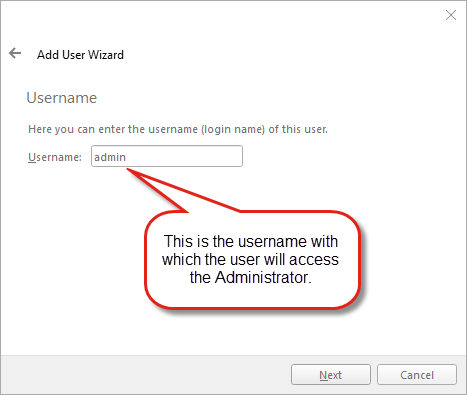
- Click Next. The Username page appears.
- Enter a username, for example, "administrator".
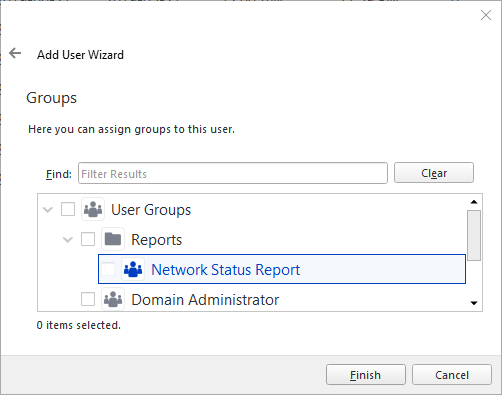
- Click Next. The Groups page appears.
- Expand the Reports folder, and then select the Network Status Report group.
- Click Finish.
To test the new settings, log off, and then log back on with the new user settings. Select the Operations ribbon, and then click the Network Status report icon.
For more details about the report, see Network Status Report.
Contact Book
Broadsign provides a contact book in Broadsign Control Administrator for two purposes:
- Collect contact information for all users (and relevant external connections) in a central location.
- Send monitoring notifications to the relevant email addresses.
Once you enter a name in your contact book, you can assign it to the top level of your domain or to selected resources, depending on that contact's responsibilities.
Note: A contact differs from a user. A user is a resource that has access to Broadsign Control Administrator in some way. Contacts exist for notification purposes, and can exist within our without your own organization. For example, an installer that specializes in player set-up in the field may never log on to Broadsign Control Administrator, but they could be in your contact book to receive certain notifications.
To add a contact:
- Select the Operations ribbon.
- Click the Contact icon.
- In the Select a folder dialogue box, right-click the Contacts folder, and then select Add Contact Folder from the menu.
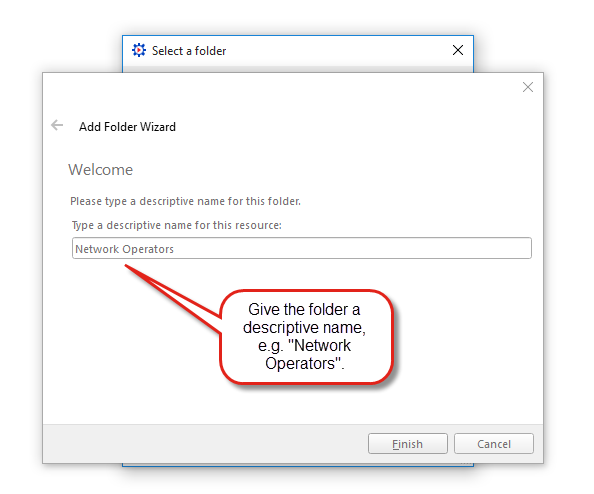
- On the Welcome page of the Add Folder Wizard, give the folder a descriptive name, for example, "Network Operators".
- Click Finish. The Network Operators folder appears in the Select a folder dialogue box.
- Select the folder named Network Operators, and then click OK. The Add Contact Wizard appears.
- On the Welcome page, enter the contact's name or title, for example, "Admin".
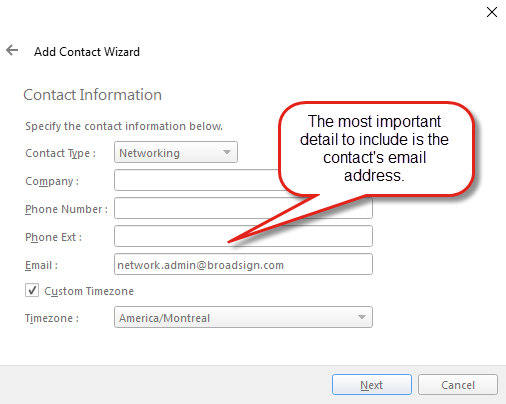
- Click Next. The Contact Information page appears.
- Enter as many details for the contact as you want.
- The email address is the most important detail. Your system will send notifications, when needed, to a contact's email address.
- For our example, we will set the contact type as "Networking".
- Click Next. The Address page appears. We will leave this blank for now.
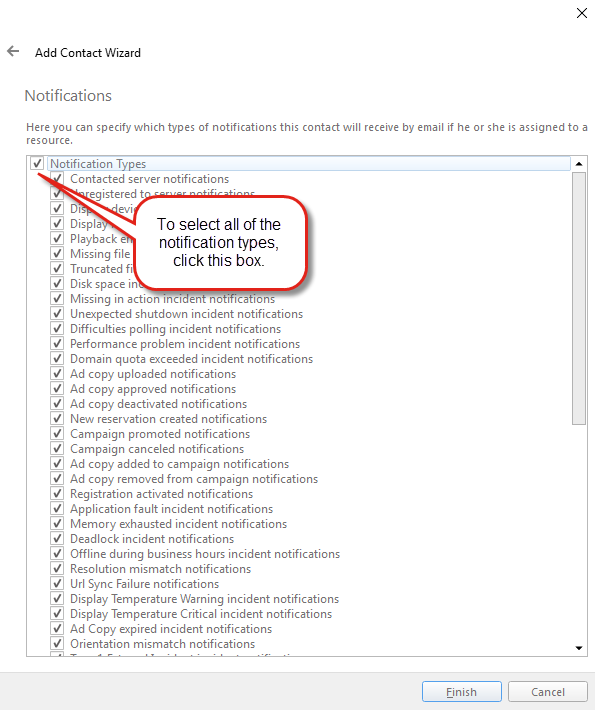
- Click Next. The Notifications page appears.
- You can decide which notifications your contact will receive. Select them based on your job function. In our example, we will select all of them. For more details, see Notifications.
- By clicking the box to the left of "Notification Types", you will select all of the types.
- Click Finish.
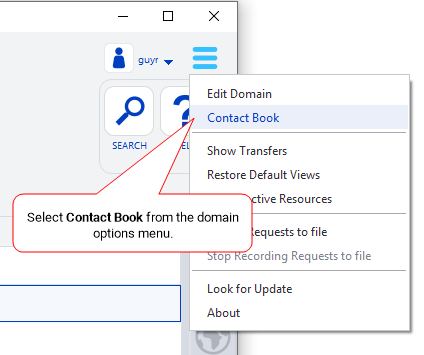
- To verify that you have added the contact, from the Domain Options menu, select Contact Book.
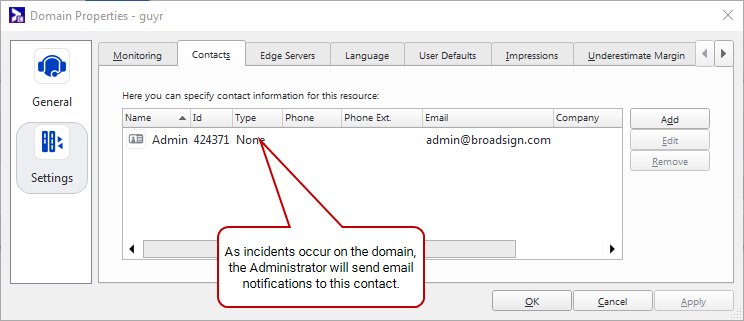
To set up a domain contact:
Now, as incidents occur on the domain, Broadsign Control Administrator will send an email notification to this contact.
Scoping
Scoping occurs when you restrict users' access to only network areas they need to perform their tasks. Privileges, which we covered in Add Users and User Groups, configure what a user can do. Scoping configures where they can do it.
Note: Scoped users will be able to view (if they have the privilege) domain level settings, but not edit them.
The following video describes how to use scoping and privileges.
Feature Spotlight: How to use scoping and privileges in the Broadsign CMS
Note: This instructional video is also available in French and Spanish.
In this example, we will scope a user to have access to a single display unit folder: "DU - Network 1". This section has the following basic steps:
- Add an "access control" user group folder.
- Scope a user group.
- Add a user to the user group.
We are going to configure groups with network access. As a result, we will add a new user group folder and call it "Folder Access".
To add an "Access Control" user group folder:
Next, we will create a new user group and configure its scoping properties.
To scope a user group:
- From the Operations ribbon, select User Group.
- On the Select a folder page, select "Folder Access". Click OK.
- We will use this group to restrict access to a display unit folder. Call this user group "DU - Network 1".
- Click Finish.
- From the User Groups list panel, select "DU - Network 1".
- From the view bar, select Edit.
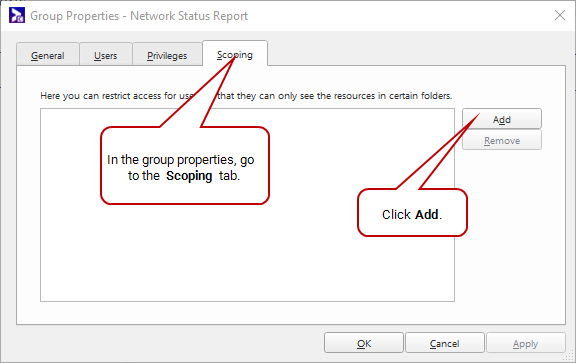
- In the User Group Properties, go to the Scoping tab. Click Add.
-
The Add Folder Scoping Wizard opens to the Folder Scoping Type page. Here, we select the type of resource to which we want to give access.
- On the Folder Scoping Type page, select Display Unit.
- Click Next.
- On the Folder Scoping page, select the folder to which we want to give access: "Network 1".
- Click OK, and then click Finish.
Note: It is possible to have multiple resources scoped into one group. For example, if we had a Network 1 customer set up, we could also limit the user to seeing only this customer.
To add a user to a user group:
- From the resource tabs on the left, select Users.
- For this example, select the user that you created in Add Users and User Groups.
- From the view bar, select Edit.
- Go to the Groups tab, and select Add.
- Select "DU - Network 1".
- Click OK, and then Apply.
Now, when this user clicks Display Units from the resource tabs, they will only see the "DU - Network 1" folder and its contents.
The most important part of running a successful digital signage network is ensuring that it remains operational. That way, your content displays as planned.
In this section, we will focus on the following basic steps:
- Add a contact for player monitoring.
- Assign the contact to players.
- Configure thresholds (this step stands independent of the first two).
You can also monitor your network using the dashboard
Let us say that a contact only needs notifications for certain players. We can assign that contact directly to the players.
First, we will add a contact that represents an installer responsible for a certain location, for example, a mall or airport.
To add a contact for player monitoring:
- From the Operations ribbon, click the Contact icon.
- To add a folder, right-click Contacts, and then select Add Contact Folder.
- Name the folder "Client Watch", and then click Finish.
- Select our new folder, and then click OK.
- Name the contact "Network 1", and then click Next.
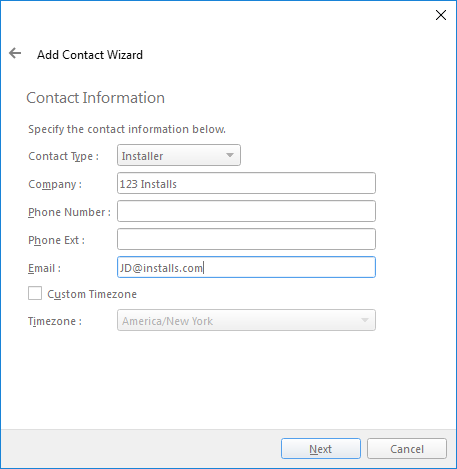
- On the Contact Information page, add the following information:
- Contact Type – "Installer"
- Company – "123 Installs"
- Email – "JD@installs.com"
-
Any other details you want.
- Add an address, if you want. Click Next.
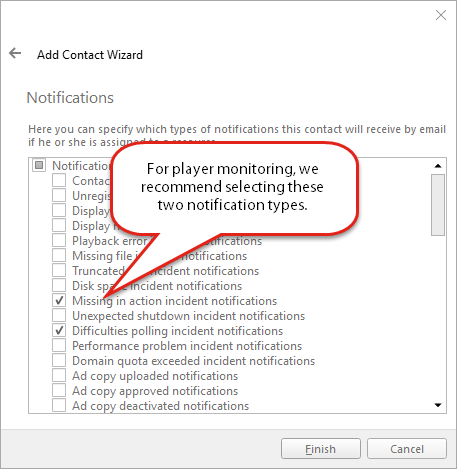
- On the notifications page, select the following incidents related to network problems:
- "Missing in action incident notifications"
- "Difficulties polling incident notifications"
-
Any other notifications you want.
- Click Finish.
Now that we have configured the contact, we need to assign it to the resources in which they are interested.
For this example, we will use the screen at Location 1.
To assign a contact to players:
- From the resource tabs on the left, select Display Units.
- From the folder panel, select "Network 1".
- From the list panel, select "Location 1 - Main Lobby Screen".
- From the view bar, select Edit.
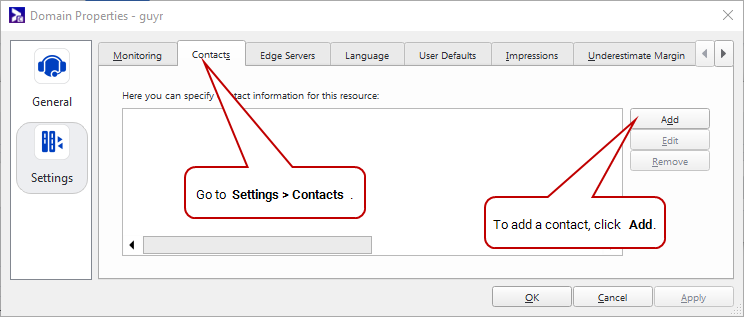
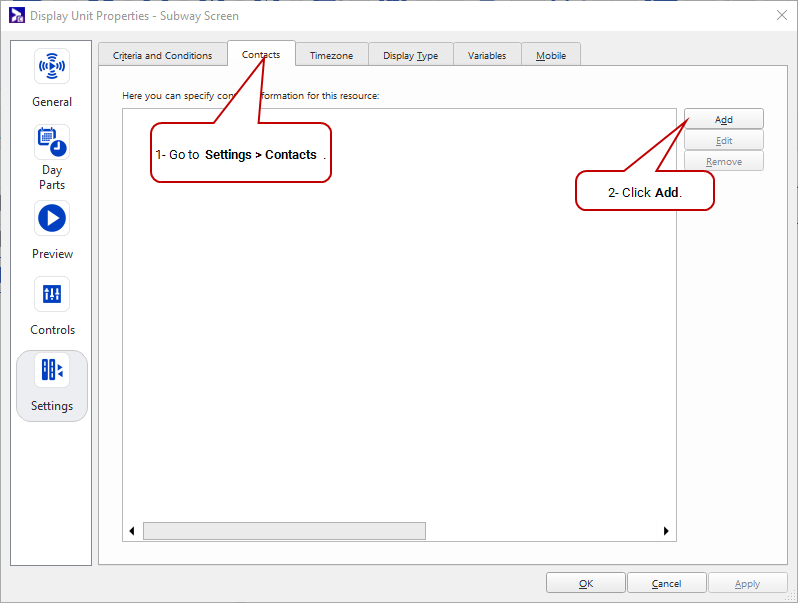
- In the Display Unit Properties, go to Settings > Contacts, and then click Add.
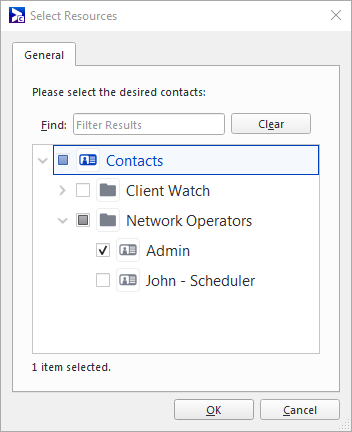
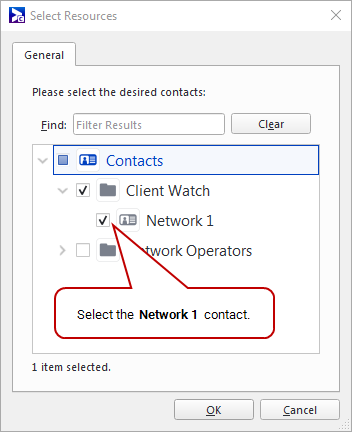
- Expand the Client Watch folder, and then select the "Network 1" contact.
Now, if this display unit has issues, Broadsign Control Administrator will notify our installer of the problem (even though they are not a user in the network).
Thresholds
Another important part of our monitoring and notifications system is thresholds. Thresholds allow each network to configure its "warning" and "critical" levels. See Incident Thresholds.
Thresholds apply to the whole domain. Notifications will go to the default domain administrator, along with any other contacts that you have added to the domain.
Note: The network health widget, in the dashboard
Example: We will set a Missing in Action (MIA) threshold. A player is considered MIA when the it has not connected with Broadsign Server. We will set up the following thresholds:
- Warning – Notify contacts after one hour, if the issue remains active.
- Critical – Notify contacts after three hours, if the issue remains active.
To configure thresholds:
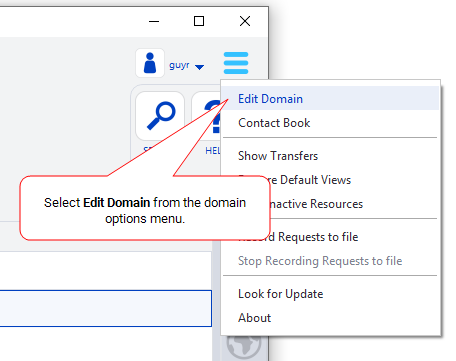
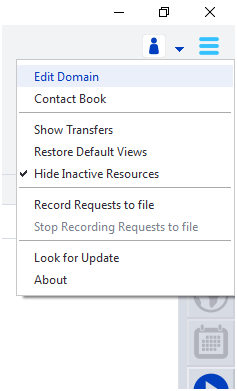
- Go to the domain properties menu, and select Edit Domain.
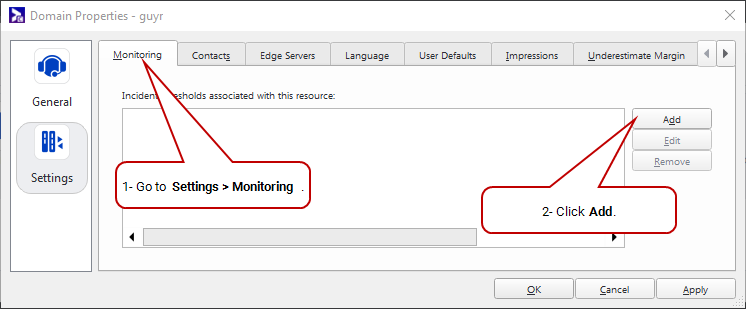
- Go to Settings > Monitoring, and then click Add. The Add Incident Threshold Wizard opens.
- On the Incident Type page, from the drop-down list, select MIA.
- Click Next.
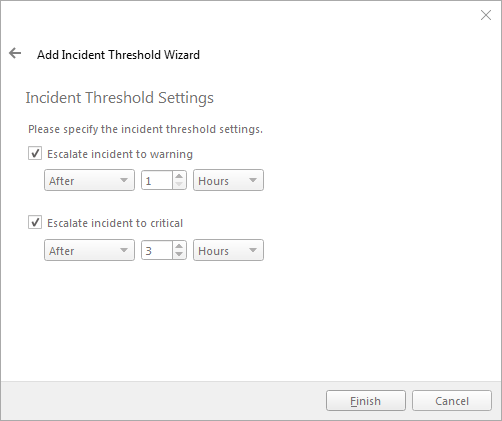
- On the Incident Threshold Settings page:
- Select Escalate incident to warning. Set it to "After 1 Hours".
-
Select Escalate incident to critical. Set it to "After 3 Hours".
- Click Finish.
Reports
Knowing what your network is doing, at any point in time, is vital to its success. Reporting in Broadsign Control Administrator allows the network operator to manage their domain as efficiently as possible. The available reports cover several aspects of managing a digital signage network from the content being scheduled, to the players connected to the displays.
We provide a training video that outlines the use of reports in Broadsign Control Administrator.
The reports covered in this video are:
Reports
For more information in our online documentation about reports, see Monitoring and Reports.
You can control some of a player or edge server’s settings by assigning them a configuration.
Each configuration contains one or more configuration profiles. A profile is a collection of settings pertaining to a particular range of Broadsign Control Administrator product versions.
To begin with, we will show you how to:
- add a configuration;
- add a profile to the configuration; and,
- set up versioning.
Broadsign offers many different ways to configure your network. For a full explanation of each setting in a configuration profile, see Configuration Profiles - Players or Configuration Profiles - Edge Servers.
To add a configuration:
- From among the resource tabs on the left, select User Groups.
- Select the Operations ribbon, and then click the Configuration icon.
- In the Select a folder dialogue box, select Configurations.
- Click OK.
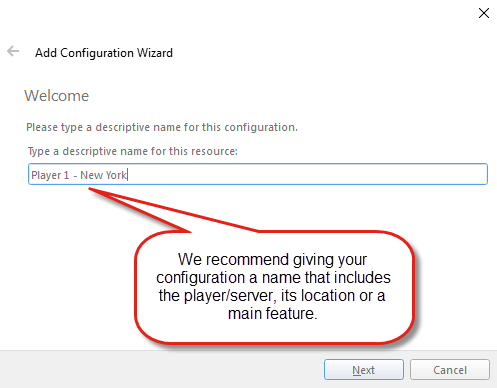
- On the Welcome page, give the configuration a descriptive name.
-
We recommend that your configuration name include the name of the player or edge server involved, its location or its main function. Possible names include "Synchronization Montreal Office", "20 min Poll Frequency - NY NW #1".
For our example, we will use the name "Player 1 - New York". - Click Next. The Configuration Type page appears.
- You can create a configuration for either a player or an edge server. In our example, we will create a configuration for a player.
- Click Finish. By default, your new configuration will appear in the work area, under the list panel.
To add a configuration profile:
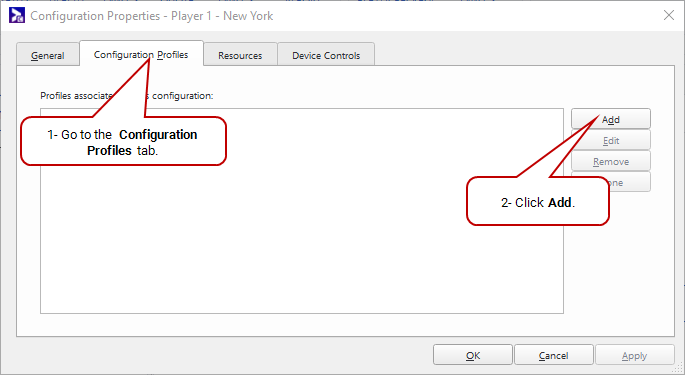
- To add a profile to this configuration, double-click on it. The Configuration Properties dialogue box appears.
- Go to the Configuration Profiles tab, and then click Add.
- On the Welcome page, give the profile a descriptive name.
-
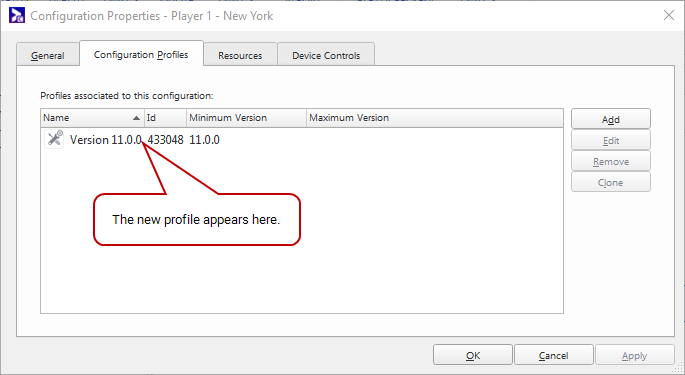
As profiles are set up according to a minimum version number, we recommend that its name correspond to that number, for example, "Version 11.0.0".
- Click Next. The Configuration Profile Version page appears.
- Specify the minimum supported version of the player (or edge server), for example, 11.0.0.
- This feature permits you to create multiple profiles, within one configuration, aimed at different versions of a player or edge server. As a result, you can target display units containing players of different versions.
- Click Finish. The profile appears in the Configuration Profiles tab.
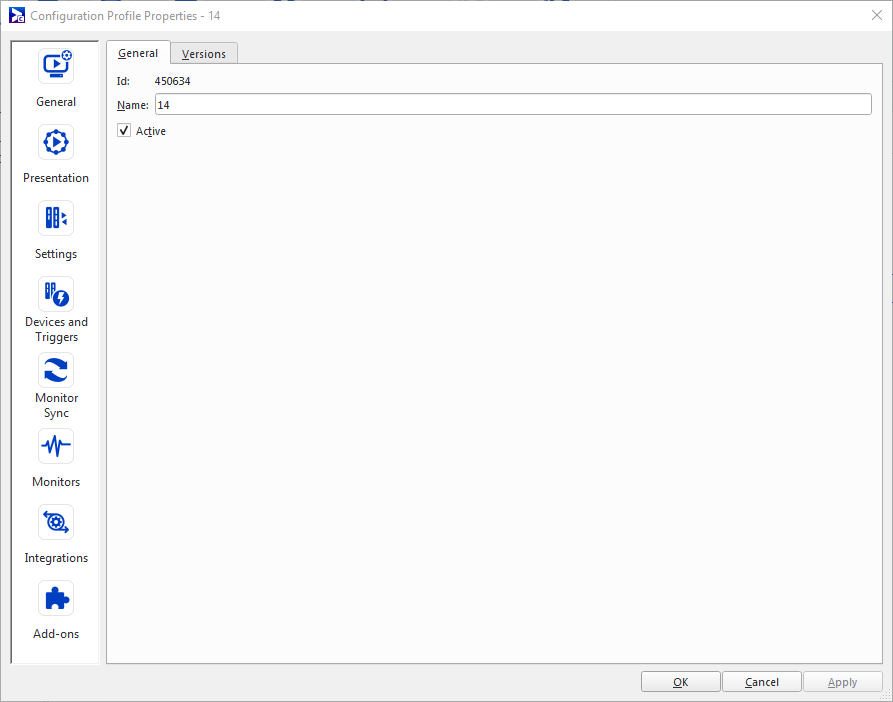
- To access the profile's properties, double-click the profile. The Configuration Profile Properties dialogue box appears.
We have documented all of the properties of configuration profiles. See Configuration Profiles - Players or Configuration Profiles - Edge Servers.


